
Candles bring warmth, ambiance, and comfort to homes, but nothing ruins the experience faster than a poorly burning candle that tunnels down the center. Tunneling—when only the wax in the middle melts while hard walls remain around the edges—not only wastes wax but shortens the candle’s lifespan significantly. The good news? You don’t need specialty tools or expensive products to fix or prevent this issue. With a few smart techniques and common household items, you can ensure your candles burn evenly, last longer, and deliver maximum fragrance and light.
The root cause of tunneling is improper first burns. When a candle isn’t allowed to form a full melt pool across its surface during its initial lighting, it “remembers” that memory and continues to burn only within that narrow zone. Over time, this leads to wasted wax, difficulty relighting, and diminished scent throw. Fortunately, with awareness and consistency, tunneling can be avoided—and even reversed—using everyday solutions found in most kitchens and drawers.
Understanding Candle Memory and Burn Cycles
Candles made from natural waxes like soy, beeswax, or paraffin have what’s known as \"candle memory.\" This means the way a candle burns the first time sets the pattern for all future burns. If the initial flame doesn't melt wax all the way to the edges of the container within one to two hours (depending on diameter), subsequent burns will follow that same narrow path.
For example, a 3-inch wide candle typically needs about 3–4 hours of continuous burn time on its first use to achieve a complete melt pool. Cutting this short creates a depression in the center. As the wick burns down, the surrounding wax walls grow taller, making it nearly impossible for later burns to reach them without intervention.
“Candle memory is real—just like muscle memory. Get the first burn right, and you set the stage for years of even, clean performance.” — Laura Bennett, Artisan Candlemaker & Founder of Hearthlight Co.
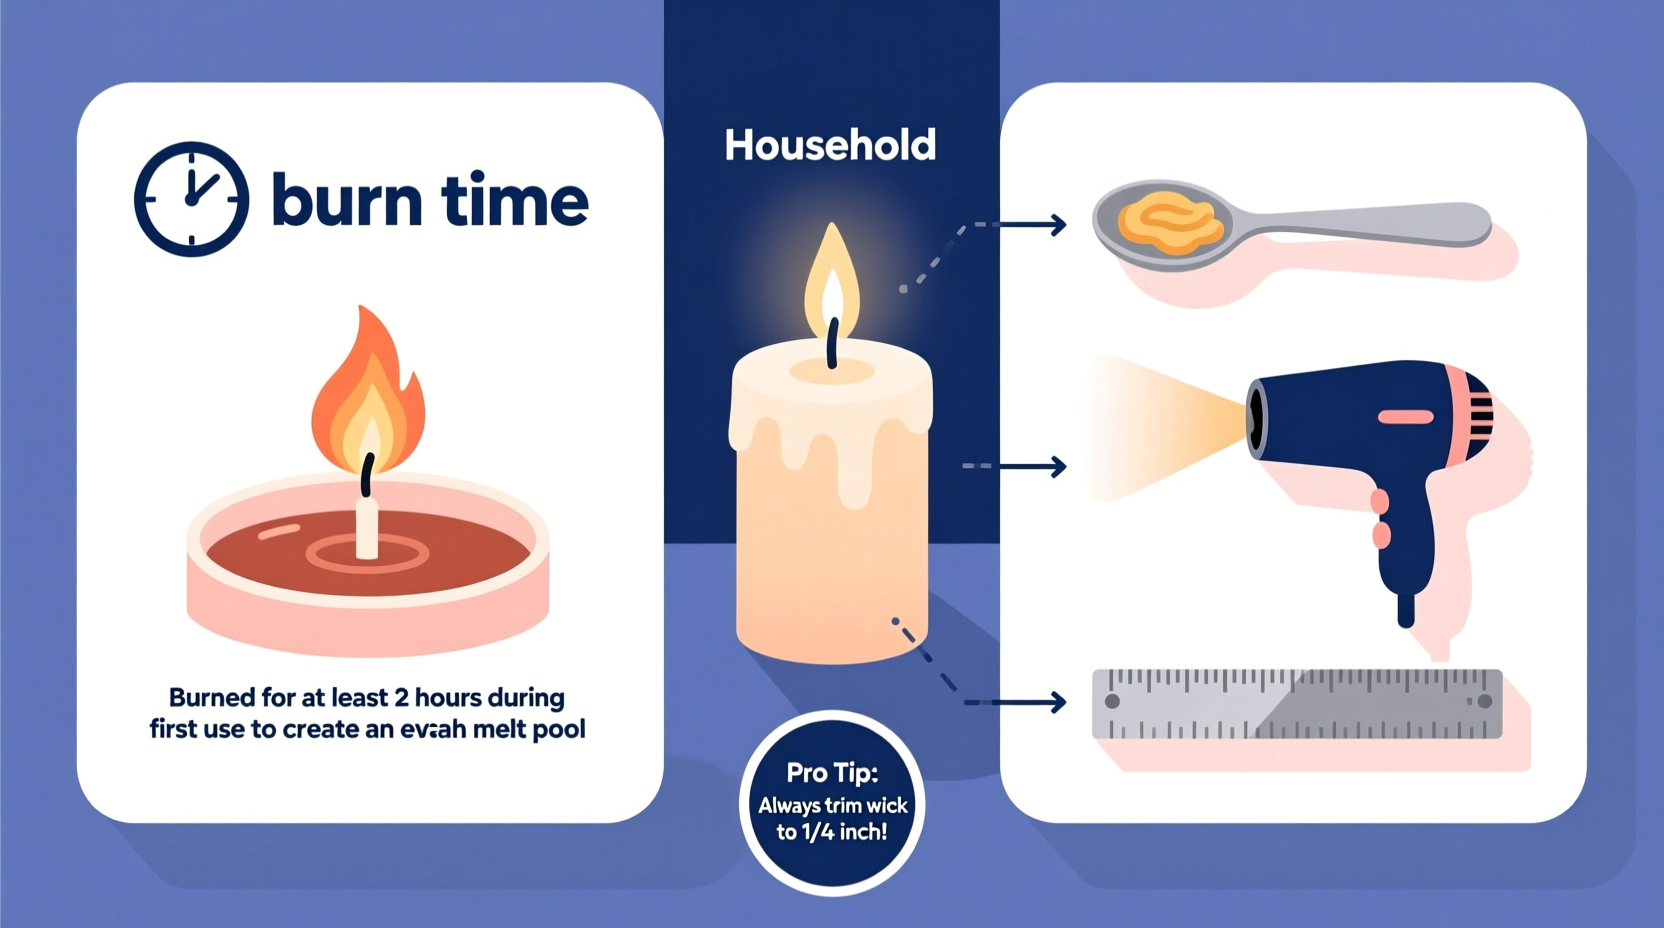
5 Household Hacks to Prevent and Fix Tunneling
You don’t need a candle repair kit or professional tools to combat tunneling. Most effective solutions come from items already in your home. Here are five proven methods:
1. Use Aluminum Foil to Redirect Heat
When a candle has already started tunneling, aluminum foil can help redistribute heat back toward the edges. Simply crumple a piece of foil into a loose boat shape and place it over the top of the candle, letting the sides drape slightly over the rim of the jar. Leave an opening near the wick for airflow.
The foil traps heat and radiates it downward, helping the outer wax walls melt more efficiently. After 30–60 minutes, check progress. Once the melt pool reaches the edges, remove the foil carefully with tongs or heat-resistant gloves.
2. Oven Method for Severe Tunneling
If your candle is deeply tunneled and unresponsive to regular burning, the oven method offers a controlled reset. Preheat your oven to 170°F (77°C)—low enough to melt wax without damaging glass containers.
- Remove the lid or metal cap from the candle.
- Place the candle on a baking sheet lined with parchment paper.
- Put it in the oven for 10–15 minutes, watching closely until the top layer of wax softens and the entire surface becomes liquid.
- Remove carefully and let cool at room temperature for several hours.
- Trim the wick to ¼ inch before relighting.
This method evens out the wax surface, effectively erasing previous burn memory. It works especially well for soy and coconut wax blends, which respond better to gentle reheating.
3. Hairdryer Trick for Quick Edge Melting
A hairdryer provides directional heat without flame, making it ideal for targeted melting. Hold the dryer 6–8 inches above the candle and move it slowly in a circular motion around the edges. Focus on the hardened wax walls, not directly on the wick.
As the outer wax begins to soften and liquefy, stop and allow the heat to distribute naturally. After a few minutes, the central melt pool should expand outward. This method is fast, safe, and perfect for quick fixes between uses.
4. Knife or Spoon Warm-Up Technique
Before lighting a tunneled candle, gently warm a metal spoon or butter knife by running it under hot water or heating it over a flame (for metal knives). Wipe dry, then carefully run the heated utensil along the inner edge of the wax wall.
This pre-melts the stubborn outer layer, giving the flame a head start on creating a full melt pool. Be cautious not to scratch glass jars or damage wicks. Repeat as needed during early stages of reuse.
5. DIY Wick Centering with Chopsticks
Over time, wicks can drift off-center due to uneven melting, worsening tunneling. To correct this, light the candle and once the surface wax softens (after 20–30 minutes), use two chopsticks or pencils laid across the rim to gently nudge the wick back to the center.
Hold it in place until the wax re-solidifies slightly. This ensures future burns stay balanced and promotes even heat distribution.
Step-by-Step Guide: How to Correct a Tunneled Candle
Follow this timeline-based approach to restore a severely tunneled candle using household tools:
- Day 1 – Assess & Prepare: Examine the depth of the tunnel. Remove any debris or old wick trimmings from the well.
- Day 1 – Apply Foil Method: Light the candle and cover with foil (vented). Burn for up to 4 hours, checking hourly for edge melting.
- Day 2 – Try Hairdryer Boost: If edges remain hard, use a hairdryer to soften them before relighting.
- Day 3 – Full Reset (Optional): If no improvement, perform the oven method to fully relevel the wax.
- Day 4+ – Maintain Proper Burns: After correction, always burn long enough to achieve a full melt pool (1 hour per inch of diameter).
With patience and consistency, most tunneled candles can be rescued within a week.
Do’s and Don’ts of Candle Maintenance
| Action | Do | Don’t |
|---|---|---|
| First Burn | Burn until wax reaches edges (minimum 1–4 hours depending on size) | Blow out after 30 minutes just because the room smells strong |
| Wick Trimming | Trim to ¼ inch before each lighting | Leave long wicks that cause sooting and mushrooming |
| Heat Application | Use foil, hairdryer, or warm utensils to aid melting | Stick sharp objects into burning wax |
| Storage | Keep in cool, dark place away from drafts | Store near windows or heaters where wax can warp |
| Burning Duration | Limited to 4 hours max per session | Burn overnight or for extended periods unattended |
Real-Life Example: Reviving a Forgotten Soy Candle
Sarah had a favorite lavender-scented soy candle she loved during winter. She’d light it for 30 minutes while reading, then extinguish it. By spring, the candle was a deep cylinder of flame surrounded by thick, untouched wax walls—classic tunneling.
Determined not to waste it, she tried the foil method for three consecutive nights, burning it for 3.5 hours each time. On the third night, the melt pool finally reached the edges. She continued proper maintenance, trimming the wick and avoiding short burns. Within a month, the candle burned cleanly again and lasted another six weeks—far longer than she expected.
“I thought it was a goner,” Sarah said. “But taking the time to fix it saved me $25 and gave me back my cozy evenings.”
Essential Checklist: Prevent Tunneling Before It Starts
- ✅ Read the manufacturer’s recommended burn time before first use
- ✅ Measure your candle’s diameter—burn 1 hour per inch to form full melt pool
- ✅ Always trim wick to ¼ inch prior to lighting
- ✅ Avoid placing candles in drafty areas that disrupt even melting
- ✅ Use foil or indirect heat if edges aren’t melting after 2 hours
- ✅ Never burn a candle for less than 1 hour unless resetting position
- ✅ Store unused candles upright in a cool, dark cabinet
Frequently Asked Questions
Can I prevent tunneling in tea lights or votives?
Tea lights and votives are less prone to tunneling because they’re designed to burn completely within their metal or plastic casings. However, if placed in holders that restrict heat flow, they may burn unevenly. Ensure they fit properly in their holders and avoid overcrowding multiple units together.
Is tunneling worse with certain types of wax?
Yes. Natural waxes like soy and coconut tend to tunnel more easily than paraffin because they have lower melting points and stronger memory effects. That said, paraffin can also tunnel if misused. Regardless of wax type, following proper burn practices prevents issues.
What happens if I ignore tunneling?
Ignoring tunneling leads to wasted wax, reduced fragrance output, difficulty relighting (as the wick gets buried), and potential container cracking due to uneven thermal stress. In extreme cases, the flame may drown in pooled wax or become too weak to sustain combustion.
Final Thoughts: Small Habits, Big Results
Preventing candle tunneling isn’t about perfection—it’s about consistency. A few mindful habits, like measuring burn times, trimming wicks, and using simple household aids when needed, can dramatically extend the life and enjoyment of every candle you own. These hacks cost nothing and take minimal effort, yet they transform how your candles perform.
Think of it as preventive maintenance: just like rotating your tires or cleaning your coffee maker, caring for your candles ensures optimal function and value. Whether you’re reviving an old favorite or lighting a new luxury scent, applying these strategies helps you get every drop of beauty and aroma from your collection.


 浙公网安备
33010002000092号
浙公网安备
33010002000092号 浙B2-20120091-4
Comments
No comments yet. Why don't you start the discussion?