
Nail polish that chips within hours of application is more than just frustrating—it undermines the effort and time invested in achieving a salon-quality manicure at home. Whether you're preparing for a special event or simply want your nails to look polished through the workweek, premature chipping can feel like a personal failure. But the truth is, most chipping isn’t due to bad luck or low-quality polish. It’s often the result of overlooked preparation, improper technique, or environmental exposure. With the right approach, it’s entirely possible to extend the life of your manicure by days—or even weeks.
The foundation of a chip-resistant manicure lies not in the brand of polish but in the process. From nail prep to topcoat selection, every step plays a role in durability. This guide breaks down the science-backed methods professionals use to lock in color and prevent early wear. You’ll learn what really works, what common habits are actually harmful, and how to adapt your routine for lasting results—no matter your lifestyle.
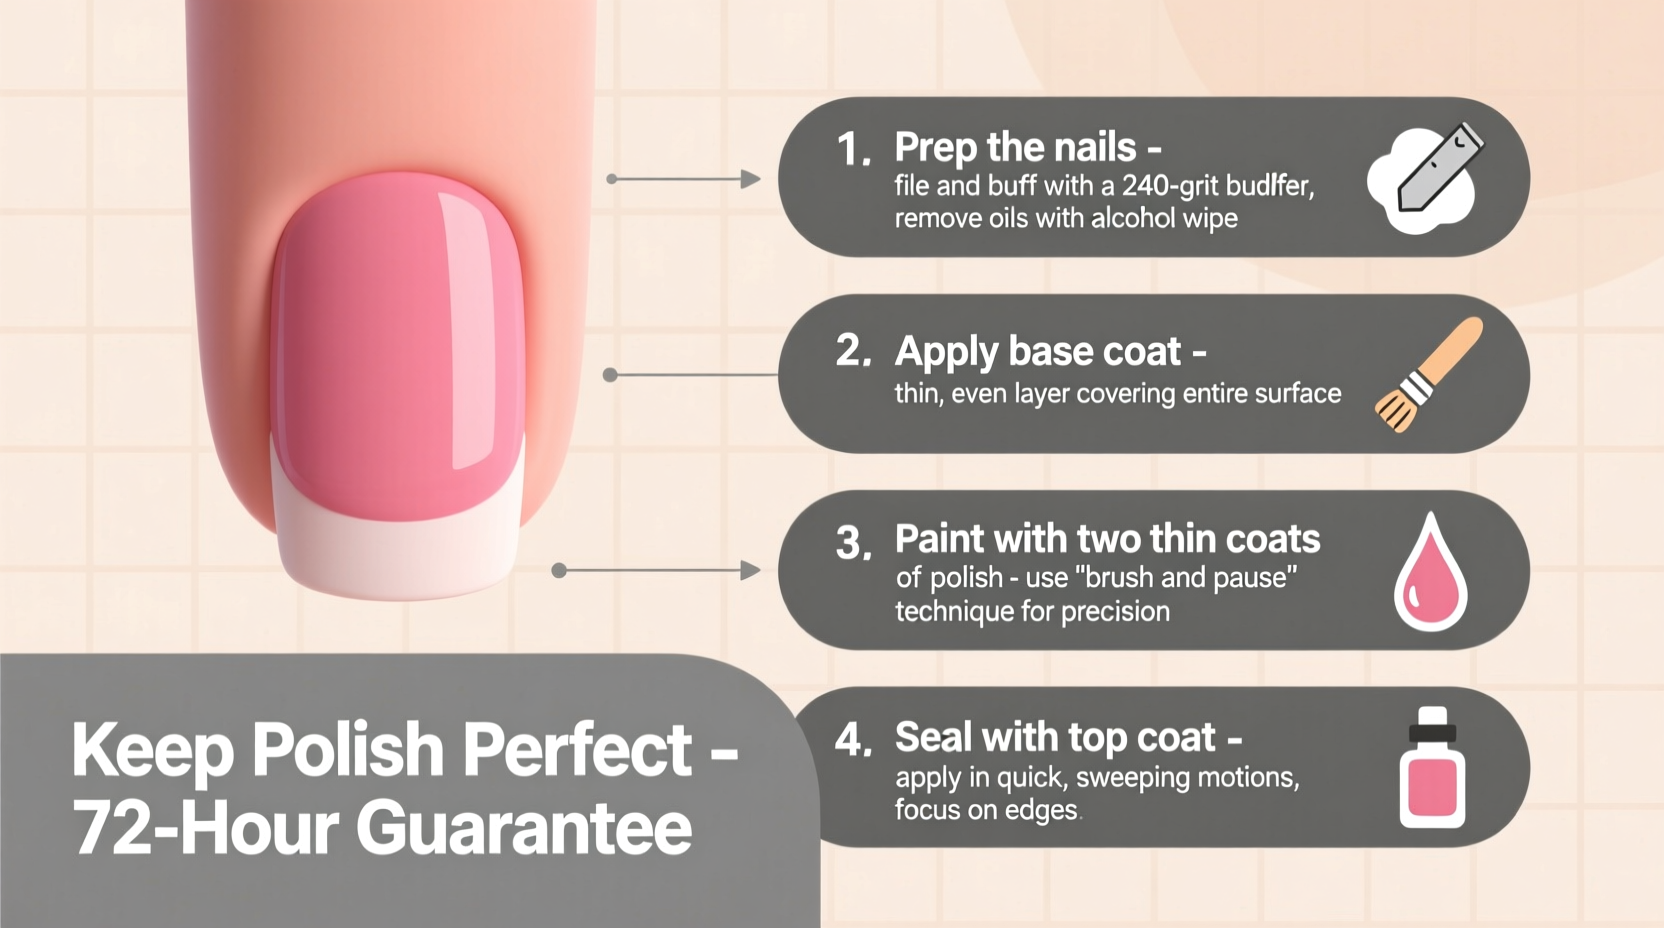
1. The Importance of Proper Nail Preparation
Skipping nail prep is the single biggest reason polish fails early. Nails, like any surface, must be clean, dry, and slightly textured to allow polish to adhere properly. Oils, lotions, and residue create a barrier that prevents bonding, leading to lifting and peeling within hours.
Start by removing any existing polish with an acetone-free remover to avoid over-drying the nail plate. Then wash your hands thoroughly with soap and water, scrubbing under the nails to remove debris. Dry completely—moisture is invisible but deadly to adhesion.
Gently buff the surface of each nail with a fine-grit buffer (180/240 grit). Avoid aggressive filing, which weakens the nail, but do create a slight texture. Think of it like sanding wood before painting—smooth is good, but too smooth prevents grip.
Push back cuticles and remove hangnails, but don’t cut them unless necessary. Damaged skin around the nail leads to snags and chips. If you’re using base coat, apply it immediately after prep while the nail is still “active” and receptive to bonding.
2. Choosing the Right Products for Longevity
Not all polishes are created equal when it comes to wear resistance. While trendy colors are tempting, longevity should be a priority—especially if you rely on your manicure for more than a day.
Look for polishes labeled “long-wear,” “chip-resistant,” or “treatment formula.” These often contain polymers that form a flexible film, allowing the polish to move with the nail rather than crack under stress. Brands like OPI Infinite Shine, Essie Gel Couture, and Zoya Naked Manicure are formulated specifically for durability without requiring UV curing.
| Product Type | Wear Time | Pros | Cons |
|---|---|---|---|
| Regular Nail Polish | 3–5 days | Affordable, easy removal | Chips easily, requires frequent touch-ups |
| Long-Wear (Non-Gel) | 7–10 days | No lamp needed, less damaging | Slightly thicker formula, longer dry time |
| Hybrid/Gel Polish | 14+ days | High shine, extreme durability | Requires UV/LED lamp, potential damage with removal |
| Peel-Off Base Coat + Regular Polish | 5–7 days | Easily removable, gentle on nails | Less durable than gel options |
Equally important is the base and top coat. A ridge-filling base coat evens out the nail surface and prevents staining, but more importantly, it acts as an adhesive layer. Top coats are not optional—they seal in color and provide a protective shield against friction and moisture.
“Top coats make or break a manicure. A high-quality one can double the lifespan of your polish by creating a scratch-resistant barrier.” — Dana Cartwright, Master Nail Technician & Educator
Reapply top coat every two to three days, especially on the free edge of the nail, where wear begins. This simple habit fills micro-cracks and renews protection.
3. Step-by-Step Guide to a Chip-Resistant Manicure
Even with great products, application technique determines success. Rushing or applying thick layers traps solvents, prolongs drying, and increases the risk of dents and chips. Follow this timeline for best results:
- Prep (Day 1, 15 minutes): Remove old polish, wash and dry hands, degrease nails with alcohol wipe, gently buff surface, push back cuticles.
- Base Coat (Immediate): Apply a thin, even layer of base coat. Extend slightly under the tip of the nail to protect the free edge. Wait 2 minutes to dry.
- First Color Coat (Thin Layer): Use small strokes, loading the brush adequately but not excessively. Start at the center, then sides, sealing the tip. Let dry for 5–7 minutes.
- Second Color Coat (Thinner than First): Reapply with precision. Two thin coats are always better than one thick one. Wait another 7 minutes.
- Top Coat (Final Seal): Apply a generous layer, ensuring full coverage and a slight wrap over the nail tip. This reinforces the weakest point.
- Cure & Wait (Critical): Allow at least 1–2 hours before heavy hand use. For maximum hardness, wait overnight.
When applying polish, avoid getting it on the skin or cuticles. Excess polish there dries unevenly and peels, pulling surrounding polish with it. If mistakes happen, clean them up with a pointed orange stick wrapped in cotton and dipped in remover.
4. Daily Habits That Prevent Chipping
Your environment and behavior impact polish more than you might think. Even a perfectly applied manicure will fail quickly if exposed to constant water, chemicals, or physical stress.
- Wear gloves during chores: Dishwashing, cleaning, and gardening expose nails to water and harsh detergents. Prolonged soaking softens polish and swells the nail plate, causing separation.
- Minimize keyboard and phone tapping: Repetitive contact with hard surfaces causes micro-abrasions. Try voice typing or styluses when possible.
- Moisturize cuticles—not nails: Hydrated cuticles prevent snags, but lotion on the nail surface weakens polish adhesion. Apply hand cream before polishing or well after it has cured.
- Use your knuckles or tools for tasks: Opening packages, texting, or scratching surfaces with your nails accelerates wear. Train yourself to use alternatives.
Temperature changes also affect polish. Going from hot showers to cold air causes expansion and contraction, leading to cracks. Keep showers short and lukewarm if possible, and always wear gloves in cold weather.
Mini Case Study: Sarah’s Workweek Manicure
Sarah, a project manager, used to reapply nail polish every few days because her manicures never lasted past Wednesday. She worked long hours, typed constantly, and washed her hands frequently. After switching to a long-wear system (Essie Gel Couture) and adopting a strict prep routine, she extended her manicure to 10 days.
Key changes: She began prepping nails with alcohol wipes, applied two thin color coats, and reapplied top coat every other day. She also started wearing nitrile gloves during dish duty and stopped using her nails to open soda cans. The result? No chips, no peeling—just consistent shine through presentations and client meetings.
5. Maintenance and Troubleshooting
Even the best manicures face challenges. Knowing how to maintain and repair minor issues can save your polish from early retirement.
If you notice a small chip, act fast. Clean the area with a cotton swab and remover, then apply a tiny drop of matching polish and seal with top coat. Waiting allows moisture to seep in, accelerating further lifting.
For stubborn peeling at the cuticle line, it may indicate over-buffing or base coat applied too thickly. In the future, use lighter pressure and ensure base coat is fully dry before adding color.
Frequently Asked Questions
Can I use regular polish over gel base coat?
Yes, many hybrid systems are designed this way. However, ensure compatibility—some gel bases require UV curing. Non-curing gel-like bases (e.g., Seche Vite Foundation) work with regular polish.
Why does my polish chip at the tips so quickly?
The free edge of the nail experiences the most contact. Always seal the tip with each coat—base, color, and top—and reapply top coat mid-week. Consider using a strengthening treatment if nails are soft or flexible.
Does quick-dry top coat really help prevent chipping?
It helps indirectly. Faster drying reduces the window for accidental smudging, which can compromise the polish layer. However, true durability comes from proper prep and sealing, not just speed.
Final Checklist for Chip-Free Nails
- Remove old polish and clean nails with soap and water
- Degrease with isopropyl alcohol wipe
- Buff surface lightly for better adhesion
- Apply thin, even base coat—seal the tip
- Use two thin color coats with full drying between
- Finish with a high-quality top coat, wrapping the edge
- Wait at least 1–2 hours before heavy use
- Reapply top coat every 2–3 days
- Wear gloves during wet tasks
- Avoid using nails as tools
Keeping nail polish from chipping within hours isn’t about luck or expensive products—it’s about consistency, precision, and protection. By treating your nails like a professional canvas and respecting the chemistry of polish adhesion, you can achieve a manicure that lasts. Small adjustments in prep, application, and daily care compound into dramatic improvements in wear time.
Start tonight. Prep your nails with intention, apply with patience, and protect with purpose. Your next manicure doesn’t have to be temporary. Make it a statement that lasts.


 浙公网安备
33010002000092号
浙公网安备
33010002000092号 浙B2-20120091-4
Comments
No comments yet. Why don't you start the discussion?