
Creating a video blog—vlog—for public consumption is common, but what if you want to share personal moments, professional insights, or sensitive content without exposing it to the open internet? A private video blog offers control, security, and exclusivity. Whether you're documenting family memories, coaching clients, or sharing internal team updates, a private vlog ensures only authorized viewers gain access.
This guide walks through every phase of setting up a private video blog—from choosing the right platform to managing permissions and publishing your first secure entry. No technical background is required, but attention to detail will ensure your content remains both high-quality and protected.
Selecting the Right Hosting Platform
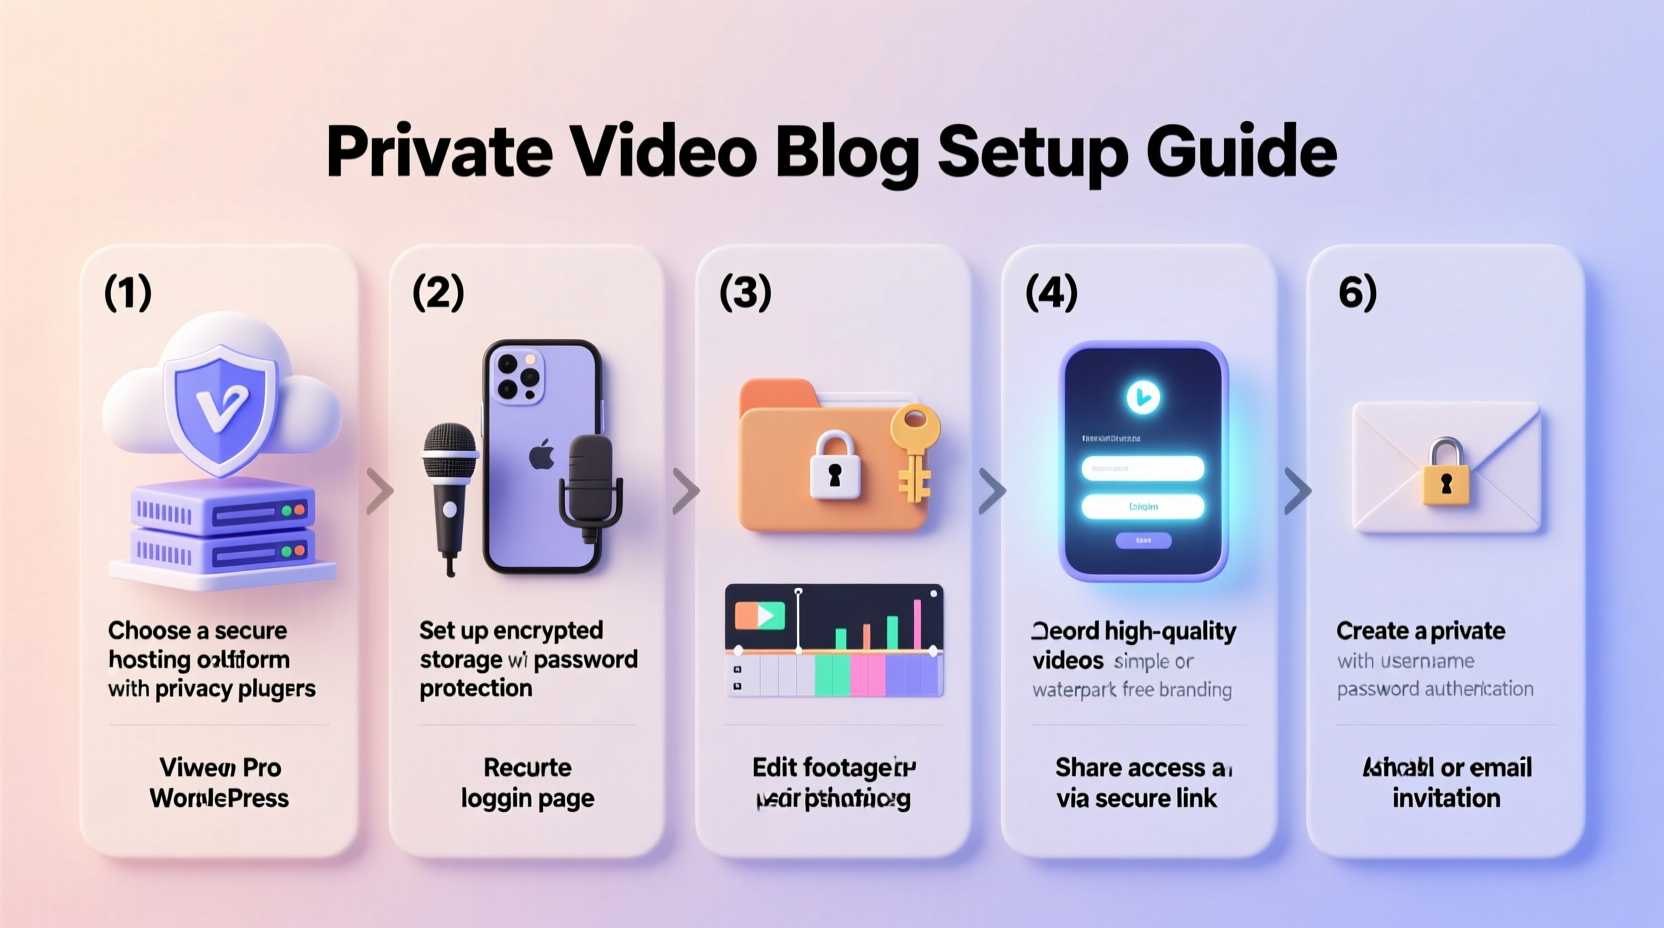
The foundation of any private video blog is its hosting environment. Unlike public platforms like YouTube or TikTok, private hosting restricts access through authentication, password protection, or invitation-only systems. The key is balancing ease of use with robust privacy controls.
Popular options include:
- Vimeo Advanced: Offers robust privacy settings, including domain-level restrictions, password protection, and viewer tracking.
- Wistia: Ideal for business-focused content with embeddable players and detailed analytics, though full privacy requires integration with external tools.
- Self-hosted solutions (e.g., WordPress + media server): Maximum control but require technical maintenance and bandwidth management.
- Google Drive or Dropbox (with caution): Useful for small-scale sharing but lack dedicated playback interfaces and scalable permission systems.
For most users, Vimeo’s paid plans offer the best balance. You can disable downloads, limit playback to specific websites, and even require email check-ins before viewing. These features make it ideal for coaches, educators, or families wanting a closed-loop experience.
Define Your Access Control Strategy
Privacy isn’t just about where you host—it’s about who gets in. Before uploading content, decide how access will be managed. There are three primary models:
- Password Protection: Simple but limited. Best for small groups with low turnover (e.g., extended family).
- Email Invitation & Authentication: Viewers must log in via email or a single sign-on (SSO) system. More secure and trackable.
- Membership System: Integrated with platforms like MemberPress or Kajabi, this allows tiered access, recurring logins, and content gating.
If your audience is static—say, a group of clients or relatives—a password-protected Vimeo album may suffice. But for growing audiences or recurring content, consider embedding videos into a members-only website using tools like WordPress and Restrict Content Pro.
| Access Method | Security Level | Best For | Limitations |
|---|---|---|---|
| Password Only | Moderate | Small, trusted groups | Passwords can be shared; no user tracking |
| Email Gate | High | Coaching, education, teams | Requires signup flow |
| Full Membership Site | Very High | Monetized or tiered content | Higher cost and complexity |
Step-by-Step Setup Process
Follow this timeline to launch your private vlog in under two weeks:
- Week 1: Planning & Platform Selection (Days 1–3)
- Define your vlog’s purpose: Is it educational, personal, or professional?
- Determine your audience size and technical comfort level.
- Choose a hosting provider (recommended: Vimeo Pro or higher).
- Set Up Your Account (Day 4)
- Create a Vimeo Business account or equivalent.
- Enable privacy settings: Disable public search, disable downloads, enable password or domain restrictions.
- Design Your Viewing Experience (Day 5)
- Customize the player color, logo, and embed settings.
- Create a simple landing page (via WordPress, Notion, or a custom site) where viewers will access videos.
- Build Access Controls (Days 6–7)
- Set up a password manager to securely distribute credentials.
- Or, integrate with a membership plugin to automate login and access tiers.
- Week 2: Production & Launch (Days 8–12)
- Record and edit your first 2–3 videos (keep them under 10 minutes each).
- Upload to your private library and test visibility settings.
- Send test links to 2–3 trusted people to verify access works.
- Launch & Onboard (Days 13–14)
- Send personalized invitations with clear instructions.
- Include troubleshooting tips: “Make sure you’re logged out of personal Vimeo accounts,” for example.
- Collect initial feedback and adjust permissions or interface as needed.
“Privacy in digital content isn’t optional—it’s a responsibility. Once something is public, you lose control. A private vlog puts you back in charge.” — Lena Torres, Digital Media Security Consultant
Optimize Video Production for Private Audiences
Private doesn’t mean low quality. In fact, because your audience is intentional, production value can deepen trust and engagement. Focus on clarity, consistency, and authenticity.
Essential equipment for a professional yet accessible setup:
- Camera: Use a smartphone with 1080p+ resolution or a DSLR/mirrorless camera.
- Audio: Lapel mics (like Rode SmartLav+) drastically improve sound over built-in microphones.
- Lighting: Natural light near a window or a softbox kit eliminates shadows and improves tone.
- Editing Software: DaVinci Resolve (free) or Adobe Premiere Rush (paid) allow clean cuts, audio leveling, and captions.
Structure your videos with intention. Open with a brief welcome, state the purpose of the entry, deliver the core message, and close with a call to action—whether that’s reflection, feedback, or preparation for the next video.
For ongoing vlogs, maintain a consistent posting schedule. Weekly updates work well for most private audiences. Irregular posting leads to disengagement, even among invited viewers.
Real-World Example: A Family Legacy Vlog
Sarah Chen wanted to preserve stories from her parents before they aged further. She didn’t want these memories on public platforms. Her solution: a private Vimeo-based vlog titled “Our Roots.”
She set up a Vimeo Pro account and created a playlist for each parent. Each month, she recorded a 15-minute conversation—topics included childhood memories, life lessons, and family recipes. Videos were uploaded with domain-restricted privacy and embedded into a private Notion page.
Access was granted only to immediate family via email invitation. She used a shared Google Doc to distribute the Notion link and a master password. Over six months, the family grew closer, referencing past videos during reunions. When her father passed, the vlog became a cherished archive.
This case illustrates how a private vlog transcends utility—it becomes emotional infrastructure.
Essential Maintenance & Security Practices
Launching is just the beginning. To keep your vlog secure and functional, follow these maintenance steps:
- Review access logs monthly: Platforms like Vimeo show who viewed which video and when. Look for anomalies.
- Rotate passwords quarterly: Especially if using simple password protection.
- Back up original files: Store master recordings on an encrypted external drive or NAS device.
- Update software regularly: Ensure your CMS, plugins, and apps are patched against vulnerabilities.
- Delete inactive users: If using a membership system, remove accounts that haven’t logged in for 6+ months.
Avoid linking private videos in public emails or social media. Even if the video is restricted, the exposure increases phishing risk. Instead, send links through secure channels like encrypted messaging or password-protected documents.
Frequently Asked Questions
Can I monetize a private video blog?
Yes. Use a membership platform like Podia or Kajabi to charge subscriptions. You can offer tiered access—basic members get monthly updates, while premium members receive live Q&As or downloadable resources.
How do I handle multiple contributors?
If others will upload videos, assign role-based permissions. On Vimeo, use “Team” accounts with editor vs. admin roles. Establish naming conventions and review all content before publishing to maintain consistency.
What if someone shares a video outside the group?
While you can’t prevent screen recording entirely, reduce risk by adding watermarks with viewer names, disabling right-click downloads, and including a brief verbal reminder at the start of each video: “This content is for invited viewers only.”
Final Checklist Before Going Live
- ✅ Choose a private-friendly hosting platform (e.g., Vimeo Pro).
- ✅ Configure privacy settings: disable public search, downloads, and embeds.
- ✅ Set up access control (password, email gate, or membership).
- ✅ Create a simple, branded viewing page or portal.
- ✅ Test video playback and access with 2–3 trusted users.
- ✅ Record and edit your first 1–3 entries.
- ✅ Develop a content calendar for the next 4–8 weeks.
- ✅ Draft onboarding instructions for new viewers.
- ✅ Enable viewer analytics to monitor engagement.
- ✅ Schedule a monthly review of access and backups.
Start with Purpose, Build with Care
A private video blog is more than a technical project—it’s a commitment to meaningful communication. Whether preserving memories, guiding clients, or uniting a team, the act of creating private content reflects intentionality. With the right setup, your vlog becomes a trusted space, insulated from noise and algorithmic pressure.
The tools exist. The methods are proven. Now it’s time to begin. Film your first message, lock the door behind you, and share what matters—only with those who should see it.


 浙公网安备
33010002000092号
浙公网安备
33010002000092号 浙B2-20120091-4
Comments
No comments yet. Why don't you start the discussion?