
Staircase garlands are one of the most elegant ways to bring holiday cheer into your home. When done right, they create a flowing cascade of greenery that draws the eye upward and transforms an ordinary staircase into a festive focal point. But all too often, garlands end up drooping, slipping, or looking lopsided—especially when layered for fullness. The key isn’t just in the materials you use, but in how you install and support them. With the right approach, you can achieve a lush, professional-looking display that stays securely in place from December 1st through New Year’s Day.
Why Garlands Sag—and How to Prevent It
The primary reason garlands sag is inadequate support. Most people drape garlands over banisters like fabric, expecting them to hold their shape. But real or faux greenery has weight, especially when layered or adorned with ornaments, pinecones, or lights. Over time, gravity pulls the center downward, creating unsightly dips between posts.
Sagging also occurs when attachment points are too far apart. If you only secure the garland at the top and bottom, there’s nothing to prevent it from sliding down or swaying outward. The solution lies in strategic anchoring along the entire length of the staircase.
Another overlooked factor is the base structure of your staircase. Open railings with widely spaced balusters require more frequent fastening than solid wood handrails. Similarly, curved or winding staircases need flexible installation methods to follow the contour without gaps or tension points.
Choosing the Right Materials for Stability
Not all garlands are created equal. Some are designed specifically for stair railing use, while others are better suited for mantels or tables. To avoid sagging, start by selecting durable, well-constructed garlands with built-in wiring or sturdy stems.
Faux garlands made with PVC or premium polyester tend to hold their shape better than cheaper alternatives. Look for models with embedded metal wire cores—these can be gently bent and secured to the railing without breaking. For real greenery, choose fresh-cut garlands with tightly bound stems and moisture-retaining backing if available.
When layering multiple garlands, vary the textures and diameters. A common technique is to use a thicker base garland (4–6 inches in diameter) as the foundation, then wrap a thinner, more decorative strand around it. This not only adds visual depth but also helps lock the inner layer in place.
“Garland installation is engineering as much as decoration. The best displays combine aesthetic judgment with structural awareness.” — Lydia Bennett, Professional Holiday Stylist & Lead Designer at Evergreen Atelier
Recommended Garland Types for Staircases
| Type | Pros | Cons | Best For |
|---|---|---|---|
| Faux with Wire Core | Durable, reusable, easily shaped | Higher upfront cost | All staircase types, especially curves |
| Real Cedar/Fir | Natural scent, authentic look | Dries out quickly, needs misting | Short-term displays, dry climates |
| Pre-lit Faux Garland | Saves time, integrated lighting | Heavier, less flexible | Straight railings, strong supports |
| Unwired Faux | Inexpensive, lightweight | Sags easily, hard to secure | Temporary decor, low-traffic areas |
Step-by-Step: Installing Layered Garlands Without Sagging
Follow this proven method to install two or more layers of garland securely and evenly across your staircase railing.
- Measure Your Staircase: Use a flexible tape measure to determine the total linear footage of your railing, including any curves. Add 10% extra for draping and overlap. This ensures you buy enough material without running short mid-installation.
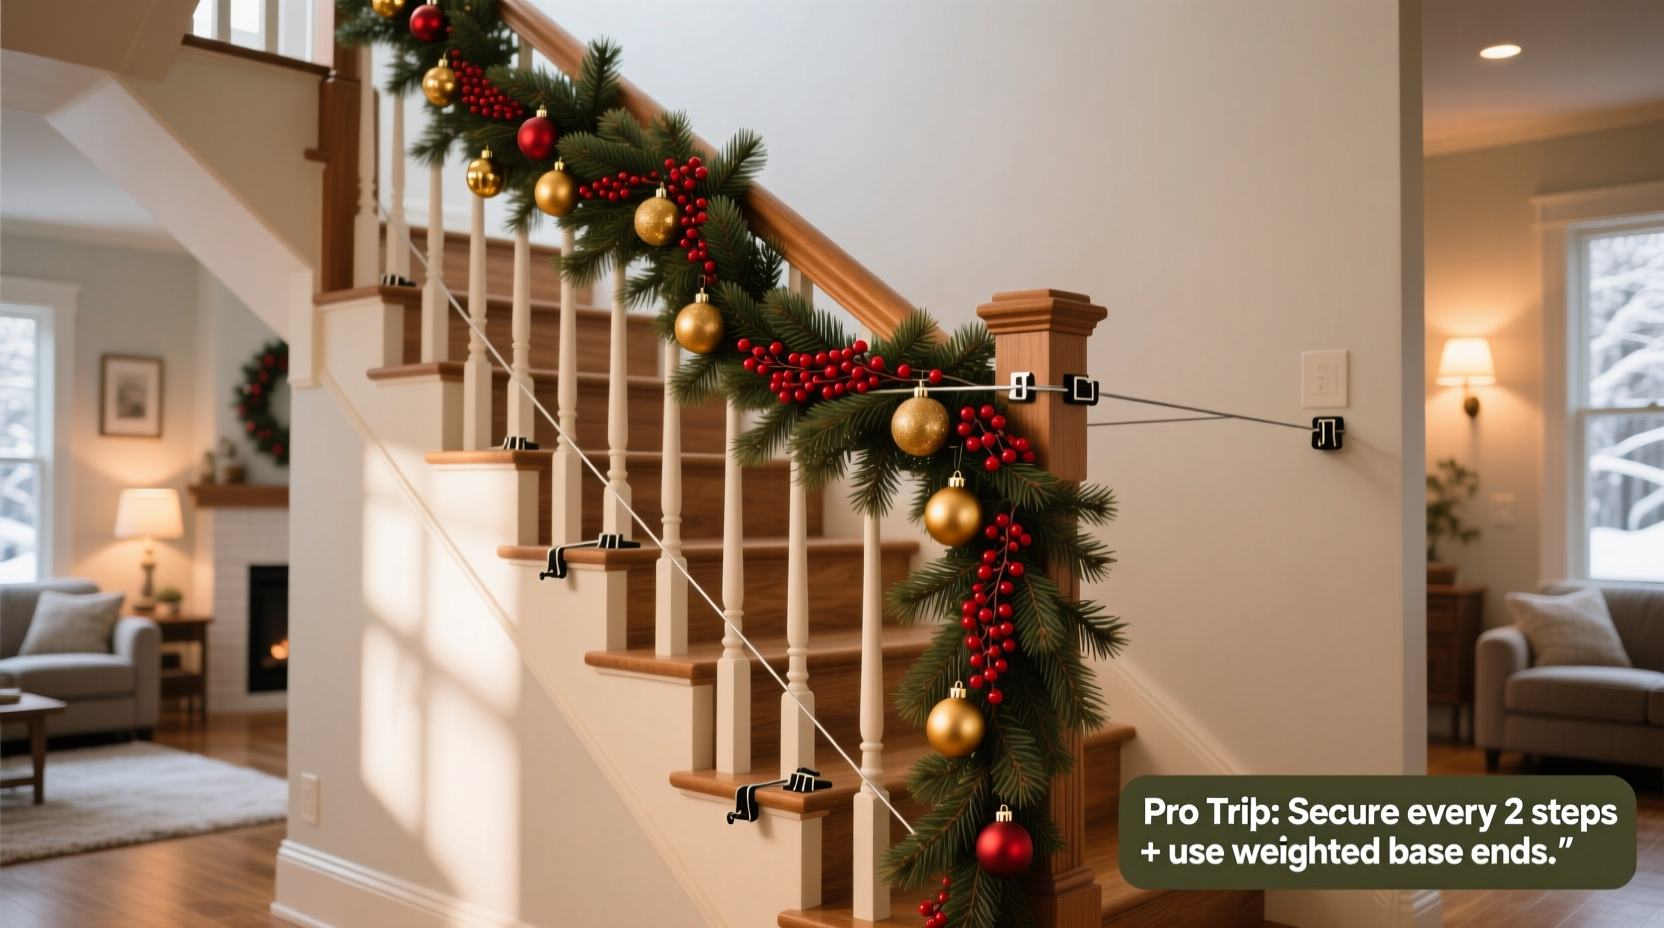
- Install a Base Garland: Begin with your thickest or primary garland. Starting at the top, position the end flush with the top post. Use floral wire, zip ties, or clear mounting clips to attach it every 12–15 inches. Gently pull taut—but do not stretch—to maintain a consistent drape.
- Anchor at Critical Points: Pay special attention to landings, turns, and mid-rail supports. These areas are prone to movement. Double-fasten here using two clips or a twist of wire for added stability.
- Add the Second Layer: Take a thinner garland (or vine-style strand) and wrap it around the base layer in a spiral motion. Start at the same top point and work downward. Secure this secondary layer every 18 inches, attaching it directly to the railing beneath the first garland so both are independently supported.
- Incorporate Lighting (Optional): If using separate string lights, weave them into the base layer before adding the second garland. This hides wires and uses the greenery as insulation. Avoid clipping lights externally—they add weight and increase sag risk.
- Fluff and Adjust: Once secured, step back and assess the flow. Fluff sections that appear flat and redistribute bulk to eliminate thin spots. Rotate sprigs outward for a fuller silhouette.
- Final Inspection: Gently tug on various points to test security. If any section shifts or sags, reinforce with additional fasteners. Recheck after 24 hours, as materials may settle slightly.
Essential Tools and Fasteners
The success of your garland installation hinges on using the right fastening tools. Avoid adhesives or tapes—they fail under weight and temperature changes. Instead, opt for mechanical fasteners that grip both the railing and garland firmly.
- Plastic Zip Ties: Inexpensive and strong. Use 6–8 inch black ties for dark railings or painted wood. Trim excess tails for a clean finish.
- Floral Wire: 22-gauge green wire blends well with foliage. Twist tightly around both garland and railing. Ideal for real greenery installations.
- Railing Clips: Specially designed plastic or metal clips that hook over the railing and cradle the garland. Reusable and nearly invisible from below.
- Clear Fishing Line: Useful for suspending heavier ornaments or bows from above, reducing strain on the garland itself.
For homes with rental restrictions or delicate finishes, consider removable adhesive hooks rated for 5+ pounds. These can support light garlands without damaging paint or wood.
Mini Case Study: The Johnson Family Staircase Makeover
The Johnsons had a 22-foot curved oak staircase in their colonial-style home. Each year, their garland would slide down by mid-December, forcing them to rehang it twice. In frustration, they hired a local decorator who implemented a layered system using two 25-foot faux garlands—one with a wire core as the base, and a pinecone-dotted accent strand wrapped around it.
The installer used 18 brass-toned railing clips spaced every 14 inches, plus zip ties at each newel post. Lights were pre-woven into the base layer. The result? A full, balanced look that remained intact for 38 days—even during a week of houseguests and children running up and down the stairs.
“We were amazed,” said homeowner Maria Johnson. “It looked like something from a magazine, and it didn’t move an inch.”
Do’s and Don’ts of Garland Layering
| Do | Don’t |
|---|---|
| Use independent fasteners for each layer | Assume one layer will hold the other in place |
| Start installation from the top down | Begin in the middle and work outward |
| Choose garlands with similar color tones | Mix warm and cool greens without blending |
| Test drape length with twine first | Guess the amount needed based on memory |
| Inspect weekly for loosening | Install and forget until removal day |
FAQ
Can I use Command Strips for garland?
Only for very lightweight garlands or temporary accents. Standard Command Strips are not designed for continuous load-bearing. Use outdoor-rated strips with higher weight capacity if adhesives are necessary, and always supplement with additional supports.
How many garlands should I layer on a staircase?
Two layers are ideal for most homes—one structural base and one decorative overlay. Three layers can work on wide or commercial-style railings, but beyond that, the look becomes cluttered and increases fall risk. Focus on quality over quantity.
What if my railing is slippery or metal?
For metal or glass railings, use rubber-gripped clips or custom brackets that clamp securely. You can also line standard clips with non-slip silicone tape to prevent shifting. Avoid relying on friction alone.
Checklist: Secure Garland Installation in 10 Steps
- Measure total railing length (+10%)
- Select two complementary garlands (one base, one accent)
- Gather supplies: zip ties, clips, wire, scissors, gloves
- Cut any excess backing wire for curves <5>Attach base garland every 12–15 inches
- Secure at top, bottom, and all newel posts
- Weave in lights before adding second layer
- Wrap accent garland around base in spiral pattern
- Fasten second layer independently to railing
- Fluff, adjust, and inspect for evenness
Conclusion
A beautifully layered staircase garland doesn’t happen by accident—it results from thoughtful planning, quality materials, and disciplined installation. By anchoring each layer properly, choosing supportive fasteners, and respecting the physics of weight and balance, you can create a holiday display that looks professionally styled and stays perfectly in place.
Don’t settle for sagging strands or last-minute fixes. Apply these techniques this season and enjoy a stunning, worry-free garland that enhances your home’s warmth and elegance from first snowfall to final celebration.


 浙公网安备
33010002000092号
浙公网安备
33010002000092号 浙B2-20120091-4
Comments
No comments yet. Why don't you start the discussion?