
Creating a memorable Christmas light display isn’t just about covering every surface in bulbs—it’s about crafting dimension, rhythm, and visual interest. The most captivating holiday displays use layered lighting techniques that mimic the way light behaves in nature: soft glows, sharp highlights, and gradual transitions. By thoughtfully combining different bulb sizes, colors, and placement strategies, you can transform a flat, predictable arrangement into a dynamic, three-dimensional spectacle. This guide walks through the principles of layered Christmas lighting, offering actionable advice for homeowners and decorators who want to elevate their seasonal presentation.
Understanding Depth in Lighting Design
Depth in lighting refers to the illusion of space created by varying intensity, color temperature, distance, and density. A two-dimensional string of lights wraps around a roofline may catch attention, but it lacks movement. In contrast, a layered approach uses foreground, midground, and background elements to draw the eye inward, creating a sense of immersion.
Professional designers often borrow techniques from theater and architectural lighting—using warm and cool tones to suggest proximity or distance, clustering bulbs for emphasis, and spacing them strategically to guide the viewer’s gaze. For outdoor holiday decor, this means combining large C9 bulbs along eaves with smaller fairy lights woven through shrubs, then adding colored accents on focal points like trees or columns.
Selecting Bulb Sizes for Visual Hierarchy
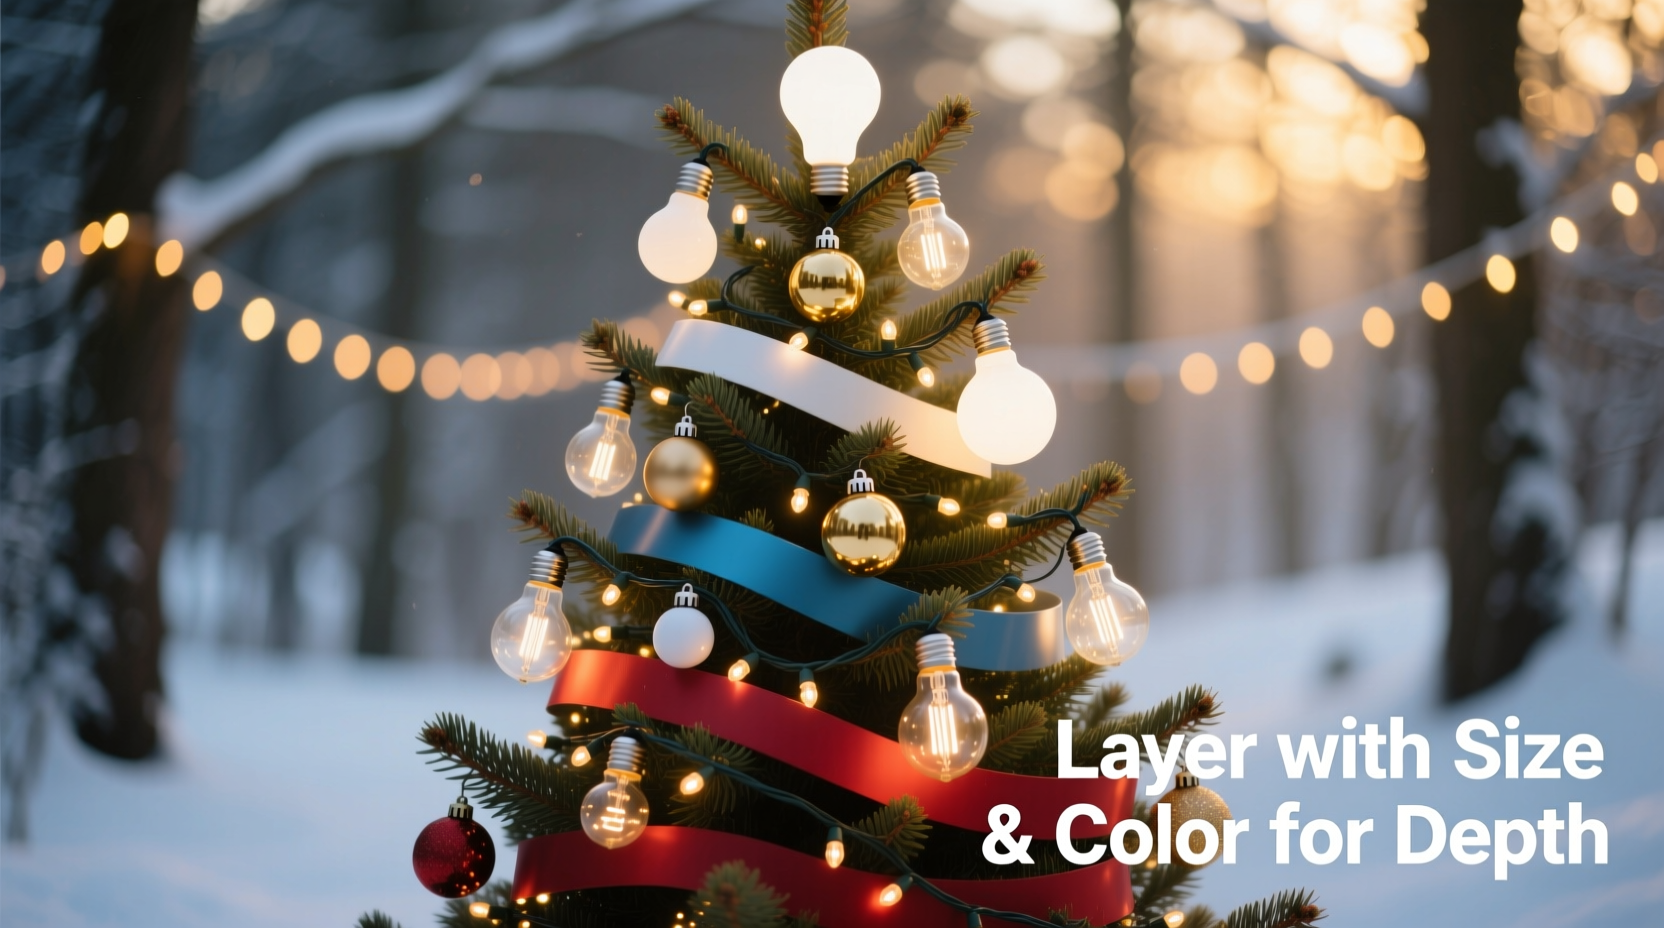
Bulb size plays a crucial role in establishing hierarchy within your display. Larger bulbs command attention and work best as anchor points, while smaller bulbs add texture and fill space without overwhelming.
- C9 bulbs (approx. 1.25” diameter): Ideal for outlining roofs, windows, and fences. Their brightness makes them visible from a distance, forming the backbone of your design.
- C7 bulbs (approx. 1” diameter): Slightly smaller than C9s, these are great for railings, garages, or secondary outlines where you want presence without dominance.
- Mini lights (approx. 0.25”): Perfect for draping over trees, wrapping columns, or filling in dense areas like hedges. When used in bulk, they create a “snowfall” effect.
- Net lights: Pre-strung grids of mini lights ideal for covering bushes or flat surfaces quickly and evenly.
- Fairy or micro LED strings: Extremely small and flexible, these work well for delicate touches—winding around tree branches, lining walkways, or accenting ornaments.
The key is not to mix all sizes randomly. Instead, assign roles: large bulbs define structure, medium bulbs reinforce key lines, and small bulbs provide detail and texture. This creates a natural progression that mimics how we perceive depth in real environments.
“Layering isn’t about more lights—it’s about smarter lights. A single strand placed with intention can do more than a hundred randomly strung.” — Marcus Lang, Professional Holiday Lighting Designer
Using Color to Enhance Dimension
Color isn’t just decorative—it’s spatial. Warm tones advance visually, appearing closer, while cool tones recede, suggesting distance. Strategic use of color can make a small yard feel expansive or highlight architectural features you want to emphasize.
A monochromatic scheme using only warm white lights can feel cozy but flat. Introducing subtle variations—such as blending warm white with soft blue or violet mini lights in tree canopies—adds atmospheric depth. For example:
- Use pure warm white on porch railings and entryways (foreground).
- Mix warm white with amber or rose-tinted bulbs on mid-level structures like second-story eaves.
- Add cool white or pale blue in back corners, tall trees, or behind planters to push those areas “into the distance.”
For a bolder look, consider limited-color palettes. A combination of deep blue, emerald green, and warm white evokes a wintry forest. Avoid using too many saturated colors across large areas—they compete for attention and flatten the scene.
| Color Temperature | Visual Effect | Best Placement |
|---|---|---|
| Warm White (2700K) | Advances, feels inviting | Entryways, porches, railings |
| Natural White (4000K) | Neutral, balanced | Rooflines, garage doors |
| Cool White (5000K+) | Recedes, crisp | Tall trees, back borders, vertical accents |
| Pale Blue / Soft Violet | Atmospheric depth | Tree canopies, behind shrubs |
Step-by-Step Guide to Layering Your Display
Follow this sequence to build a layered lighting scheme from the ground up:
- Assess your space. Walk around your property during dusk. Note architectural lines, trees, and natural focal points. Sketch a rough map if helpful.
- Define the outline with large bulbs. Install C9 or C7 lights along roof edges, gutters, and window frames. These form your “backbone” layer.
- Add mid-layer textures. Drape mini lights over shrubs, wrap tree trunks, or line stair railings. Use warm white or natural white here for consistency.
- Introduce depth with cool tones. Place cool white or pale blue fairy lights in taller trees or at the rear of garden beds. This creates a sense of distance.
- Highlight focal points. Use colored bulbs or tightly clustered warm whites on the front door, mailbox, or centerpiece tree. Consider spotlighting with focused LED projectors.
- Fill gaps with net or curtain lights. Cover flat surfaces like hedges or walls with pre-strung netting to maintain even brightness without overloading circuits.
- Test at night. Turn off ambient lights and view your display from the street. Adjust spacing, replace flickering bulbs, and refine clusters until balance is achieved.
This method ensures each layer serves a purpose. You’re not just adding lights—you’re building a visual story.
Real Example: Transforming a Suburban Front Yard
Consider a typical two-story home with a covered porch, two columnar evergreens, and a row of boxwoods along the driveway. The homeowner wanted a festive but elegant look, avoiding the “overlit carnival” effect common in the neighborhood.
The designer began by installing C9 warm white bulbs along the roofline and porch eaves. Next, C7s were wrapped around the porch columns to reinforce vertical lines. Mini lights in warm white were densely wound around the evergreens, with slight gaps to allow shadow play. To add depth, cool white micro-LEDs were tucked into the upper third of each tree, simulating moonlight filtering through branches.
The boxwoods received warm white net lights, providing even coverage without drawing focus. Finally, a single strand of vintage-style amber bulbs was draped diagonally across the front door, acting as a warm focal point. From the street, the house appeared both bright and dimensional—the eye moved naturally from the glowing doorway up to the illuminated roof, then back into the softly lit trees.
Neighbors reported it was “the first time they’d stopped to look instead of just driving by.”
Checklist: Pre-Lighting Preparation
Before hanging a single strand, ensure you’re ready with this checklist:
- ✅ Inventory all lights—test each strand for continuity and color accuracy.
- ✅ Measure linear feet of rooflines, trees, and railings to estimate needed length.
- ✅ Group lights by type and color for easy access during installation.
- ✅ Purchase clips or fasteners appropriate for your surfaces (gutter hooks, tree wraps, etc.).
- ✅ Plan outlet locations and use heavy-duty extension cords rated for outdoor use.
- ✅ Check circuit load limits—avoid daisy-chaining more than three strands unless labeled safe.
- ✅ Schedule installation during dry weather for safety and efficiency.
Common Mistakes to Avoid
Even experienced decorators fall into traps that undermine depth and cohesion:
- Over-lighting small areas: Clustering too many strands on one bush or window creates visual noise. Let some areas remain subtly lit or dark to provide contrast.
- Mixing incompatible color temperatures: Combining warm and cool whites in the same zone flattens depth. Keep temperature zones distinct.
- Ignoring scale: Using C9 bulbs on delicate shrubs overwhelms the feature. Match bulb size to object size.
- Skipping planning: Hanging lights as you go leads to uneven spacing and wasted materials. Sketch a plan first.
- Forgetting maintenance: Flickering or dead sections break immersion. Inspect and repair before the season starts.
FAQ
Can I mix LED and incandescent bulbs?
Technically yes, but it’s not recommended. LEDs run cooler, use less energy, and last longer. Incandescents emit more heat and have a shorter lifespan. More importantly, their color output differs—incandescents are naturally warmer, which can clash with LED whites. Stick to one type for consistency.
How many layers should I use?
Most effective displays use three: structural (large bulbs), textural (mini lights), and atmospheric (cool tones or special effects). Adding more than three can work in large estates or commercial settings, but for residential use, three layers provide ample depth without chaos.
Do I need smart lights for layering?
No. While smart lights offer control over color and animation, traditional plug-in strands work perfectly for static layered designs. Smart lights shine when you want programmable scenes—like a “twinkle wave” moving from front to back—but aren’t required for depth.
Conclusion: Light with Intention
Layering Christmas lighting for depth transforms decoration into design. It shifts the focus from quantity to quality, from randomness to rhythm. By selecting the right bulb sizes, balancing warm and cool colors, and placing each strand with purpose, you create not just a lit house—but an experience. Whether viewed from the sidewalk or through your living room window, a well-layered display invites wonder, evokes nostalgia, and becomes part of your community’s holiday memory.


 浙公网安备
33010002000092号
浙公网安备
33010002000092号 浙B2-20120091-4
Comments
No comments yet. Why don't you start the discussion?