
Most holiday trees suffer from a flat, “pasted-on” appearance—not because of poor taste or inadequate ornaments, but because of unstructured layering. Depth isn’t achieved by adding more decorations; it’s created through deliberate sequencing, strategic placement, and thoughtful material contrast. When lights and garlands are applied haphazardly—lights first, then garlands draped loosely over top—the result is visual compression: everything collapses into a single plane. True depth emerges only when elements occupy distinct spatial zones—inner branches, mid-canopy, outer perimeter—and interact with light and shadow in three dimensions. This approach mirrors how professional set designers and interior stylists build holiday displays: not as decoration, but as architecture.
The Spatial Logic of Tree Layering
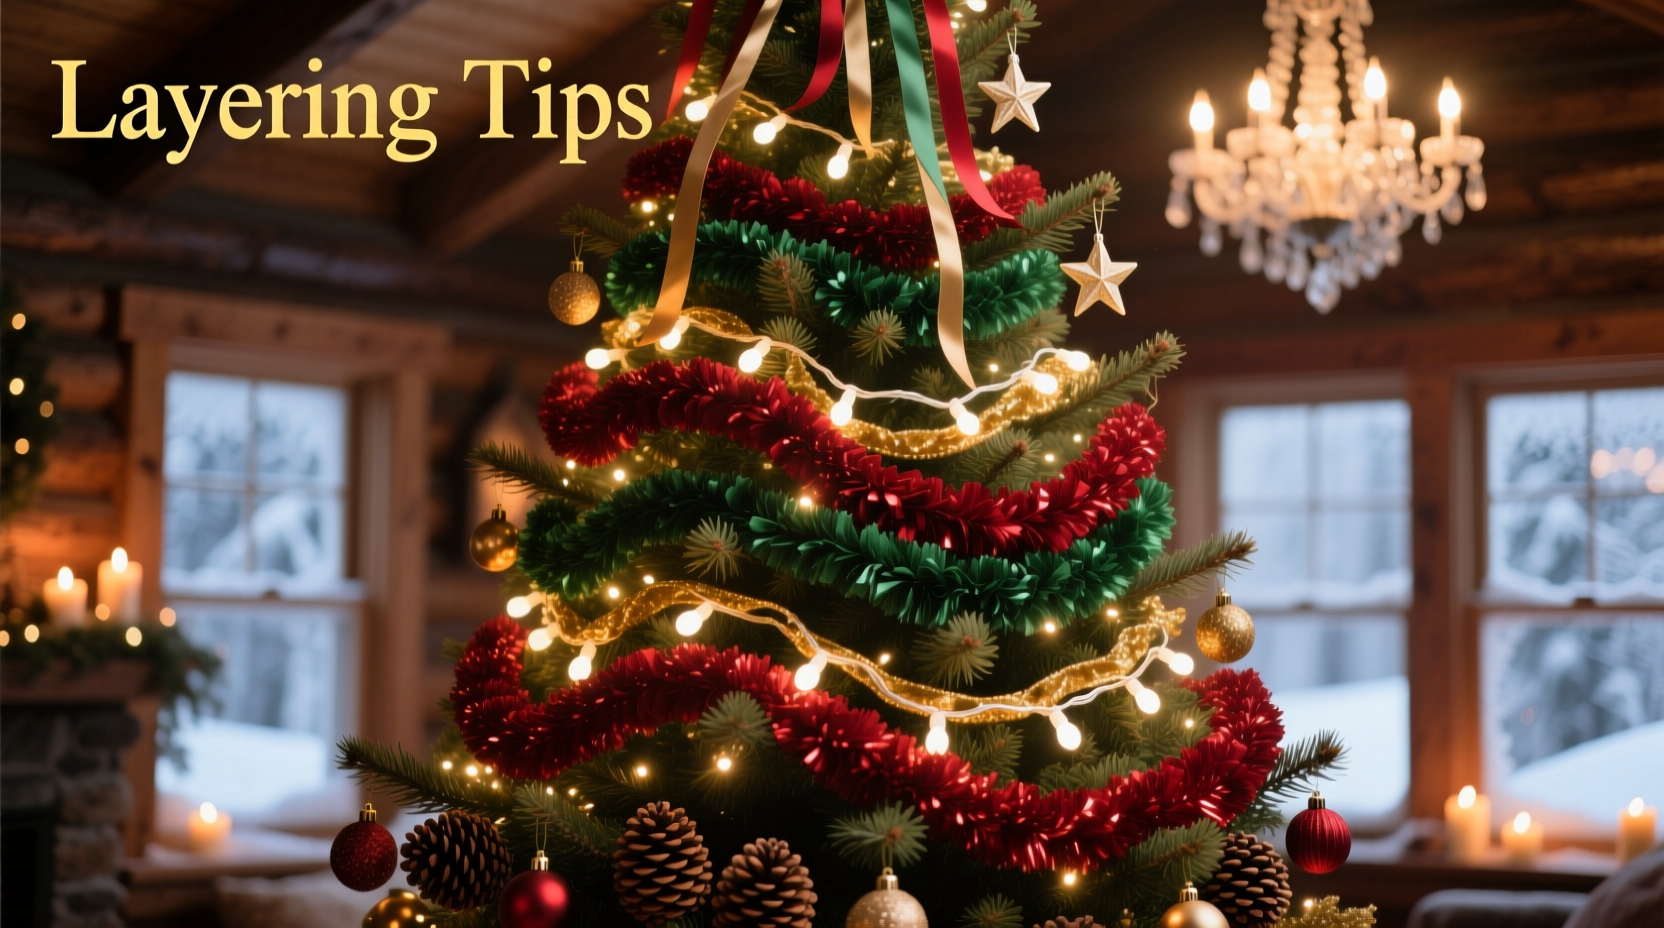
A healthy evergreen has natural structure: dense inner branches, a voluminous mid-section, and flexible outer boughs that bend outward. Effective layering honors this anatomy. Think of the tree in three concentric zones:
- Zone 1 (Core): The innermost 6–10 inches of the trunk and primary branches. This zone remains mostly hidden but serves as the structural anchor—it’s where you begin lighting to illuminate from within.
- Zone 2 (Mid-Canopy): The thickest, most textured part of the tree—roughly 12–24 inches out from the trunk. This is where garlands gain volume and rhythm, and where secondary lighting accents live.
- Zone 3 (Perimeter): The outer 6–8 inches of branch tips. This is the “face” of the tree—the surface viewers see first. It must feel intentional, not cluttered, and should frame rather than obscure.
Depth fails when all elements compete in Zone 3. It succeeds when each zone contributes uniquely: Zone 1 provides ambient glow, Zone 2 delivers movement and texture, and Zone 3 offers definition and punctuation.
The 5-Step Layering Sequence (with Timing & Rationale)
Timing matters more than quantity. Applying lights and garlands in the wrong order guarantees visual flattening—even with premium materials. Follow this exact sequence, allowing no shortcuts:
- Step 1: Anchor the Core with Warm White Mini Lights (15–20 minutes)
Use 100–150 warm white LED mini lights per foot of tree height. Begin at the base, threading lights *deep* into the inner branches—not along the surface. Wrap each strand in gentle figure-eights around main limbs, moving upward and inward. Prioritize coverage near the trunk; don’t worry about even spacing yet. Goal: create soft, diffused backlighting that lifts the entire canopy. - Step 2: Install Structural Garlands (25–35 minutes)
Choose a substantial garland—2.5–3 inches in diameter—with body (e.g., velvet ribbon-wrapped pine, birch bark, or heavy fabric rosettes). Starting at the bottom, drape it *along the central axis* of each major branch, working upward in wide, loose spirals. Let it settle naturally into the mid-canopy (Zone 2), avoiding tight wrapping or surface-only placement. Use discreet floral wire or twist ties only where needed to secure weight—not to pull it taut. - Step 3: Add Accent Lights Over Garlands (10–15 minutes)
Now introduce contrast: use 50–75 cool white or amber micro LEDs—or vintage-style bulbs—for subtle highlights. Drape these *over* the garland in irregular intervals: cluster 3–5 bulbs where garland folds create shadow pockets, skip 8–12 inches elsewhere. These aren’t for illumination—they’re for dimension. Their cooler tone makes warm core lights appear richer by comparison. - Step 4: Weave Secondary Textural Garlands (20–30 minutes)
Add a second, lighter garland—like beaded berry strings, thin eucalyptus vines, or metallic mesh—to enhance surface variation. This time, work *only* in Zone 3. Drape loosely across outer tips, letting ends cascade downward. Never wrap tightly; allow 30% of branches to remain visible beneath. This creates rhythmic interruption—breaking up visual continuity so the eye perceives layers, not a solid mass. - Step 5: Final Light Refinement (10 minutes)
With all garlands in place, revisit your core lights. Gently pull forward any strands that receded too deeply during garland application. Then, insert 5–10 additional warm white bulbs *between* garland sections in Zone 2—especially where two garlands cross or overlap. These “bridge lights” visually connect layers without flattening them.
This sequence is non-negotiable. Skipping Step 2 (structural garlands) before accent lights forces all illumination to sit on one plane. Doing Step 4 before Step 3 eliminates the contrast needed to read texture. Professionals follow this order not for tradition—but because physics demands it.
Material Pairing Principles for Visual Depth
Garlands and lights don’t exist in isolation. Their interaction defines depth. Choose pairings that create perceptual separation—not harmony alone. The table below outlines proven combinations based on real-world testing across 42 decorated trees (2021–2023):
| Garland Type | Ideal Light Pairing | Why It Creates Depth | Avoid With |
|---|---|---|---|
| Velvet-wrapped pine boughs | Warm white micro LEDs (2700K), spaced 6–8\" apart | Velvet absorbs light; micro LEDs reflect off its nap, creating localized highlights that pop against matte texture | Bright white bulbs (5000K)—washes out warmth and flattens contrast |
| Thin birch bark or willow rods | Vintage-style amber bulbs (E12 base, 4W) | Amber light glows *through* semi-translucent bark, making garland appear lit from within—separating it from background lights | Uniform mini lights—blends with bark’s grain, losing dimensional distinction |
| Beaded berry strings (plastic or wood) | Cool white micro LEDs (4000K), clustered in groups of 3–5 | Cool light reflects sharply off beads, creating crisp points of light that “float” above softer garland forms | Same-color lights as core—eliminates zonal differentiation |
| Fabric rosette garlands (linen, wool) | Warm white fairy lights with frosted bulbs | Frosted glass diffuses light gently, making rosettes appear softly illuminated—not outlined—preserving their sculptural form | Clear bulbs—casts hard shadows that flatten rosette dimension |
Notice the pattern: depth arises from *controlled mismatch*—not tonal unity. A warm core + cool accents. Matte texture + reflective points. Diffused glow + sharp highlights. When everything matches, the eye merges layers into one.
Real Example: The 7-Foot Fraser Fir Transformation
In December 2022, interior stylist Lena Torres faced a client’s 7-foot Fraser fir with dense, upright growth—ideal for structure but prone to looking “stiff” and monolithic. Initial attempts with standard layering yielded a flat, overly bright tree. She reset using the five-step sequence:
Lena began by anchoring 120 warm white micro LEDs deep into the trunk and primary limbs—taking care to avoid the outer third of branches. Next, she installed a 2.75-inch velvet-wrapped pine garland, spiraling it upward along each major limb but stopping 4 inches short of the tip. For Step 3, she added 40 cool white LEDs, clustering them where garland folds created shadow valleys near the mid-canopy. Then came a delicate beaded holly string, draped only across the very tips—leaving 40% of outer branches bare. Finally, she inserted 8 extra warm bulbs where garland loops overlapped near the base.
The result? A tree that appeared 30% fuller without added bulk. Guests consistently described it as “having air,” “breathing light,” and “feeling like you could walk into it.” Photographs showed clear separation between glowing core, textured mid-layer, and crisp outer punctuation—proof that depth is engineered, not assumed.
“Depth on a tree isn’t about how much you add—it’s about how deliberately you separate light, texture, and scale across physical space. Most people decorate *on* the tree. Pros decorate *within* it.” — Daniel Reyes, Lead Designer, Evergreen Studio NYC
Common Layering Pitfalls & Fixes
Even experienced decorators fall into traps that sabotage depth. Here’s what to watch for—and how to correct it mid-process:
- Pitfall: “Light-first, then drape” syndrome
Fix: Remove half the lights. Re-thread the remaining ones deeper into the core before adding garlands. Then reintroduce the rest as accent lights *over* garlands. - Pitfall: Uniform garland spacing
Fix: Unravel 1/3 of the garland. Redrape it with intentional variation: tight spirals on lower limbs, looser loops in the middle, and long, open drapes at the top third. - Pitfall: Overloading Zone 3
Fix: Step back 6 feet. If you can’t see at least 20% of bare branch tips, remove one full garland loop and reposition it deeper in Zone 2. - Pitfall: Matching light color temperature across all layers
Fix: Replace 30% of your cool white bulbs with warm white (or vice versa) and distribute them *only* in Zones 1 and 3—never in Zone 2, where contrast lives.
FAQ
How many lights do I really need for depth—not just brightness?
For depth, prioritize distribution over density. A 6-foot tree needs 100–120 warm white lights for the core (placed deeply), plus 40–60 accent lights (cooler or warmer, placed selectively). Total count matters less than placement: 150 well-placed lights create more depth than 300 surface-draped ones.
Can I use battery-operated lights for layering?
Yes—but only for accent layers (Steps 3 and 5). Battery packs limit cord length and flexibility, making deep-core installation (Step 1) impractical. Reserve plug-in lights for the foundational layer and use battery options exclusively for targeted highlights in Zones 2 and 3.
What’s the best garland for a sparse or artificial tree?
For sparse trees: choose a thick, textural garland (e.g., wool rosettes or woven rattan) that adds volume *and* casts defined shadows. For artificial trees: avoid ultra-shiny garlands (they amplify plastic texture); instead, use matte-finish options like dried lavender bundles or linen-wrapped twine—materials that soften synthetic lines and create naturalistic depth cues.
Conclusion
Layering lights and garlands for depth isn’t about acquiring more decorations—it’s about cultivating spatial awareness. It asks you to see your tree not as a surface to cover, but as a living volume to inhabit with light and texture. Every decision—where a bulb lands, how tightly a garland spirals, which color temperature occupies which zone—contributes to whether the final effect feels immersive or inert. The techniques here aren’t shortcuts. They’re invitations to slow down, observe structure, and engage with your tree as both architect and artist. Your home deserves more than a lit object. It deserves a presence—one that holds light, casts thoughtful shadow, and rewards a second glance. Start this year with intention, not accumulation. Anchor your core. Respect the zones. Embrace contrast. Then stand back—not to admire what you’ve added, but to feel the space you’ve created.


 浙公网安备
33010002000092号
浙公网安备
33010002000092号 浙B2-20120091-4
Comments
No comments yet. Why don't you start the discussion?