
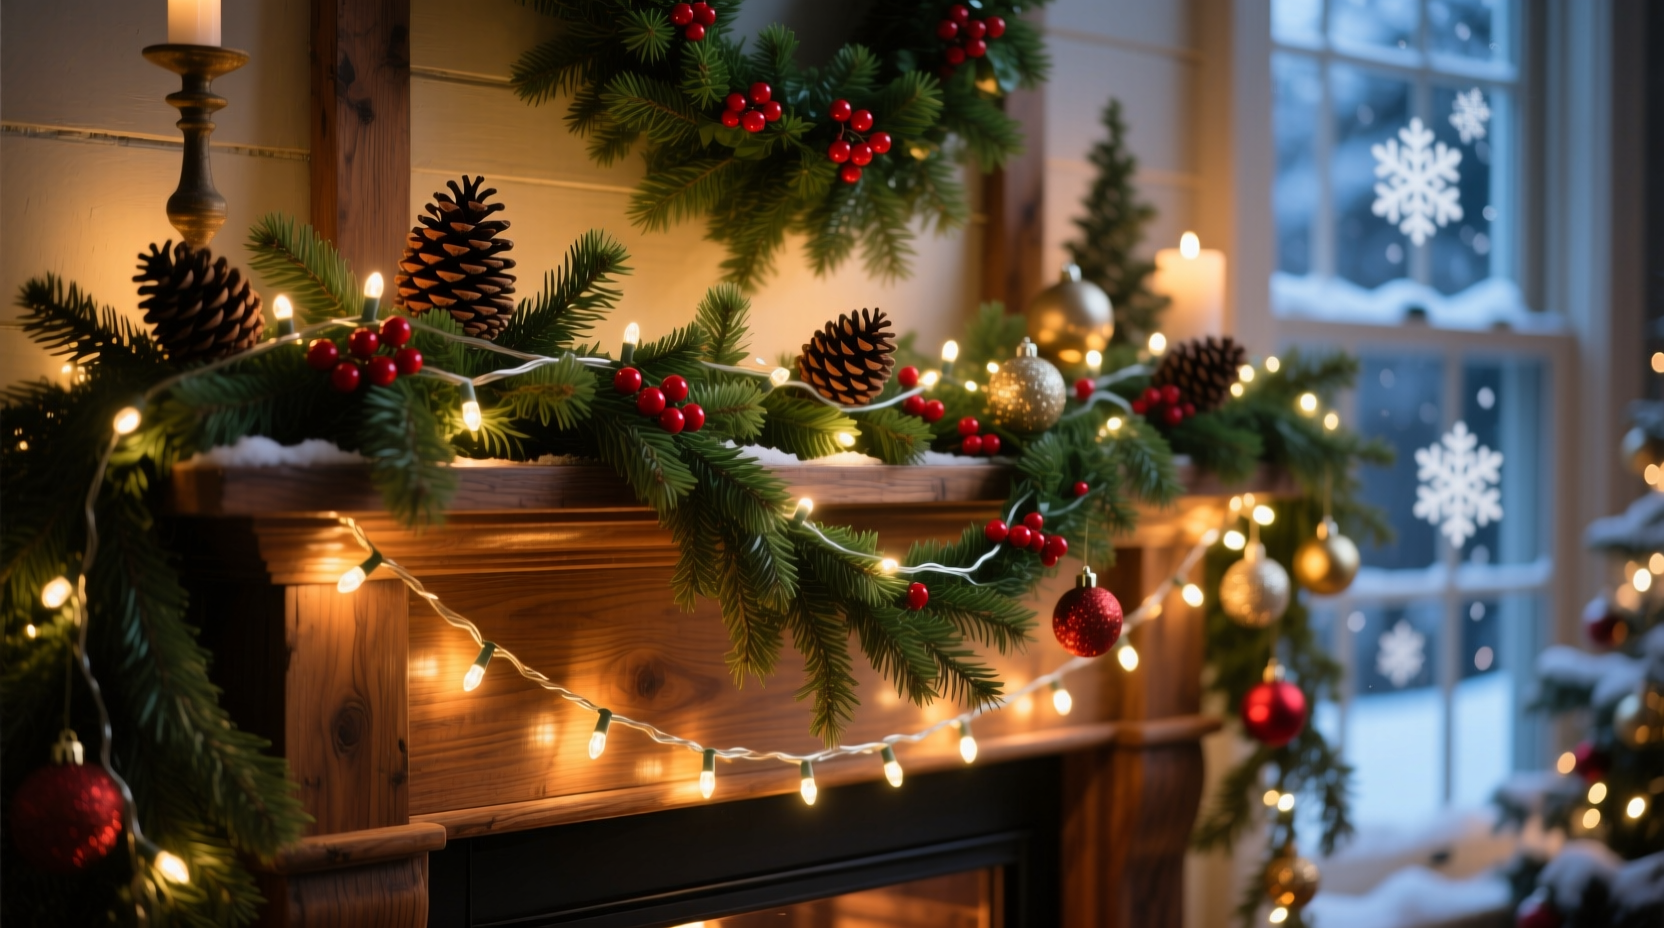
Depth transforms a holiday display from festive to unforgettable. Flat arrangements—lights draped over garland, or garland draped over lights—read as two-dimensional, even when abundant. True depth emerges only when elements occupy distinct spatial planes: foreground, midground, and background—and when light interacts intentionally with texture, scale, and shadow. This isn’t about adding more; it’s about orchestrating layers with intentionality. Professional designers don’t rely on volume—they rely on hierarchy, contrast, and rhythm. Whether you’re dressing a mantel, staircase, dining table, or outdoor porch railing, mastering layered lighting and greenery elevates your decor from seasonal to sculptural.
The Three-Plane Framework: Why Depth Requires Spatial Thinking
Most home decorators instinctively layer vertically—top to bottom—but depth is built horizontally and volumetrically. Think in terms of three overlapping planes:
- Background plane: The structural anchor—walls, mirrors, door frames, or the back of a bookshelf. This plane sets tone and scale but should remain relatively recessed.
- Midground plane: The primary visual field—where garlands rest, wreaths hang, or centerpieces sit. This is where texture and form dominate.
- Foreground plane: The most active, tactile zone—where lights protrude, ornaments dangle, or trailing elements draw the eye forward. This plane creates intimacy and invites closer inspection.
Without deliberate placement across these zones, even premium materials flatten under ambient light. A garland laid flat against a wall occupies only one plane. But lift its center with floral picks, tuck lights behind its base, and let ribbon tails cascade into the foreground—and suddenly, the eye travels through space.
Sequence Matters: The Non-Negotiable Order of Application
Reversing the order is the single most common reason layered displays collapse visually. Lights must be installed first—not last. Here’s why: garlands compress and obscure wiring; once secured, they hide cord paths and create tension points that distort light flow. Installing lights *after* garland forces awkward weaving, visible clips, and uneven spacing.
Follow this exact sequence for every surface:
- Secure mounting hardware (hooks, adhesive strips, or screw-in brackets) at consistent intervals—never eyeball spacing.
- Install lights first, anchoring them to the structure—not the garland—with low-profile clips or twist ties. Keep cords taut but relaxed; avoid sagging between points.
- Add garland second, draping it loosely over the lit framework—not hiding the lights, but interacting with them. Let it settle naturally, then gently lift and separate sections to reveal light beneath.
- Introduce accent elements third: pinecones, dried oranges, velvet ribbons, or miniature ornaments—placed deliberately in the foreground plane to catch light and cast soft shadows.
- Final adjustment: Step back, turn off room lights, and observe. Adjust only where light disappears or clusters unnaturally. Never add more—refine placement.
This sequence respects physics and perception. Light defines space before form fills it. Garlands gain dimension because they are illuminated *from within and behind*, not just from above.
Material Pairing: Matching Light Type to Garland Texture
Not all lights complement all garlands. Mismatched pairings mute contrast and erase depth. The key is leveraging how light reflects, diffuses, or penetrates each material. Below is a practical guide to pairing based on optical behavior—not aesthetics alone.
| Garland Type | Best Light Type | Why It Works | Avoid |
|---|---|---|---|
| Fresh pine or cedar (dense, waxy needles) | Warm white micro LED string lights (2–3 mm bulbs, 6–8” spacing) | Small bulbs nestle between branches without overwhelming; warm tones enhance natural resin glow and cast soft, directional shadows. | Large C7 bulbs or cool-white LEDs—they glare off wax, flatten texture, and create harsh hotspots. |
| Faux eucalyptus or olive (light, airy foliage) | Twinkling fairy lights with random twinkle function | Movement mimics dappled sunlight through leaves; fine wires disappear behind delicate stems, making lights appear suspended in air. | Steady-burn lights or rope lights—they overwhelm subtle veining and eliminate the illusion of depth. |
| Burlap-wrapped or linen-textured garland | Amber filament Edison-style bulbs (E12 base, 2W) | Soft, omnidirectional glow diffuses evenly across matte fabric; filament warmth echoes vintage charm without competing with texture. | Blue-white LEDs or net lights—they create cold reflections that make burlap look synthetic and lifeless. |
| Pinecone-and-ivy mixed garland | Multi-color mini lights (red/green/white, non-twinkling) | Color variation adds chromatic layering—reds recede slightly, whites advance—enhancing perceived volume without visual noise. | Monochrome white-only strings—they flatten tonal variation and mute the organic contrast of wood and leaf. |
Professional decorator Lena Torres, who has styled holiday installations for Soho House and the Four Seasons Downtown, confirms this principle: “I’ve watched clients spend $300 on a ‘luxury’ garland, then ruin it with mismatched lights. Depth isn’t in the price tag—it’s in how light *behaves* on the surface. A $12 string of warm micro-LEDs on fresh cedar outperforms a $50 cool-white icicle set every time—because it honors the material’s truth.”
“Depth isn’t added—it’s revealed. Your job is to remove visual noise so light and texture can speak for themselves.” — Lena Torres, Holiday Design Director, Lumina Collective
Pro Techniques for Physical Dimension: Beyond Draping
Draping alone rarely achieves true depth. These five hands-on methods introduce measurable physical separation between layers—measurable in inches, not millimeters.
- Offset mounting: Install garland mounting hooks 1.5” behind the light string’s anchor points. When draped, the garland sits visibly behind the lights—not over them—creating literal airspace.
- Branch lifting: For fresh garlands, use 4” floral wire stems bent into gentle U-shapes. Insert them vertically beneath dense sections, then lift the garland 2–3” at strategic intervals (e.g., every 18”) to create peaks and valleys. Lights shine *under* the lifted sections, illuminating undersides.
- Backlighting with sheer ribbon: Run narrow ivory or champagne satin ribbon (¼” wide) horizontally behind the garland, attaching it directly to the wall or mantel. Weave lights *over* the ribbon, not under it. The ribbon catches and diffuses backlight, creating a soft halo effect that pushes the garland forward.
- Shadow casting with silhouette ornaments: Hang flat, laser-cut metal ornaments (snowflakes, stars, deer) 4–6” in front of the garland using clear monofilament. Positioned to catch light, they cast crisp, changing shadows onto the garland below—adding kinetic depth as ambient light shifts.
- Fore-ground trailing: Attach 12–18” lengths of faux ivy vine or velvet ribbon to the *bottom front edge* of the garland using discreet hot-glue dabs. Let them fall freely, ending 3–4” short of the surface below. This creates an unbroken visual line from garland to floor—anchoring the composition while emphasizing vertical drop.
Each technique introduces measurable spatial separation—between light source and surface, between garland and wall, between ornament and backdrop. That separation is what the brain interprets as depth.
Real-World Application: A Staircase Transformation
Consider the case of Maya R., a graphic designer in Portland, OR, who struggled for years with her oak staircase railing. She’d used 30 feet of pre-lit garland—bulky, uniform, and visually heavy. “It looked like a green sausage wrapped in white string,” she says. “No matter how many pinecones I added, it felt flat.”
In November, she applied the three-plane framework:
- Background: She painted her stair risers a deep charcoal (Benjamin Moore HC-169) to deepen the recessed plane and absorb ambient light—making foreground elements pop.
- Midground: She removed the pre-lit garland and installed 40 feet of fresh noble fir garland—hand-selected for tight branching—secured with offset hooks.
- Foreground: She strung warm micro-LEDs along the top rail first, then draped the garland *over* the rail, letting it spill 4” down the front face. She lifted the center of each 3-foot section with floral wire, then hung brass snowflake silhouettes 5” in front using monofilament.
The result? A staircase where light pooled in the lifted valleys, glinted off brass edges, and cast elongated shadows down each step. Neighbors stopped mid-climb to photograph it. Crucially, Maya used 25% *less* total garland than before—but achieved greater impact because every element occupied its own plane.
Common Pitfalls & How to Correct Them
Even experienced decorators stumble here. These errors sabotage depth silently:
- Overloading the midground: Piling on too many ornaments, berries, or bows eliminates negative space—the “breathing room” that lets light define shape. Solution: Remove half the accents, then assess. Depth needs voids as much as volume.
- Ignoring cord management: Visible black cords or tangled plugs break the illusion of floating light. Solution: Use cord covers painted to match wall color, or route cords behind baseboards using adhesive clips.
- Uniform spacing everywhere: Equal distances between lights, ornaments, and garland loops create visual monotony—a hallmark of flat design. Solution: Vary spacing intentionally—e.g., 6”, 8”, 12”, 6”, 10”—to mimic organic growth and encourage the eye to wander.
- Forgetting ambient light sources: Overhead fixtures washing out your display flatten contrast. Solution: Dim or turn off ceiling lights during evening viewing. Let your layered lights be the sole source—then depth becomes undeniable.
FAQ
Can I layer lights and garlands on a mirrored surface?
Yes—but with precision. Mirrors amplify depth *only* when reflections are controlled. Mount lights and garland 3–4” away from the mirror surface using spacers (e.g., small wooden blocks or acrylic risers). This prevents direct reflection of cords and creates a subtle “floating” effect. Avoid placing lights *on* the mirror—they’ll reflect as harsh, undefined glare.
How many light strands do I need per foot of garland?
For depth—not brightness—aim for 100–150 bulbs per linear foot. Too few (under 75) leaves gaps that read as emptiness, not dimension. Too many (over 200) overwhelms texture and creates visual static. Micro-LEDs at 150 bulbs/ft deliver optimal density: enough to outline form without obscuring it.
Do battery-operated lights work for layered displays?
Only if they offer consistent, high-CRI (Color Rendering Index >90) warm white output and have a minimum 12-hour runtime on fresh batteries. Many budget battery lights dim significantly after 4–6 hours or emit cool, flat light that bleaches natural garland tones. Test runtime and color accuracy *before* installation.
Conclusion
Layering Christmas lights and garlands for maximum depth is less about decoration and more about spatial storytelling. It asks you to think like a sculptor—to carve space with light, define volume with shadow, and invite the eye to move—not just across a surface, but *through* a composition. You don’t need rare materials or expensive tools. You need observation, sequence, and the willingness to remove rather than add. Start small: rework a single shelf or mantel using the three-plane framework. Install lights first. Choose bulbs that respect your garland’s texture. Lift a section. Cast a shadow. Then step back—in darkness—and watch depth emerge.


 浙公网安备
33010002000092号
浙公网安备
33010002000092号 浙B2-20120091-4
Comments
No comments yet. Why don't you start the discussion?