
Christmas lights transform homes into festive beacons, but achieving that rich, radiant glow without tripping a breaker requires more than just stringing up every set you own. Many homeowners learn the hard way—flickering lights, warm outlets, or even power outages—that enthusiasm can override electrical limits. The key to a dazzling yet safe display lies in strategic layering: combining light types, intensities, and placements while respecting your home’s electrical capacity.
With careful planning, you can create depth, warmth, and brilliance that catches the eye from down the block—all without risking an overload. This guide breaks down how to build a layered lighting design that maximizes visual impact while staying within safe energy use.
Understand Your Circuit Capacity
Before hanging a single bulb, know what your electrical system can handle. Most outdoor circuits in modern homes are 15-amp or 20-amp, operating at 120 volts. A simple formula determines each circuit’s wattage limit:
“Wattage = Volts × Amps”
A 15-amp circuit supports up to 1,800 watts (120V × 15A), while a 20-amp handles 2,400 watts. However, electricians recommend using only 80% of that capacity to prevent overheating. That means:
- 15-amp circuit: Max 1,440 watts continuous load
- 20-amp circuit: Max 1,920 watts continuous load
LED lights typically draw 0.5 to 10 watts per string, depending on length and density. Incandescent sets can use 40 to 100 watts each. Always check the label on your light strings for exact wattage. Multiply that by the number of sets you plan to connect to ensure you stay under the 80% threshold.
Choose the Right Light Types for Layering
Layering isn’t just about quantity—it’s about combining different kinds of lights to create dimension. Think of it like painting with light: base layers, mid-tones, and highlights.
Here’s how to select and combine types effectively:
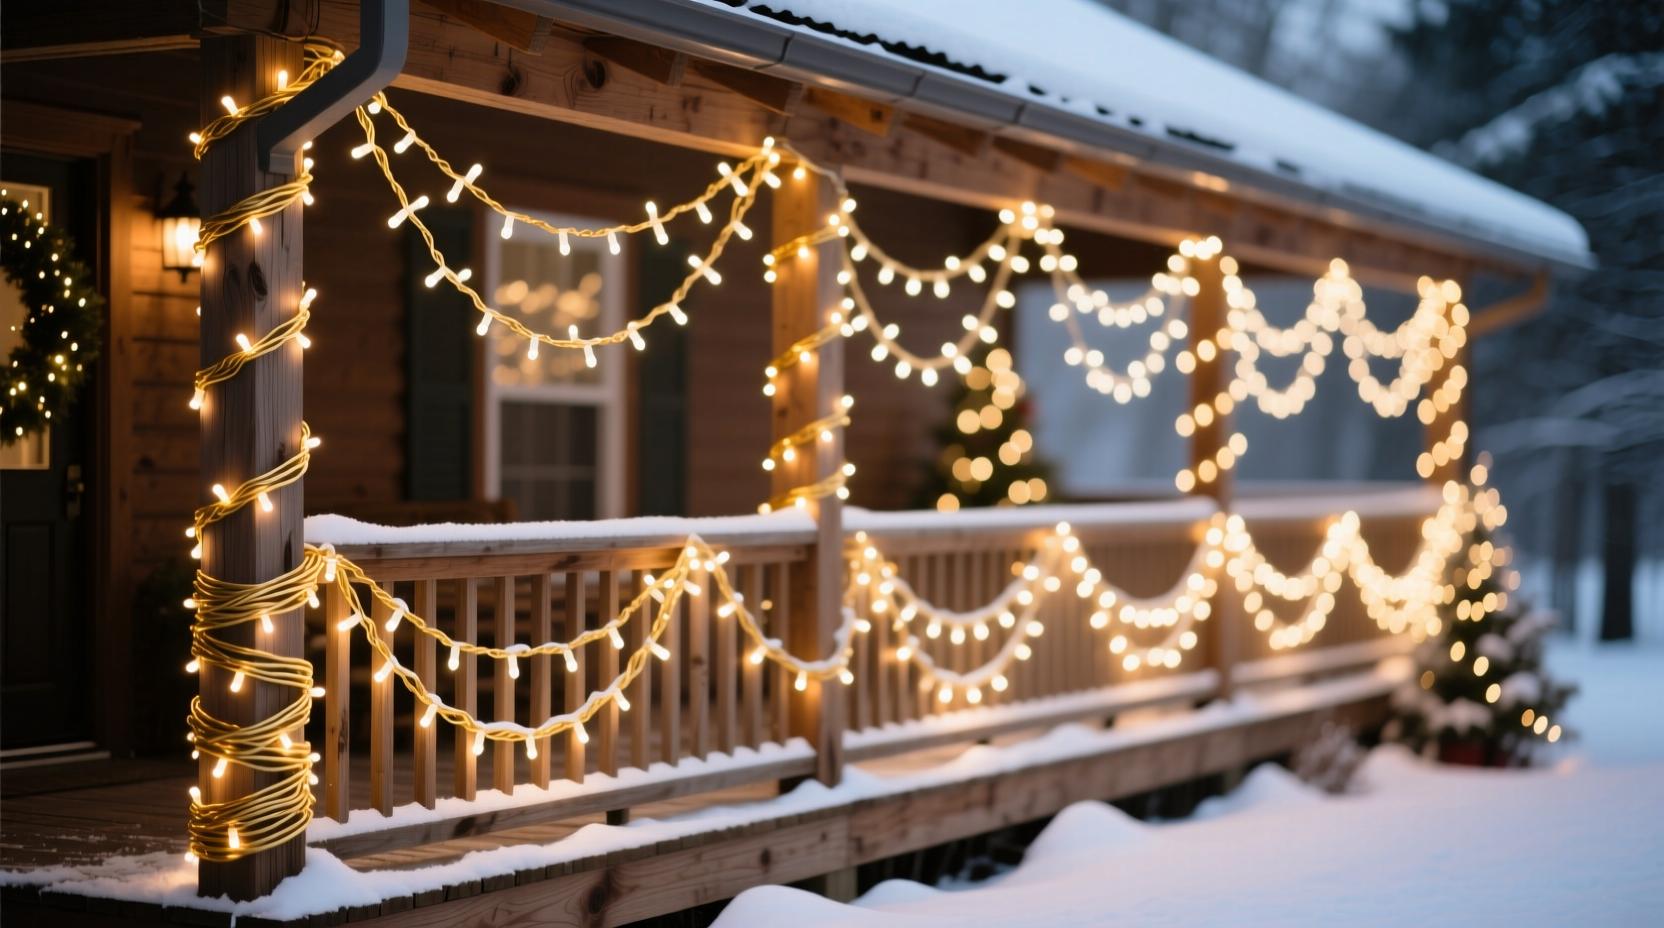
- String Lights (Warm White LED): Ideal as a base layer. Use along rooflines, eaves, and railings for consistent coverage.
- Bulb Spacing Matters: Tightly spaced bulbs (e.g., 2”–4”) give a denser, brighter line; wider spacing (6”–12”) works better for subtle accents.
- C7 and C9 Bulbs: Larger bulbs with higher visibility. Use these as focal points—on trees, columns, or wrapped around posts.
- Net Lights and Curtain Lights: Perfect for covering bushes, hedges, or porches. They add volume without complex installation.
- Spotlights and Uplights: Don’t overlook directional lighting. Aim them at trees or architectural features to enhance depth.
“Mixing bulb sizes and temperatures creates visual interest. Warm white for coziness, cool white for crispness, and a touch of color for accent.” — Daniel Reyes, Holiday Lighting Designer, BrightScapes Inc.
Step-by-Step Guide to Layering Lights Safely
Follow this sequence to build a professional-quality display without exceeding electrical limits.
- Map Your Outlets and Circuits
Identify which outdoor outlets are on the same circuit. Use a circuit tester or turn off breakers one by one to trace connections. Avoid daisy-chaining across multiple circuits without proper extension cords and surge protection. - Plan Zones by Power Source
Divide your home’s exterior into zones based on available outlets. For example:- Front porch (circuit A)
- Sidewalk shrubs (circuit B)
- Garage peak and driveway tree (circuit A)
- Select a Base Layer
Install warm white LED strings along rooflines, gutters, and stair railings. These form the foundation. Use clips instead of nails to avoid damage. - Add Mid-Layer Texture
Place net lights over bushes or install C7/C9 strands vertically on pillars. Wrap tree trunks with wide-spaced LEDs. This adds body and prevents flatness. - Apply Accent Highlights
Use colored bulbs sparingly—on wreaths, mailbox, or window frames. Install spotlights beneath large trees to cast upward glow through branches. - Test Each Circuit Before Finalizing
Plug in all lights in one zone and monitor for dimming, flickering, or warm outlets. If issues occur, redistribute loads or use additional circuits. - Secure Connections and Use Timers
Waterproof outlet covers and GFCI-protected extensions are non-negotiable. Set timers to run displays from dusk to midnight, reducing wear and energy use.
Do’s and Don’ts: Wiring and Safety Checklist
To avoid overloads and hazards, follow this essential checklist:
| Do’s | Don’ts |
|---|---|
| Use LED lights—they use up to 90% less power than incandescents. | Never exceed the manufacturer’s “max connect” limit on light strings. |
| Group lights by circuit and test total draw before final installation. | Don’t plug high-wattage items (like inflatables) into the same outlet as multiple light strings. |
| Use heavy-duty, outdoor-rated extension cords (16-gauge or thicker). | Don’t run cords under rugs, snow, or where they can be damaged. |
| Label outlets and circuits for quick troubleshooting. | Don’t use indoor lights outdoors—even if they seem weather-resistant. |
| Install smart plugs to remotely control sections and monitor usage. | Don’t ignore buzzing sounds, hot plugs, or discolored outlets—these signal danger. |
Real Example: A Balanced Front Yard Display
Consider the Johnson family’s two-story colonial. They wanted a bright, inviting look without blowing their garage outlet circuit.
Their plan:
- Ran two separate circuits: front porch (GFCI-protected) and side yard (dedicated outdoor).
- Used 8 strands of 100-count warm white LEDs (each 4.8 watts) along rooflines and windows—total: 38.4 watts.
- Added 3 C9 strings (each 10 bulbs, 7 watts) on columns: 21 watts.
- Covered two large boxwood shrubs with 4 net light panels (each 6 watts): 24 watts.
- Installed 2 LED spotlights (each 12 watts) at tree bases: 24 watts.
Total load on the porch circuit: 107.4 watts—well under the 1,440-watt safe limit. They used the second circuit for inflatable decorations and pathway stakes.
The result? A rich, multi-dimensional glow that neighbors praised—and no tripped breakers all season.
Maximize Glow with Smart Placement Techniques
More lights don’t always mean more visibility. Strategic placement amplifies perceived brightness.
- Double-String Rooflines: Run two parallel strands close together. This creates a bolder, more luminous edge than a single line.
- Wrap Trees from Base to Top: Spiral lights upward with even spacing. Use a mix of vertical runs and spiral wraps for fuller coverage.
- Highlight Architectural Details: Frame doors, windows, and columns. These focal points draw the eye and anchor the design.
- Use Reflective Surfaces: Position lights near light-colored walls or stone. They bounce and amplify illumination naturally.
- Create Depth with Foreground Lighting: Place lit wreaths or potted trees near the sidewalk. They add layers between street and house.
One underrated trick: stagger warm and cool white tones. For instance, warm white on the roof and cool white on lower shrubs. This mimics natural light gradients and increases visual contrast.
Frequently Asked Questions
Can I connect more than three light strings together?
Only if the manufacturer specifies a higher “max connect” number. Most traditional incandescent strings allow three; many LED sets permit 40 or more due to lower wattage. Always check packaging labels and never assume compatibility.
Why do my lights dim when I turn on another section?
This usually indicates circuit overload or voltage drop from undersized extension cords. Try shortening cord runs, upgrading to 14-gauge wire, or redistributing lights across circuits. Dimming can also stem from poor connections—inspect plugs and sockets for corrosion or looseness.
Are smart lights safe for outdoor layering?
Yes, if they’re rated for outdoor use and connected through GFCI outlets. Smart LEDs offer precise control over brightness and timing, helping you fine-tune glow levels and reduce energy use. Just ensure hubs and controllers are protected from moisture.
Final Tips for a Brilliant, Safe Display
Layering Christmas lights is both an art and a science. The most memorable displays aren’t the ones with the most bulbs, but those that balance brightness, texture, and safety. By understanding your home’s electrical limits, choosing the right products, and placing lights intentionally, you can achieve a professional-grade glow that lasts all season.
Start small. Test one zone at a time. Measure actual power draw. And remember: consistency beats clutter. A few well-placed, layered strands will outshine a tangled mess of overloaded strings.


 浙公网安备
33010002000092号
浙公网安备
33010002000092号 浙B2-20120091-4
Comments
No comments yet. Why don't you start the discussion?