
Most people hang Christmas lights once—then step back, squint, and wonder why their tree looks flat, dim in the center, or blindingly bright at the tips. The difference between an ordinary lit tree and one that glows with dimensional warmth isn’t more bulbs—it’s intentional layering. Like a painter building up glazes or a sound engineer balancing frequencies, lighting a tree well requires strategic placement across three spatial zones: interior structure, mid-canopy volume, and outer silhouette. This approach transforms your tree from a decorative afterthought into a luminous centerpiece—one that draws the eye inward, invites closer inspection, and holds its magic even in daylight.
The Three-Zone Layering Principle
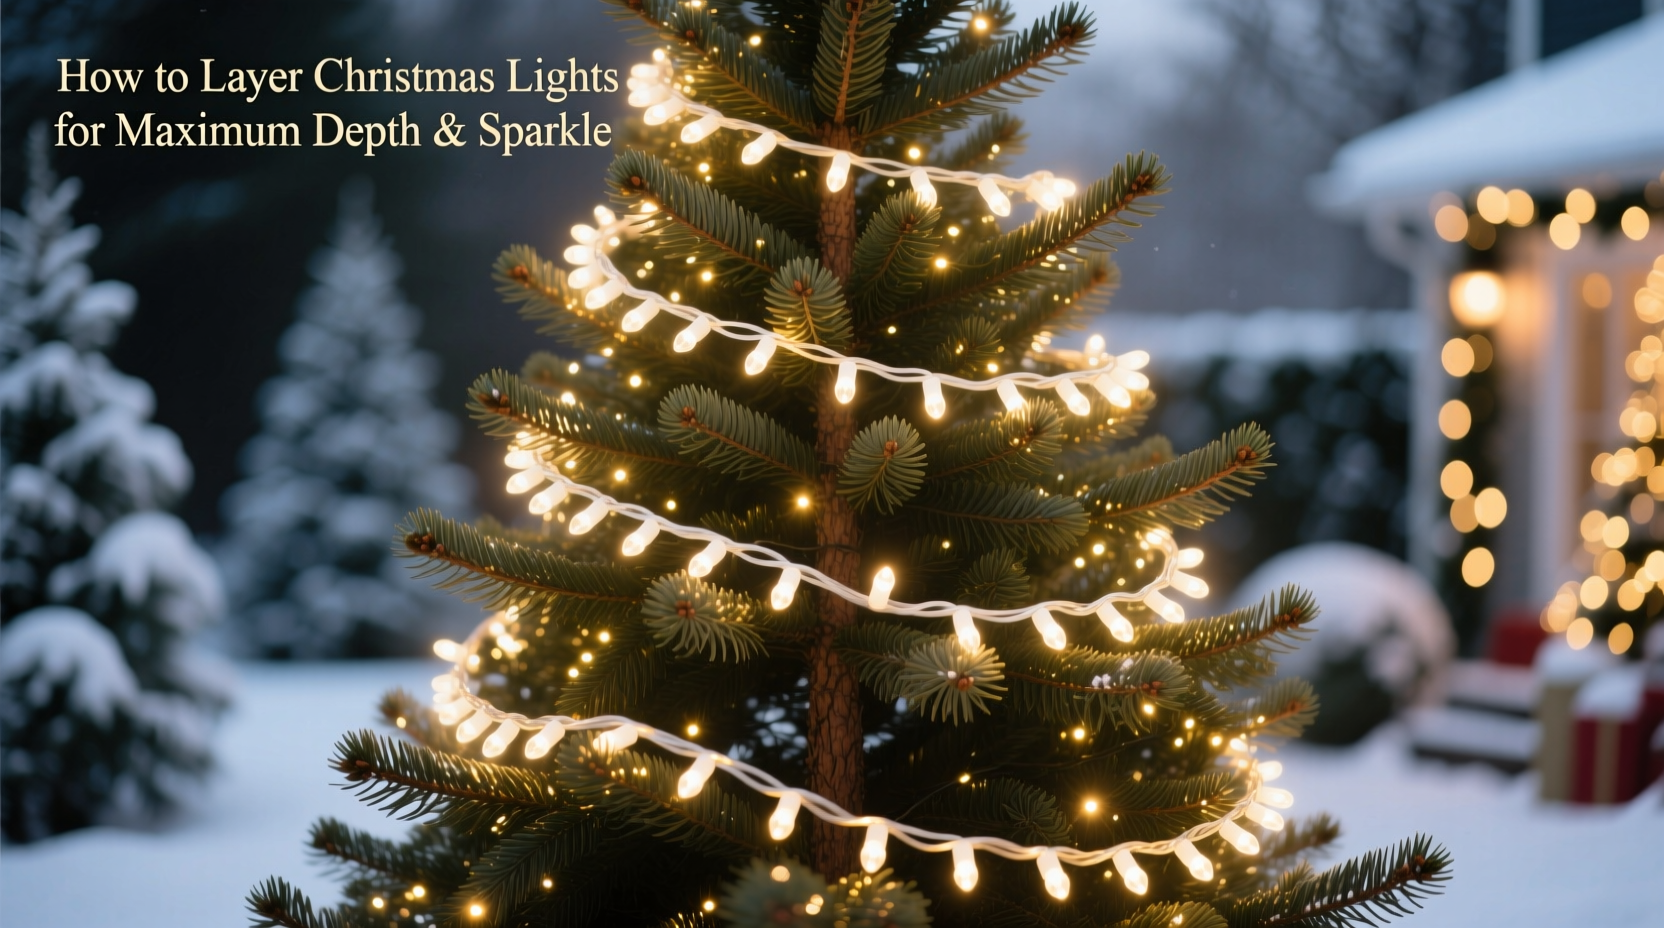
Professional holiday designers don’t think in “strings” or “bulbs.” They think in layers—each serving a distinct optical function:
- Zone 1 (Interior Framework): Thin, warm-white micro-lights wound tightly around primary branches and the central trunk. These act as ambient backlighting—illuminating the tree’s architecture without competing for attention.
- Zone 2 (Mid-Canopy Volume): Medium-density LED strings (5–7mm bulbs) placed in deliberate spirals, moving outward and upward from the trunk. This creates mass, rhythm, and the illusion of density—what makes a tree feel full rather than sparse.
- Zone 3 (Outer Silhouette): Larger, cooler-toned or specialty bulbs (like vintage-style filaments or frosted LEDs) placed *only* on the very tips of branches. These catch reflections, define shape, and create “sparkle points”—the tiny highlights that dance when you move past the tree.
This is not decoration by accumulation. It’s illumination by intention. Skipping Zone 1 leaves the interior dark and hollow; overloading Zone 3 drowns out subtlety with glare; neglecting Zone 2 results in a two-dimensional outline—like a cartoon cutout rather than a living, breathing presence in your room.
A Step-by-Step Layering Timeline
Follow this sequence—not chronologically, but hierarchically. Each step builds on the last. Deviate, and you’ll fight physics and perception.
- Prep & Assess (15 minutes): Fluff all branches outward from trunk to tip. Identify major structural limbs—the “skeleton” that supports everything. Measure height and widest girth. Note where natural shadows fall (e.g., behind large ornaments or dense lower branches).
- Install Zone 1: Interior Framework (25–35 minutes): Use 200–300 warm-white micro-lights (2.5–3.5mm bulbs, 12V low-voltage preferred). Starting at the base of the trunk, wind tightly—3–4 wraps per foot—upward along main limbs. Then, weave gently into the inner third of each branch, avoiding the tips. Keep wires hidden beneath foliage. Goal: soft, even glow—not visible wires or bulbs.
- Install Zone 2: Mid-Canopy Volume (40–55 minutes): Use 3–5 medium-density strings (e.g., 100–150 bulbs each, 5mm warm-white or soft-neutral LEDs). Begin at the lowest strong branch and spiral upward in a consistent 6–8 inch pitch—like a DNA helix. Alternate direction every other string (clockwise, then counterclockwise) to prevent wire twisting and ensure even distribution. Tuck bulbs deep enough to be seen—but not so deep they vanish.
- Install Zone 3: Outer Silhouette (20–30 minutes): Use 1–2 premium strings (e.g., 70–100 larger bulbs, 8–10mm, with higher CRI >90 and slight color variation). Place *only* on the outermost 1–2 inches of branch tips—never on side-facing surfaces. Space evenly: one bulb per 4–6 inches of tip length. Prioritize front-facing and upper-third branches for maximum visual impact.
- Final Audit & Refinement (15 minutes): Stand 6 feet back in dim light. Look for dark voids (add 2–3 Zone 1 bulbs), clustered glare (reposition Zone 3), or rhythmic gaps (adjust Zone 2 spacing). Unplug and recheck connections. Let the tree rest for 2 hours before final ornamenting—lighting should feel settled, not frantic.
Do’s and Don’ts: Lighting Layering Edition
| Action | Do | Don’t |
|---|---|---|
| Bulb Temperature | Use 2200K–2700K for Zones 1 & 2; 2700K–3000K for Zone 3 (creates subtle warmth-to-crisp gradient) | Mix 2200K and 5000K bulbs on same tree—they’ll clash like mismatched instruments |
| String Density | Zone 1: 100 bulbs per 3 ft of trunk/branch length; Zone 2: 1 string per 18–24 inches of vertical height; Zone 3: 1 bulb per 4–6 inches of tip exposure | Assume “more strings = better”—overcrowding flattens dimension and overheats wiring |
| Placement Logic | Zone 1 bulbs face inward toward trunk; Zone 2 bulbs face outward at 45°; Zone 3 bulbs face straight forward | Hang all strings parallel to floor—this creates horizontal stripes, not depth |
| Power Management | Use UL-listed extension cords rated for indoor use; never exceed 80% of outlet’s wattage capacity | Daisy-chain more than 3 standard LED strings—voltage drop dims inner bulbs and strains transformers |
| Wire Handling | Loosely coil excess wire at base inside trunk; secure with twist-ties (not tape) | Wrap wires tightly around branches—they’ll cut into bark and create tension points |
Real Example: The “Flat Fir” Transformation
When interior designer Lena R. took on a client’s 7.5-foot Fraser fir—pre-lit with a single tangled string of cool-white net lights—the tree looked like a fluorescent shrub: bright at the surface, black at the core, and visually exhausting after 90 seconds. She removed all existing lights, fluffed every branch, and applied the three-zone method over 2.5 hours. She used 250 micro-lights for Zone 1 (wound only on primary limbs and inner third of branches), four 150-bulb warm-white spirals for Zone 2 (alternating directions), and one 80-bulb vintage filament string for Zone 3—placed exclusively on front-facing tips of upper and middle tiers. The result? A tree that glowed with layered warmth—soft amber at the heart, gentle gold in the body, and delicate champagne sparkle at the edges. Guests consistently remarked, “It feels like it’s *breathing* light.” Not brighter—deeper. Not flashier—more alive.
“Depth in lighting isn’t about intensity—it’s about contrast control. A well-layered tree has no ‘darkest dark’ or ‘brightest bright.’ It has 17 shades of warm, each supporting the next.” — Marcus Bellweather, Lighting Director, The Holiday Collective (12+ years designing retail and residential seasonal displays)
Expert Checklist: Before You Plug In
Run through this *before* turning on the first string. Missing one item compromises the entire effect.
- ✅ All bulbs tested and functional (use a bulb tester or multimeter if unsure)
- ✅ Tree fully fluffed—no compressed or downward-facing branches
- ✅ Outlet circuit load calculated (total watts ≤ 1,440W for a standard 15A circuit)
- ✅ Zone 1 bulbs installed *first*, fully concealed, with no visible wire runs
- ✅ Zone 2 strings spiraled with consistent pitch—no “ladder rungs” or horizontal bands
- ✅ Zone 3 bulbs placed *only* on exposed tips—not sides, not undersides, not clustered
- ✅ All connections secured with insulated wire nuts—not just plug-in couplers
- ✅ Timer or smart plug programmed for gradual fade-in (not instant on/off)
FAQ
How many total lights do I need for a 7-foot tree?
Forget outdated “100 lights per foot” rules. For true layering: Zone 1 requires 200–300 micro-lights; Zone 2 needs 300–500 medium bulbs (3–5 strings); Zone 3 uses 70–100 premium bulbs. Total: 570–900 bulbs—distributed intentionally, not randomly. A 7-foot tree lit with 700 thoughtfully layered bulbs will outperform one with 1,200 haphazardly draped.
Can I layer lights on an artificial tree with built-in lights?
Yes—but only if the built-ins are low-voltage, warm-white, and concentrated in the interior (i.e., acting as Zone 1). Test them first: if they’re cool-white, overly bright, or only on outer branches, disable them. Built-in lights rarely support Zone 2 or 3 logic. Treat them as a starting point—not a foundation.
Why does my tree look dimmer after adding more lights?
Voltage drop. When too many strings draw from one outlet or daisy-chain beyond manufacturer specs, voltage decreases along the line—especially in longer runs. Inner bulbs receive less power, appear duller, and generate less heat (which affects LED efficiency). Solution: Use multiple outlets on separate circuits, or invest in a dedicated 15A outlet strip with individual circuit breakers per port.
Conclusion
Layering Christmas lights isn’t about perfection—it’s about presence. It’s the quiet confidence of knowing your tree doesn’t just sit in the corner; it occupies space with intention, radiates warmth without glare, and rewards slow looking instead of demanding attention. That depth you feel—the sense of stillness, of invitation, of quiet celebration—isn’t magic. It’s physics, psychology, and craft aligned: warm light receding, neutral light holding space, cool light catching the eye. You don’t need expensive gear or decades of experience. You need one afternoon, three zones, and the willingness to treat light as material—not just decoration. Your tree deserves more than illumination. It deserves dimension. So start small: unplug one string, fluff one branch, wind ten micro-lights inward. Watch how the shadow changes. Notice where the light pools. That’s where the depth begins.


 浙公网安备
33010002000092号
浙公网安备
33010002000092号 浙B2-20120091-4
Comments
No comments yet. Why don't you start the discussion?