
There’s a subtle art to creating a Christmas tree that doesn’t just sparkle—but glows with depth, dimension, and magic. One of the most effective yet underrated techniques is layering Christmas lights beneath tinsel. When done correctly, this method produces a luminous, three-dimensional effect where light catches every metallic strand from within, making the tree appear as though it's radiating from its core. It’s not just about adding more decorations; it’s about orchestrating them in a way that amplifies their impact.
This approach elevates both vintage charm and modern elegance, whether you're using classic silver tinsel or iridescent holographic garlands. The result? A tree that shimmers like freshly fallen snow lit by moonlight—dynamic, luxurious, and unforgettable.
Why Light Placement Matters in Tree Design
The visual weight of a Christmas tree comes from how light interacts with its layers. Most people string lights after placing ornaments and garlands, which often results in flat illumination. The bulbs become visible only on the surface, and shadows form behind bulky decorations. By contrast, embedding lights early—specifically underneath reflective materials like tinsel—creates internal illumination. This technique mimics natural luminescence, similar to how light filters through frost-covered branches.
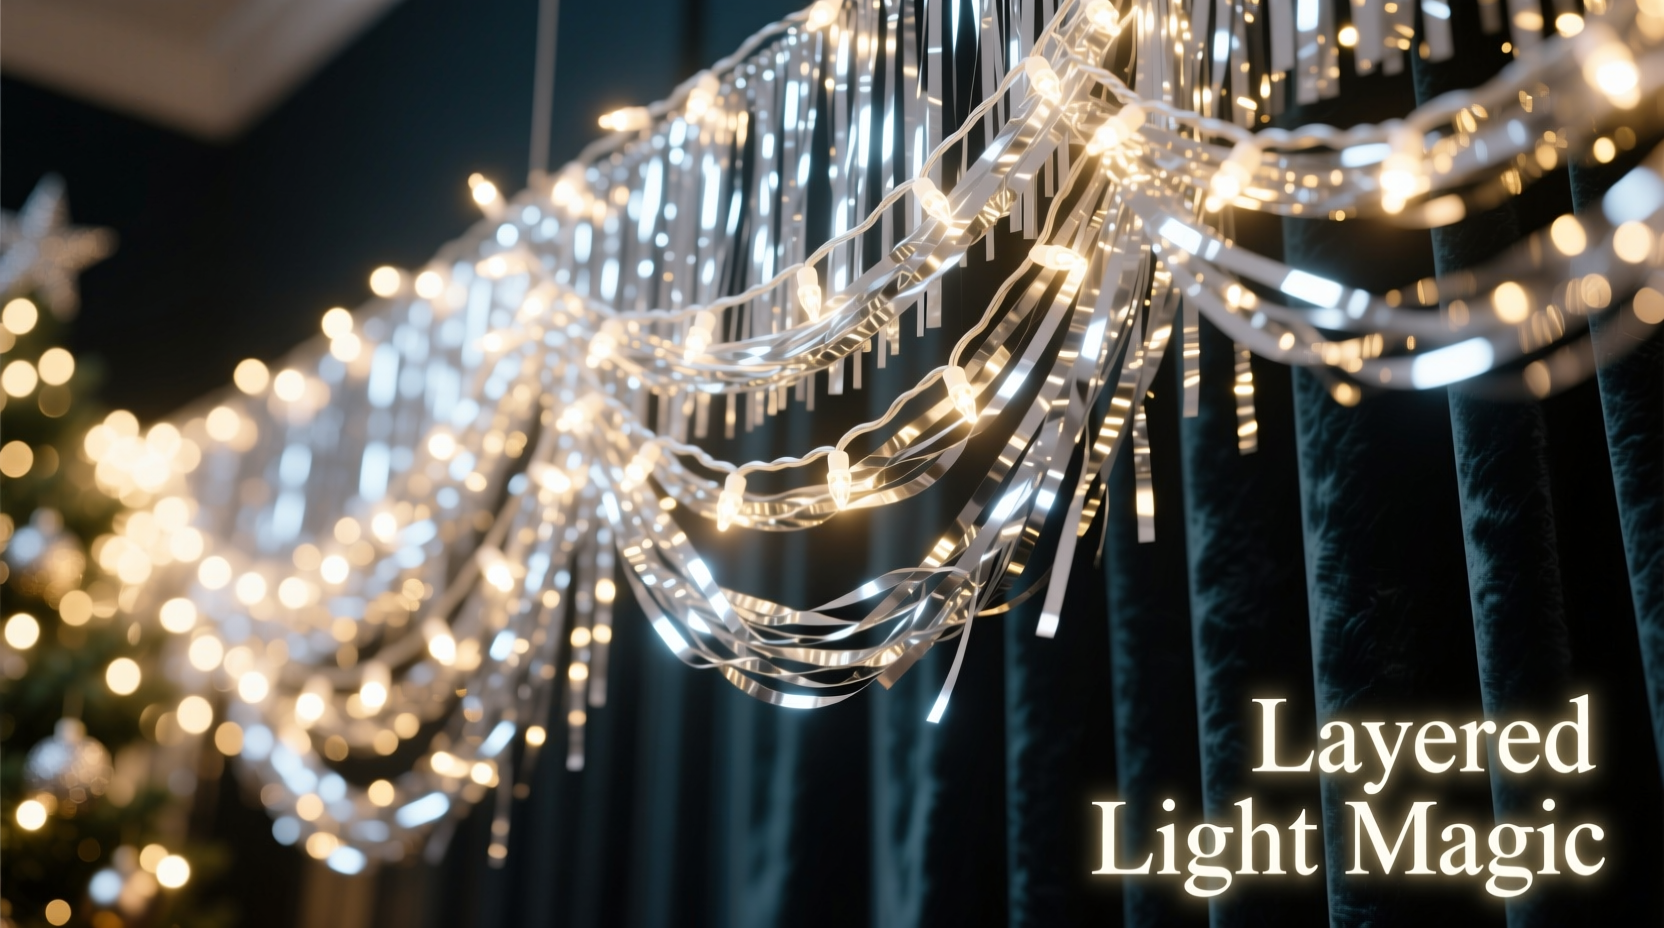
Tinsel, particularly when made from metallic-coated film or Mylar, acts as a reflector. When placed over a lit base, each strand captures and redirects light outward, multiplying the glow. Unlike matte ornaments or fabric ribbons, tinsel doesn’t absorb light—it bounces it around the room. This interplay between hidden light sources and reflective surfaces is what gives rise to the coveted 3D shimmer.
Step-by-Step Guide: Layering Lights Beneath Tinsel
Success lies in sequence. Follow these steps carefully to ensure optimal coverage, safety, and aesthetic harmony.
- Start with a well-fluffed tree. Whether artificial or freshly dressed real fir, fluff branches outward to create volume. This provides space for both lights and tinsel to settle naturally without clumping.
- Test your lights before installation. Plug in each strand to confirm all bulbs work. Replace any faulty sets immediately. For best results, use mini LED lights with a high bulb count (at least 100 per 5-foot tree).
- Begin at the trunk and work outward. Start threading lights near the central pole, wrapping them around the inner core of branches. Move systematically up and down, ensuring even distribution across all levels and angles. Aim for 100 lights per vertical foot of tree height.
- Weave deeply into the canopy. Don’t just drape lights over the surface. Push strands inward toward the trunk so they nestle between branch clusters. This creates a foundational glow rather than a superficial outline.
- Secure connections discreetly. Use twist ties or floral pins to fasten plug ends and connectors close to the pole, keeping cords hidden and reducing tripping hazards.
- Add tinsel last—after lights are fully installed. Begin draping tinsel strands evenly across the tree, starting from the top third and working downward. Gently separate clusters so they fall naturally over lit areas.
- Adjust for balance. Step back frequently to assess symmetry. Rotate the tree if needed and add more tinsel to sparse zones while avoiding overloading one side.
This order ensures that light becomes an integral part of the tree’s structure—not an afterthought.
Choosing the Right Materials for Maximum Impact
Not all tinsel and lights produce the same effect. Selecting compatible materials enhances the 3D illusion.
| Component | Recommended Type | Avoid |
|---|---|---|
| Lights | Warm white or cool white LEDs with tight spacing (2–3 inches apart) | Flickering incandescent bulbs or wide-spaced strands |
| Tinsel | Metallic film strips (Mylar), 6–12 inches long, pre-cut or hand-teared | Plastic beads, thick ropes, or vinyl-coated chains |
| Tree Color | Silver, frosted white, or dark green (high contrast helps reflection) | Bright red or patterned trees that compete visually |
| Ornaments | Clear glass, mirrored balls, or frosted crystals | Large opaque ornaments that block light transmission |
Hand-torn tinsel edges scatter light more organically than machine-cut uniform pieces. Similarly, mixing lengths (some 6-inch, some 10-inch) adds texture and prevents a monotonous cascade.
Real Example: Transforming a Dull Tree into a Showstopper
Consider Sarah, a homeowner in Portland who inherited her mother’s artificial tree—a full-bodied, 7-foot silver flocked model stored in the attic for years. Each season, she followed the standard routine: lights first, then tinsel, then ornaments. But no matter how many bulbs she added, the tree looked flat and dated.
Last November, she tried reversing the process. After re-fluffing the tree and repairing bent branches, she spent two hours meticulously weaving 700 warm white LED lights deep into the interior framework. She unplugged them temporarily, then began applying hundreds of hand-cut silver tinsel strands—each gently draped from upper limbs downward.
When she finally turned the lights back on, the transformation stunned her family. “It was like the tree had come alive,” she said. “The whole room filled with soft sparkle. You couldn’t see the bulbs, but you felt their presence everywhere.” Neighbors later commented that her front window display looked professionally decorated.
The key difference wasn’t more lights or costlier tinsel—it was the strategic layering.
Expert Insight: What Designers Know About Light Layering
“Most people decorate in layers but forget that light should be the foundation, not the frosting. Placing reflective materials like tinsel over embedded lighting creates depth you simply can’t achieve otherwise.” — Marcus Langley, Professional Holiday Stylist & Former Window Display Designer for Saks Fifth Avenue
Langley emphasizes that theatrical lighting principles apply directly to holiday decor. “In stage design, we call it ‘backlighting.’ You don’t spotlight the actor from the front—you place lights behind and below to create silhouette and glow. The same logic works for trees.”
“Tinsel isn't outdated—it was just used wrong for decades. Once people started covering lights with tinsel instead of letting light shine through it, the magic disappeared.” — Clara Nguyen, Restoration Decor Historian
Checklist: Preparing Your Tree for the 3D Shimmer Effect
- ☐ Choose a tree with ample branch density and good color contrast
- ☐ Test all light strands and replace damaged ones
- ☐ Calculate light needs: ~100 bulbs per foot of tree height
- ☐ Fluff the tree thoroughly, focusing on outer and inner layers
- ☐ Install lights first, weaving them deep into the core and mid-layers
- ☐ Secure wire connections neatly against the trunk
- ☐ Prepare tinsel: pre-cut or hand-tear into varied lengths (6–12 inches)
- ☐ Drape tinsel evenly from top to bottom, allowing strands to overlap lit areas
- ☐ Step back and adjust for balanced coverage and glow
- ☐ Add final ornaments that complement—not obstruct—the layered effect
Common Mistakes That Diminish the Effect
Even with the right materials, poor execution can ruin the illusion. Avoid these pitfalls:
- Adding tinsel before lights: This forces you to move or remove tinsel later, damaging its shape and risking broken strands.
- Using too much tinsel: Over-application leads to clumping and blocks light escape, resulting in dull patches.
- Draping lights only on the surface: Surface-level strings make bulbs visible and create hotspots instead of ambient glow.
- Mixing incompatible colors: Gold tinsel over cool white lights creates a jarring contrast. Stick to harmonious pairings.
- Ignoring power load limits: Connecting too many light strands can trip circuits or cause overheating. Use a maximum of 3–4 sets per outlet unless rated higher.
Frequently Asked Questions
Can I use this technique on a real Christmas tree?
Yes, but take extra care. Real trees shed needles and dry out, increasing fire risk. Use only UL-listed LED lights (they run cooler), check moisture daily, and avoid placing tinsel too close to heat sources. Remove tinsel promptly after the holidays to prevent sap buildup.
Is tinsel safe with pets and children?
Traditional metallic tinsel poses a choking and intestinal blockage hazard if ingested. For homes with curious pets or toddlers, consider safer alternatives like fiber-optic garlands, glitter-coated raffia, or biodegradable mylar ribbons labeled non-toxic. Alternatively, hang tinsel high and out of reach, removing it during unsupervised times.
How do I store tinsel and lights for reuse next year?
Wrap lights around a cardboard spool or use a dedicated light keeper reel to prevent tangling. Store tinsel in a breathable cotton bag—never plastic, which encourages static and brittleness. Keep both in a climate-controlled space away from rodents. Label boxes clearly by type and color.
Conclusion: Bring Depth and Wonder to Your Holiday Display
The difference between an ordinary Christmas tree and one that captivates lies in intentionality. Layering lights beneath tinsel isn’t merely decorative—it’s architectural. It builds luminosity from within, transforming static branches into a living sculpture of light and reflection. With careful planning, the right materials, and attention to sequence, anyone can achieve this professional-grade effect at home.
This holiday season, rethink your usual routine. Let light lead the way. Nestle it deep within the tree’s structure, then veil it with shimmering tinsel to unlock a radiant, multidimensional glow. Your tree won’t just be seen—it will be remembered.


 浙公网安备
33010002000092号
浙公网安备
33010002000092号 浙B2-20120091-4
Comments
No comments yet. Why don't you start the discussion?