
Layering Christmas lights beneath tinsel garland is a classic technique for achieving that luminous, ethereal glow—like captured starlight draped across your mantel or tree. Yet many decorators unintentionally cross the line from “magical” to “overwhelming”: lights drown in shimmer, wires snag and sag, bulbs overheat under reflective layers, or the whole arrangement collapses under its own weight. The problem isn’t ambition—it’s execution. Done well, this layering creates depth, dimension, and warmth. Done poorly, it looks chaotic, unsafe, or cheaply overwrought. This guide distills years of professional holiday styling experience—not just theory, but tested practices used by interior stylists, retail display teams, and certified lighting technicians—to help you achieve balance: where light breathes *through* tinsel, not fights it.
Why “Under” Matters More Than You Think
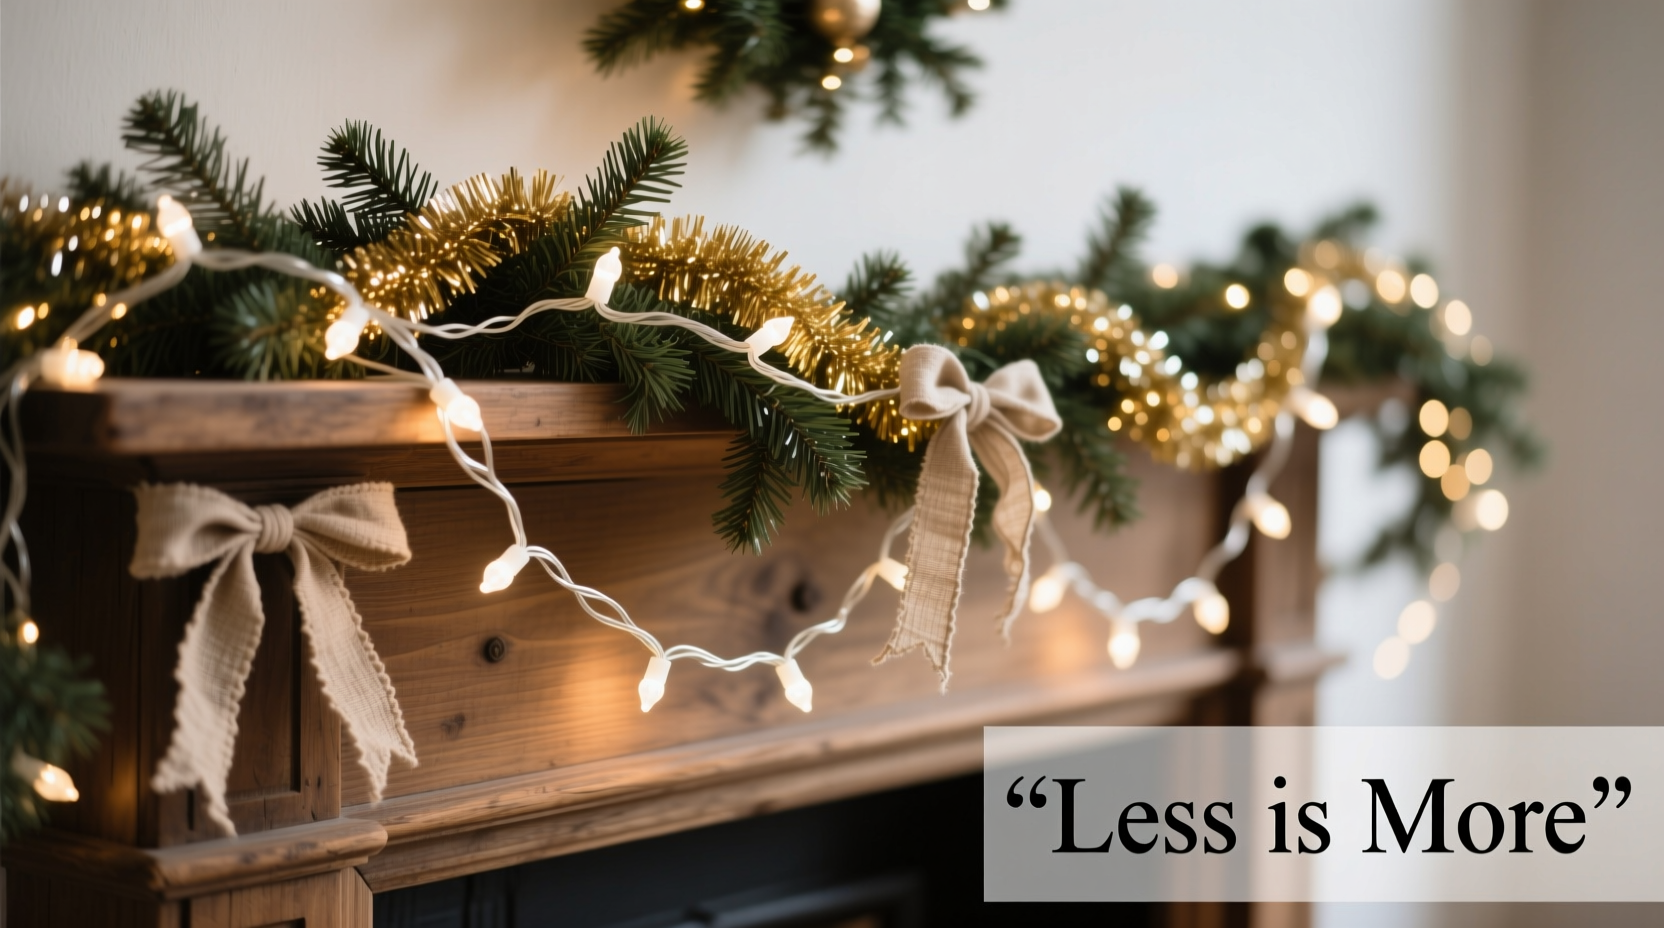
Placing lights *under* tinsel (rather than wrapping them around or weaving them through) leverages physics and perception. Tinsel acts as a diffuser: its thin, reflective Mylar strips scatter light sideways and upward, softening harsh points and filling gaps with ambient radiance. When lights sit beneath, their beams travel upward, strike the underside of each tinsel strand, and bounce outward—creating volume and halo-like highlights. In contrast, lights wrapped *within* tinsel create hot spots, increase tangling, trap heat near delicate plastic filaments, and often result in uneven coverage because tinsel shifts and slides during installation.
This method also supports longevity. Tinsel degrades faster when exposed directly to LED heat or UV emissions—especially cheaper varieties with thinner metallization. Keeping lights physically separated (even by ½ inch) significantly slows oxidation and dulling. As lighting engineer and holiday safety consultant Rafael Mendoza notes:
“Tinsel isn’t decorative insulation—it’s a thermal reflector. Trapping LEDs underneath without airflow invites localized heating above 65°C, which accelerates Mylar embrittlement and increases fire risk in older or non-UL-listed strands. A clean air gap isn’t optional; it’s the first line of thermal management.” — Rafael Mendoza, Certified Lighting Safety Specialist, National Holiday Safety Institute
The 5-Step Layering Sequence (Tested & Timed)
Follow this precise sequence—not as rigid rules, but as a rhythm calibrated to real-world conditions (e.g., ladder stability, cord reach, tinsel static cling). Each step builds on the last, preventing backtracking or rework.
- Anchor & Test First: Secure your garland base (mantel, banister, or tree branch) using low-tack painter’s tape or removable adhesive hooks—not staples or nails. Then, plug in and test lights *before* adding tinsel. Verify every bulb, check for flickering or dim sections, and confirm cord length allows slack for adjustments.
- Position Lights at 4–6 Inch Intervals: Lay lights along the surface *beneath* where tinsel will rest—not centered, but slightly offset toward the front edge. Space bulbs 4 inches apart for standard 100-light mini strands (3.5 ft spacing); stretch to 6 inches for larger C7/C9 bulbs. This prevents “light pooling” and ensures even diffusion.
- Add Tinsel in Reverse Order: Start at the far end *away* from your power source. Drape tinsel loosely—not tightly wound—so strands fall naturally with gentle overlap (about 30% coverage). Let gravity do the work: hold tinsel 12 inches above the surface and release slowly. This minimizes static and avoids compressing lights underneath.
- Fluff, Don’t Force: Once tinsel is placed, gently lift sections with fingertips (not fists) to separate clumped strands. Focus on lifting the *top third* of the drape—this opens light pathways without disturbing bulb placement. Never tug or pull tinsel horizontally; it stretches and loses reflectivity.
- Final Light Check & Trim: Step back 6 feet. Observe from multiple angles. If light appears muffled or uneven, lift tinsel *just enough* to slide one bulb forward 1 inch—then re-fluff. Cut excess cord *only after* confirming final placement; leave 12 inches of slack behind outlet for future adjustments.
Do’s and Don’ts: A Practical Comparison Table
| Action | Do | Don’t |
|---|---|---|
| Tinsel Type | Opt for premium-grade, double-coated Mylar tinsel (look for “UV-stabilized” or “heat-resistant” labels). It reflects more light per strand and resists curling. | Avoid ultra-thin, single-layer tinsel sold in bulk bags—it flattens under weight, clings to itself, and dims light output by up to 40%. |
| Light Density | Use 100–150 bulbs per 6-foot garland section. For wider surfaces (e.g., 8-ft mantel), add a second parallel strand 3 inches behind the first. | Never exceed 200 bulbs per 6 feet—even if strands are rated for it. Overcrowding creates thermal stacking and visual noise. |
| Installation Surface | Mount lights on a flexible wire grid or low-profile LED channel (1/4-inch deep) to maintain consistent elevation and airflow. | Don’t lay lights directly on wood, stone, or drywall without a thermal buffer. Surfaces absorb heat and reduce light diffusion efficiency. |
| Maintenance During Season | Wipe tinsel weekly with a microfiber cloth lightly dampened with distilled water to remove dust buildup that scatters light. | Don’t use furniture polish, silicone sprays, or dryer sheets—they leave residue that attracts grime and dulls reflectivity within days. |
A Real-World Case Study: The Mantel That Stopped Traffic
In December 2023, interior stylist Lena Cho was hired to refresh the fireplace mantel for a historic Boston brownstone featured in Architectural Digest’s holiday issue. The client insisted on “lots of sparkle,” but previous attempts had failed: one year, tinsel melted onto hot incandescent bulbs; another, lights vanished under dense silver tinsel, making the mantel look flat and lifeless.
Lena applied the under-layering method with precision adjustments: she used UL-listed, low-heat 2700K micro-LEDs spaced at 5-inch intervals, mounted on a custom aluminum heat-dissipating rail. She chose heavyweight, matte-finish silver tinsel (not glossy) to reduce glare and increase directional reflection. Most critically, she installed tinsel in three overlapping tiers—front, middle, back—each lifted 1/2 inch higher than the one below, creating cascading depth. Viewers didn’t see wires or bulbs. They saw a soft, radiant gradient: brightest at the front edge, fading into warm shadow at the back.
The result? A mantel that drew sustained attention—not for being “busy,” but for its quiet, dimensional luminescence. Visitors reported feeling “calm excitement,” a reaction Lena attributes to controlled light dispersion: “When light isn’t fighting the material, it doesn’t shout. It hums. And humming is what makes people pause.”
Essential Tools & Supplies Checklist
- UL-listed LED mini lights (warm white, 2700K–3000K, max 150 bulbs per 6 ft)
- Premium double-coated Mylar tinsel (minimum 0.003 mm thickness; avoid “jumbo” or “extra-shiny” variants)
- Low-tack painter’s tape or removable adhesive hooks (e.g., Command™ Outdoor Strips)
- Flexible aluminum LED mounting rail or ¼-inch foam weatherstripping (for consistent air gap)
- Microfiber cloths (dedicated to holiday use only)
- Digital thermometer (to verify surface temps stay below 45°C after 1 hour of operation)
- Small binder clips (to temporarily secure tinsel ends while adjusting)
Frequently Asked Questions
Can I use battery-operated lights under tinsel?
Yes—but with caveats. Battery packs generate more heat per watt than plug-in transformers, and their bulk can disrupt the smooth tinsel drape. Choose lithium-ion powered strands with built-in thermal cutoffs, and position the battery pack *outside* the tinsel zone—e.g., tucked behind the mantel shelf or inside a decorative box. Never conceal batteries under tinsel layers.
How do I prevent tinsel from slipping off smooth surfaces like marble or glass?
Apply two parallel strips of 3M™ Dual Lock™ SJ3551 (reusable hook-and-loop) along the surface edge before installing lights. Press tinsel gently onto the textured side—it grips without residue and releases cleanly. Avoid spray adhesives or glue dots: they leave marks and cause tinsel to stiffen and lose movement.
What if my lights are already tangled under existing tinsel?
Don’t pull. Unplug immediately. Gently lift tinsel in 12-inch sections using chopsticks or a knitting needle to create working space. Isolate one light strand at a time; coil it loosely around your hand, then transfer to a labeled storage spool. Reinstall using the 5-step sequence—this isn’t extra work, it’s correcting foundational error. Most “tangling” stems from initial compression, not poor quality.
Conclusion: Light Should Serve the Moment, Not Dominate It
Layering Christmas lights under tinsel isn’t about maximizing sparkle—it’s about cultivating presence. It’s the difference between a decoration that demands attention and one that invites it. When executed with intention, this technique transforms light from a functional element into an atmospheric partner: warming wood grain, catching the curve of a ceramic vase, making evergreen boughs glow from within. It respects the materials—giving tinsel room to breathe and lights space to shine—while honoring the human need for spaces that feel both celebratory and serene.
You don’t need more lights. You need better placement. You don’t need heavier tinsel. You need smarter spacing. This season, resist the urge to add—and instead, refine. Measure twice, drape once, fluff with patience. Then stand back. Notice how light moves *with* the tinsel, not against it. That quiet harmony? That’s the hallmark of craftsmanship, not clutter.


 浙公网安备
33010002000092号
浙公网安备
33010002000092号 浙B2-20120091-4
Comments
No comments yet. Why don't you start the discussion?