
There’s a quiet magic in the way light filters through fabric—especially during the holidays. When delicate strands of Christmas lights nestle behind airy, translucent curtains, they transform ordinary windows into luminous focal points: warm, diffused, and deeply inviting. This isn’t about brightness or spectacle; it’s about atmosphere—the kind that makes guests pause at your front door, or prompts a slow exhale as you walk into your living room on a December evening. Achieving that soft glow requires more than draping lights over fabric. It demands intentionality in selection, precision in placement, and respect for both aesthetics and safety. This guide distills years of interior styling experience—including consultations for boutique hotels, holiday pop-ups, and residential clients—into a practical, no-compromise approach. You’ll learn exactly which lights work (and which don’t), how to avoid common pitfalls like glare or uneven diffusion, and why the *order* of layering matters more than most realize.
Why sheer curtains—and not heavier fabrics?
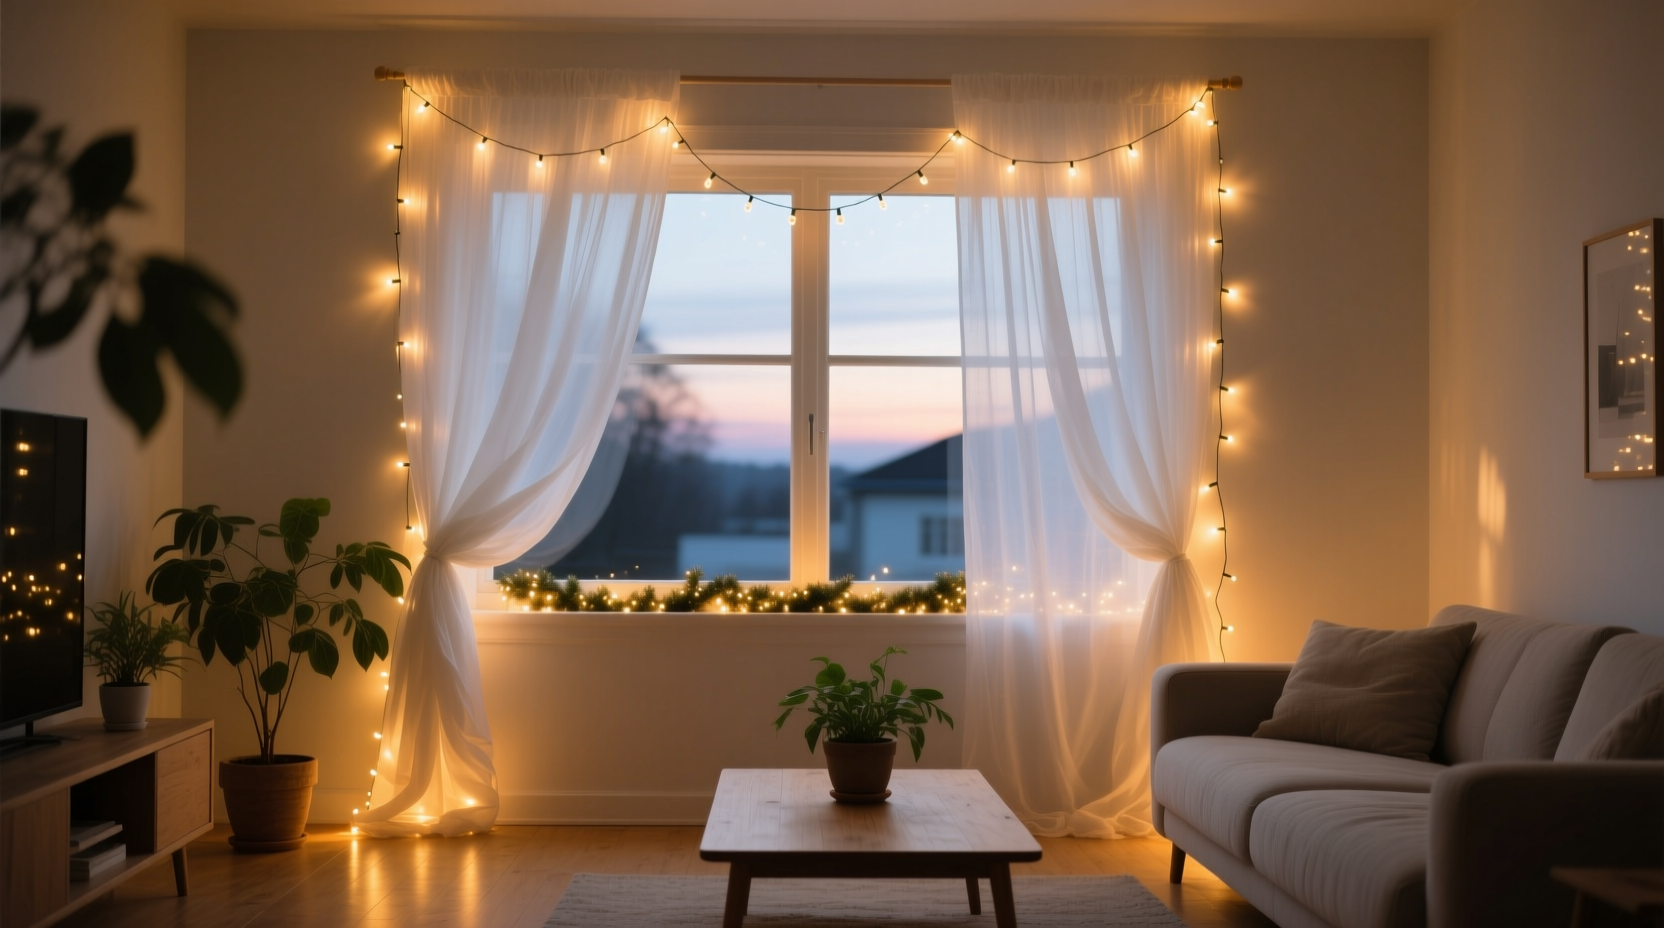
Sheer curtains are uniquely suited for light diffusion because of their open-weave construction and low thread count. Unlike blackout linens or velvet drapes—which absorb or block light—sheers scatter photons gently across their surface, softening harsh edges and eliminating hotspots. The result is ambient radiance, not illumination. Cotton voile, polyester organza, linen blends, and nylon tricot all perform well, but only when hung with proper fullness (minimum 2x width of the window) and tension (no sagging or bunching). Heavier fabrics compress light, creating dense shadows beneath the curtain rod and stark contrasts at the hem. Sheers, by contrast, allow light to breathe—both vertically and horizontally—producing a halo-like aura around the entire window frame.
Selecting the right lights—beyond “warm white”
Not all warm-white lights create the same glow. Color temperature (measured in Kelvin), bulb spacing, and filament type determine how light interacts with sheer fabric. LEDs dominate the market for good reason—energy efficiency, longevity, and cooler operation—but not all LED strings deliver soft diffusion. Incandescent mini-lights (C7/C9 bulbs excluded) remain unmatched for organic warmth and gentle spread, though they’re less efficient and generate more heat. For true softness, prioritize these specifications:
- Color temperature: 2200K–2400K (“amber” or “vintage warm”), not 2700K (“soft white”). Lower Kelvin values mimic candlelight and reduce blue-light scatter, which sharpens edges under fabric.
- Bulb spacing: 4–6 inches between bulbs. Tighter spacing (e.g., 2-inch intervals) creates visual noise; wider spacing (8+ inches) yields uneven pools of light.
- Diffusion technology: Look for “frosted,” “pearl,” or “opal” LED bulbs—not clear or colored. These have internal micro-texturing that scatters light before it exits the bulb.
- Wire gauge: 22 AWG or thicker. Thinner wires (e.g., 24–26 AWG) sag under fabric weight and increase voltage drop, causing dimming toward the end of the strand.
Smart lights (e.g., Wi-Fi-enabled RGBW) offer programmable dimming and color shifts—but for soft glow, stick to fixed-warm settings. Dynamic effects undermine the serene, static quality that defines this aesthetic.
The layering sequence—what goes where, and why order matters
Most people assume lights go *behind* the curtain. That’s partially correct—but incomplete. The ideal configuration uses *three intentional layers*, each serving a distinct optical function:
- Layer 1 (Back): A neutral backdrop—either the wall itself (painted matte white or light gray) or a lightweight, non-reflective liner (e.g., unbleached muslin tacked flat to the wall behind the curtain rod).
- Layer 2 (Middle): The lights—strung *horizontally* along the top of the curtain rod, then gently draped downward in loose, vertical loops (not zigzags or spirals). Each loop should hang freely, 1–2 inches away from the curtain’s back surface.
- Layer 3 (Front): The sheer curtain—hung on a separate, forward-mounted rod (at least 3 inches in front of the light rod) to ensure air gap and prevent heat buildup.
This separation is critical. Without the air gap, heat from bulbs warms the fabric, accelerating yellowing and brittleness. Without the neutral backdrop, light reflects off textured walls or baseboards, creating distracting secondary highlights. And without horizontal stringing + vertical looping, lights cluster at the bottom, leaving the upper third of the window dark.
“The 3-layer principle isn’t decorative—it’s optical physics. Light needs space to diffuse, a clean surface to reflect from, and directional control to avoid pooling. Skip one, and you lose the ‘glow’ for ‘glare.’” — Lena Torres, Lighting Designer & Founder of Lumina Studio, specializing in residential ambient lighting since 2012
A real-world example: The downtown Chicago apartment transformation
When interior stylist Maya Chen redesigned a 450-square-foot loft in Chicago’s West Loop, her client—a pediatrician who worked long winter shifts—asked for “a space that feels like coming home to warmth.” The living room featured two oversized, north-facing windows with minimal natural light after 4 p.m. Standard holiday lighting felt too clinical; garlands obscured views; and battery-operated options lacked sustained output. Maya installed dual rods per window: a rear aluminum rod (painted matte white) holding 22-foot strands of 2200K frosted LED mini-lights spaced at 5 inches, strung horizontally and dropped in 14-inch vertical loops. In front, she mounted brushed-nickel rods holding ivory cotton-linen sheers (2.5x fullness), hung 4 inches forward. She added no additional decor—no wreaths, no ribbons—just the layered light. The result? Guests described the space as “like being inside a teacup lit by candlelight.” Energy use stayed under 12 watts per window, and the installation remained cool to the touch even after 10 hours of continuous use. Crucially, the glow was visible from the street—not as blinding brightness, but as a soft, golden haze outlining the windows.
Safety, maintenance, and seasonal adaptability checklist
Soft glow shouldn’t compromise safety—or convenience. Use this field-tested checklist before finalizing your setup:
- ✅ Verify all lights are UL-listed for indoor use (look for the mark on packaging or cord tag)
- ✅ Use a GFCI-protected outlet—even indoors—for added surge protection
- ✅ Install a mechanical timer (not app-based) to limit daily runtime to 6–8 hours; extended use accelerates filament fatigue and heat stress on fabric
- ✅ Clean sheers *before* installing lights—dust and lint scatter light unpredictably and attract static that holds bulbs in place
- ✅ Store lights on cardboard reels (not plastic spools) to prevent wire kinking and insulation cracking
- ✅ Replace any bulb showing discoloration at the base—this signals early LED driver failure and inconsistent output
Do’s and Don’ts comparison table
| Action | Do | Don’t |
|---|---|---|
| Light placement | String horizontally along rod, then drape in loose vertical loops (12–16 inches long) | Wrap tightly around the rod or wind vertically up the curtain track |
| Curtain fullness | Use minimum 2x width; gather evenly with pinch pleats or goblet headings | Hang flat panels or use less than 1.5x fullness—creates thin, streaky light |
| Heat management | Maintain ≥1-inch air gap between bulbs and curtain back; use LED-only strands | Use incandescent lights behind sheers—or place bulbs directly against fabric |
| Color coordination | Match bulb warmth to existing ambient lighting (e.g., 2200K if overheads are candle-style) | Mix 2200K lights with 3000K recessed downlights—creates visual dissonance |
| Seasonal transition | Leave lights installed year-round; switch to dimmable white mode for summer evenings | Remove and reinstall annually—increases wear on sockets and wire joints |
FAQ: Practical questions answered
Can I use battery-operated lights for this effect?
Yes—but with caveats. Opt for lithium-powered sets with built-in dimmers and 2200K–2400K output. Avoid coin-cell lights; their low lumen output (under 50 lumens/strand) fails to penetrate deeper sheers. Rechargeable USB sets are preferable—they maintain consistent voltage longer than alkaline batteries, preventing the “fade-out” effect that breaks the glow illusion.
My curtains are already hung. Can I add lights without remounting rods?
You can—but expect compromises. Clip-on LED strips designed for curtain rods (e.g., magnetic or adhesive-backed) work only if your rod is metal and smooth. Non-metal rods require double-sided tape, which risks fabric residue and uneven adhesion. More reliably, use discreet, flexible command hooks spaced every 12 inches behind the existing rod to suspend lights—but test hook weight limits first. Never staple or pin lights directly to fabric; needle holes weaken fibers and create permanent light leaks.
How do I clean sheers with lights installed?
Never wash or steam sheers while lights are attached. Remove lights first, then hand-wash or dry-clean according to fabric care instructions. For light dusting between seasons, use a lint roller with low-tack adhesive—roll *gently* from top to bottom, never side-to-side, to avoid shifting bulb positions. Always unplug and cool lights completely before handling.
Conclusion: Your window, reimagined
A soft-glow curtain isn’t decoration—it’s spatial storytelling. It tells visitors that warmth is cultivated here, not just switched on. That light is treated with reverence, not utility. That beauty resides in subtlety, not saturation. You now have everything needed to achieve it: the science of diffusion, the specificity of bulb selection, the discipline of layered installation, and the pragmatism of safe, sustainable execution. No special tools. No expensive gear. Just attention to proportion, patience with placement, and respect for how light behaves when given room to breathe. Start with one window. Observe how the glow changes at dusk versus midnight. Notice how it alters the mood of the room—not by adding light, but by softening shadow. Then share what you discover. Post a note in the comments about your first successful layer: Which bulb type surprised you? How did your sheers respond? What small adjustment made the biggest difference? Because the most enduring holiday traditions aren’t bought—they’re built, one thoughtful layer at a time.


 浙公网安备
33010002000092号
浙公网安备
33010002000092号 浙B2-20120091-4
Comments
No comments yet. Why don't you start the discussion?