
Layering Christmas tree skirts is no longer just about covering the stand—it’s a deliberate design strategy that elevates your entire holiday aesthetic. When done thoughtfully, layered skirts introduce rhythm, contrast, and tactile richness while preserving clean sightlines and structural balance. Yet many decorators abandon the idea after one too many attempts result in a lopsided, overstuffed base that swallows ornaments, obscures lights, or forces the tree into an awkward lean. The truth? Bulk isn’t inevitable. It’s a symptom of mismatched scale, unbalanced proportions, or materials that fight rather than complement each other. This guide distills years of set design experience, stylist consultations, and real-world trial across dozens of homes—from historic brownstones to minimalist lofts—to deliver a precise, actionable framework for achieving layered elegance: dimension without density, contrast without chaos.
Why “No Bulk” Matters More Than You Think
Bulk undermines both function and form. Visually, excessive volume flattens depth perception—making the tree appear shorter, heavier, and disconnected from the room. Physically, thick layers compress under the tree stand’s weight, causing uneven draping, visible puckering, and premature wear at stress points. Worse, bulky skirts obstruct airflow around the trunk and base, accelerating needle drop in real trees and trapping dust and pet hair beneath synthetic ones. Interior designers consistently report that clients who prioritize *lightness* in their skirt layers describe higher satisfaction with overall tree presence—even when using fewer ornaments or simpler lighting schemes. As interior stylist Maya Renfro notes during her annual holiday workshop series:
“The most memorable trees I’ve styled share one trait: the skirt feels like an invitation, not a barrier. When you can see the floor beneath the outer edge—and feel air moving between layers—the tree breathes. That’s where magic lives.”
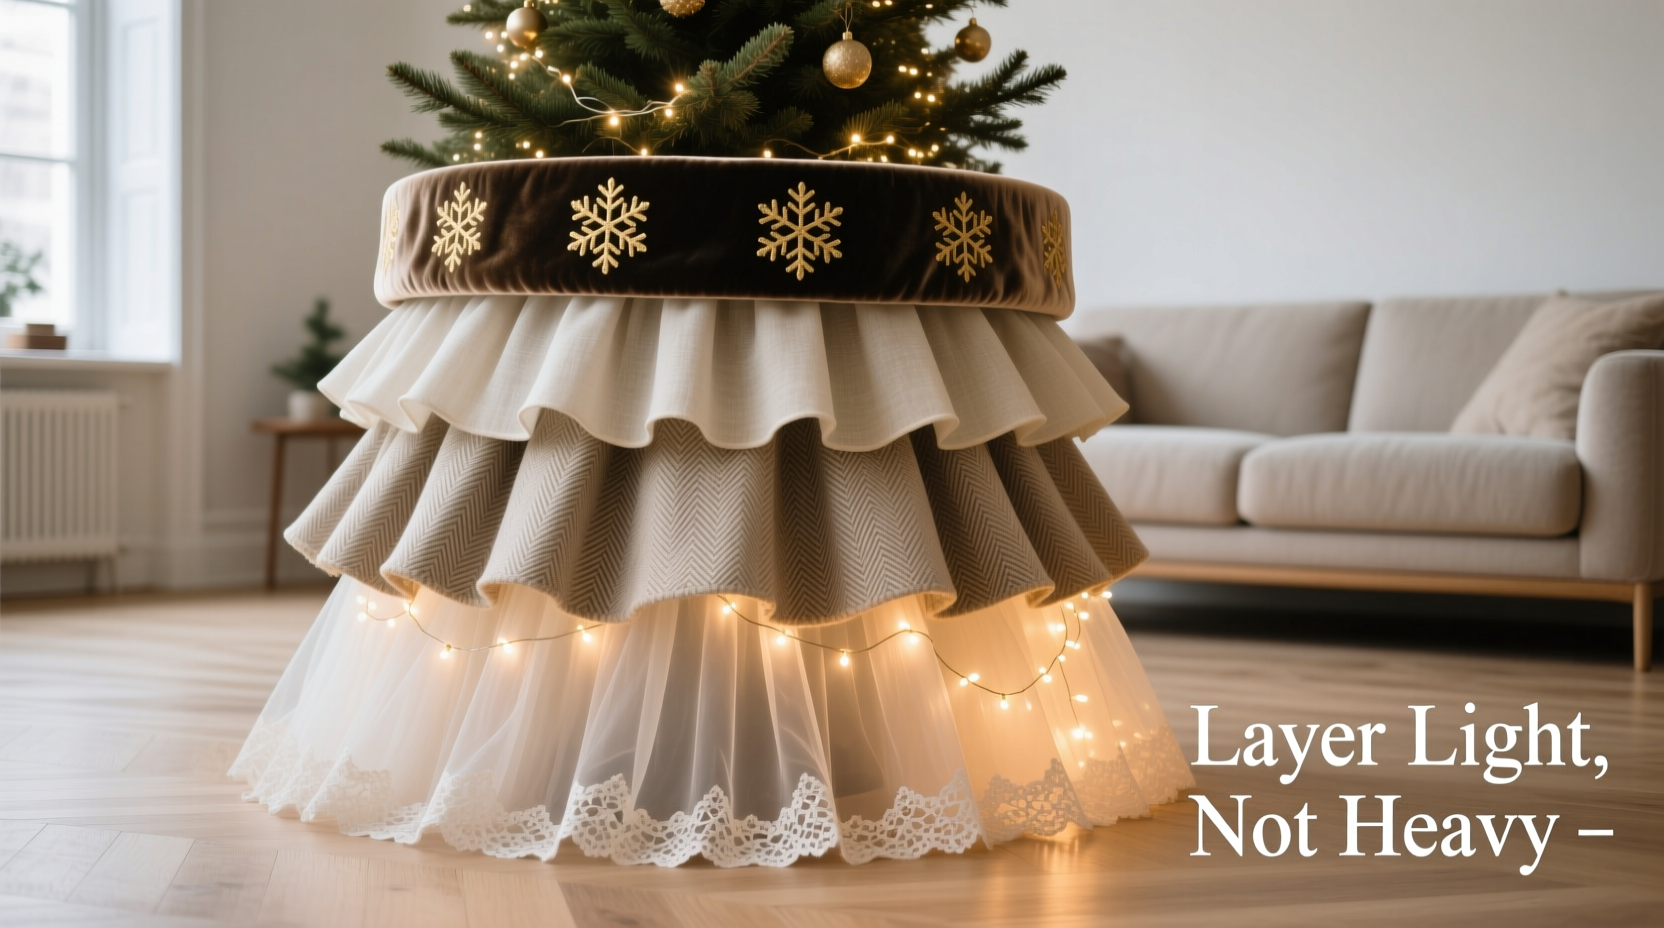
The 4-Layer Framework: Purpose, Proportion, and Material Logic
Forget arbitrary stacking. Successful layering follows a disciplined four-tier architecture—each layer serving a distinct visual and functional role. Deviate from this order, and cohesion collapses.
- Foundation Layer (Base): A flat, rigid, or semi-rigid circle (not fabric) that sits directly on the floor. Its sole job is stability and definition—not decoration. Think: a thin cork mat, a woven seagrass placemat, or a custom-cut plywood disc painted matte black or ivory. This layer anchors all others and prevents slippage.
- Structure Layer (Sub-skirt): A lightweight, drape-friendly fabric in a neutral tone (oatmeal, charcoal, deep olive) cut 6–8 inches larger in diameter than your tree stand. Linen-cotton blend, washed silk dupioni, or heavyweight taffeta work best—stiff enough to hold gentle folds, soft enough to avoid rigidity. This layer establishes silhouette and subtle texture.
- Texture Layer (Mid-skirt): The star of contrast. Cut 4–6 inches larger than the structure layer. Prioritize tactility over sheen: raw-edged burlap, hand-loomed wool felt, vintage lace trim mounted on organza, or pleated velvet with a low pile. This layer introduces grain, irregularity, and visual “catch”—but must remain flexible and light.
- Detail Layer (Top skirt): The final, intentional flourish—never the largest. Cut only 2–3 inches larger than the texture layer. Use delicate, airy elements: embroidered organza with scattered seed beads, hand-cut paper snowflakes fused to silk gauze, or narrow bands of antique ribbon stitched in concentric circles. This layer draws the eye inward and adds micro-detail without mass.
Material Pairing Principles: What Works (and What Wrecks Everything)
Not all fabrics coexist peacefully. Bulk arises when materials resist each other’s drape, reflect light identically, or share competing textures. The table below outlines proven pairings and critical incompatibilities based on tensile strength, weight per square yard, and surface reflectivity.
| Layer Position | Ideal Materials | Avoid Combining With | Why It Fails |
|---|---|---|---|
| Foundation | Cork, thin plywood, rigid foam board, woven seagrass | Felt, quilted cotton, memory foam | Soft foundations compress under weight, causing upper layers to sink and ripple unpredictably. |
| Structure | Linen-cotton (5.5–6.5 oz/yd²), washed silk dupioni, matte taffeta | Velvet, brocade, heavy damask | Heavy fabrics overwhelm the foundation’s rigidity, creating stiff, unnatural folds that resist layering. |
| Texture | Raw burlap (lightweight grade), wool felt (2mm thickness), open-weave lace on silk organza | Satin, polyester georgette, stiff tulle | Slippery or overly crisp fabrics slide against structure layers, causing constant shifting and exposed gaps. |
| Detail | Embroidered organza, hand-cut vellum, silk gauze with beading, narrow velvet ribbon (¼\") | Beaded fringe, wired ribbon, pom-pom trim | 3D embellishments add vertical height, visually lifting the top layer and breaking continuity with lower tiers. |
A Real Example: Transforming a “Too Much” Tree in a Brooklyn Brownstone
When interior designer Lena Cho was called to refresh a client’s 7-foot Fraser fir in a narrow, high-ceilinged parlor, she found three skirts already layered haphazardly: a thick quilted velvet (24\" diameter), a ruffled polyester tulle (30\"), and a heavy knitted wool (36\"). The result? A dense, wobbling mound that obscured the antique brass tree stand and made the room feel cramped. Lena removed all three, measured the stand (18\"), then rebuilt using the 4-layer framework:
- Foundation: A 19\"-diameter circular cork mat ($12, sourced from a flooring supplier).
- Structure: A 25\"-diameter linen-cotton skirt in heather gray, hemmed with French seams for clean edges.
- Texture: A 30\"-diameter circle of lightweight, undyed burlap, raw-edged and gently gathered at the center with invisible thread—creating soft, organic ripples without stiffness.
- Detail: A 32\"-diameter ring of ivory silk gauze, hand-embroidered with tiny silver-thread snowflakes spaced 3 inches apart.
The transformation was immediate. The tree appeared taller and more grounded. Light from the copper wire string lights reflected softly off the gauze, catching the burlap’s texture without glare. Most importantly, the floor remained visible for 4 inches beyond the outermost edge—preserving spatial clarity. “Clients don’t notice ‘no bulk’,” Lena observes. “They notice how calm and intentional the whole scene feels. That calm comes from precision—not abundance.”
Step-by-Step: Installing Your Layered Skirt System
Follow this sequence exactly. Skipping or reordering steps invites slippage, misalignment, or tension that pulls layers askew.
- Prep the floor: Sweep and dry-mop the area. Place the foundation layer centered under the tree stand location. Verify it lies perfectly flat—no curling edges.
- Secure the structure layer: Drape it over the stand, aligning its center precisely with the foundation’s center. Pinch the fabric at four equidistant points (0°, 90°, 180°, 270°) and secure each with a single, discreet fabric clip tucked beneath the stand’s lowest crossbar. Do not tie, staple, or glue.
- Add the texture layer: Lay it over the structure layer, centering carefully. Gently gather excess fabric at the center point *only*—just enough to create soft, radial folds radiating outward. Secure the gathered center with one small, clear elastic band hidden beneath the stand. Never pull tight; aim for gentle fullness.
- Position the detail layer: Drape it last. Adjust until its outer edge extends no more than 2 inches beyond the texture layer. Smooth outward from center—never tug inward. If using beaded or embroidered elements, ensure weight is evenly distributed; rotate the layer slightly if one side sags.
- Final calibration: Step back 6 feet. Turn off overhead lights. Observe how ambient light interacts with each layer. Adjust only if you see harsh shadows, abrupt transitions, or visible clips. Touch only the top two layers—never disturb the foundation or structure anchors.
Common Pitfalls & How to Avoid Them
- Pitfall: Using identical fabric weights across layers. Solution: Introduce a deliberate weight gradient—foundation (rigid) → structure (medium drape) → texture (soft but textural) → detail (airy). Test drape by holding 12\" squares vertically: they should fall at visibly different speeds.
- Pitfall: Over-trimming or over-hemming. Solution: Raw or minimally finished edges (like serged burlap or rolled organza) enhance lightness. Hem only the foundation and structure layers; let texture and detail layers breathe with intentional fraying or open weaves.
- Pitfall: Ignoring seasonal humidity shifts. Solution: Natural fibers (linen, wool, cotton) expand in damp air. Build in ¼-inch extra diameter for texture and detail layers if installing in November (high-humidity months). Synthetic blends require no adjustment.
- Pitfall: Forgetting the tree’s visual weight. Solution: A heavily decorated tree needs lighter skirts. Reduce texture layer fullness by 30% and skip beading on the detail layer. A minimalist tree can support richer textures—but never heavier weights.
FAQ
Can I layer skirts on a pre-lit artificial tree with a built-in stand?
Yes—but with caution. Most integrated stands have non-removable metal rings or plastic housings that prevent traditional clipping. Instead, use the foundation layer as your anchor: cut it 1 inch larger than the stand’s outer diameter, then secure the structure layer to the foundation *before* placing the tree. Let the tree’s weight hold all layers in place. Avoid elastic bands—they can damage wiring.
How do I store layered skirts for next year without crushing the texture?
Never fold or stack. Roll each layer separately, starting from the outer edge inward, around a cardboard tube (like a wrapping paper core). Slip each roll into a breathable cotton garment bag labeled with layer position and diameter. Store upright—not flat—in a cool, dry closet. Unroll and air for 2 hours before reusing.
What if my tree stand has an unusual shape (hexagonal, oval)?
Match the foundation layer’s shape exactly—it’s the only layer that must conform. All upper layers remain circular. The contrast between geometric foundation and organic drape creates intentional visual interest. Just ensure the foundation’s longest axis aligns with the tree’s centerline.
Conclusion: Depth Is a Choice, Not a Consequence
Layering Christmas tree skirts isn’t about accumulating more—it’s about curating intention. Texture emerges not from quantity, but from thoughtful contrast. Visual depth grows not from stacked volume, but from calibrated light interaction, controlled drape, and purposeful restraint. When you choose a foundation that grounds, a structure that defines, a texture that whispers, and a detail that winks—you don’t just dress a tree. You compose a moment. One that feels collected, calm, and quietly confident. No apologies for simplicity. No strain to impress. Just the quiet thrill of seeing light catch a raw burlap edge, then soften into silk gauze, then vanish into the floor—exactly as it should. That’s the elegance of less.


 浙公网安备
33010002000092号
浙公网安备
33010002000092号 浙B2-20120091-4
Comments
No comments yet. Why don't you start the discussion?