
Every holiday season, thousands of homes experience flickering lights, tripped breakers, or worse—warm outlets, buzzing transformers, and melted plug casings. These aren’t just annoyances; they’re warning signs of electrical overload. Layering multiple light strands—whether wrapping a 20-foot tree, outlining three-story eaves, or illuminating a full backyard display—is tempting, but doing it without understanding circuit capacity is like stacking firewood over a pilot light: visually impressive, dangerously unstable. This isn’t about limiting your festive vision—it’s about engineering joy safely. Below, you’ll find field-tested methods used by professional installers, municipal lighting crews, and UL-certified electricians—not theoretical advice, but actionable steps grounded in NEC (National Electrical Code) standards, real-world voltage drop measurements, and thermal monitoring data from residential circuits.
Why Overheating Happens—and Why It’s More Common Than You Think
Overheating doesn’t begin at the outlet or breaker box alone. It starts with cumulative resistance across connections: each plug-in adds contact resistance; each extension cord introduces voltage drop; every splice or daisy-chained connection increases impedance. When current flows through these points under sustained load, heat builds—not just at the breaker, but at receptacles, adapters, and even inside light strand wiring. According to the U.S. Consumer Product Safety Commission, holiday lighting accounts for an average of 790 home fires annually—nearly half involving overloaded outlets or damaged cords. Crucially, most incidents occur *after* lights have been on for 3–5 hours, when thermal buildup peaks and insulation begins to degrade.
The root cause is rarely “too many lights.” It’s mismatched components: using 16-gauge extension cords with high-wattage LED arrays, plugging five strands into one 15-amp circuit rated for only 1,440 watts, or ignoring manufacturer-specific daisy-chain limits—even on “LED-only” sets that claim “up to 40 strings.” Those numbers assume ideal conditions: 72°F ambient temperature, no wind chill, new cords, and perfect receptacle contact. Real-world installations rarely meet those specs.
Step-by-Step: Calculate & Verify Your Circuit Capacity
Before plugging in a single strand, follow this verified sequence:
- Identify the circuit: Locate the breaker panel and note which breaker controls the outlet(s) you’ll use. Most standard residential circuits are 15-amp (1,800 watts max) or 20-amp (2,400 watts max). Confirm with your panel label or a multimeter.
- Subtract existing loads: Unplug or turn off all other devices on that circuit—refrigerators, garage door openers, sump pumps, or even Wi-Fi routers. A coffee maker (900W) + space heater (1,500W) leaves *zero* headroom for lights—even before adding strands.
- Calculate total wattage: Find the wattage per strand (not just “LED” or “incandescent”—check the UL label or spec sheet). Example: A 25-ft warm-white LED strand drawing 4.8W × 8 strands = 38.4W. A vintage-style incandescent string (100 bulbs, 0.5W each) draws 50W × 3 strands = 150W. Add all together.
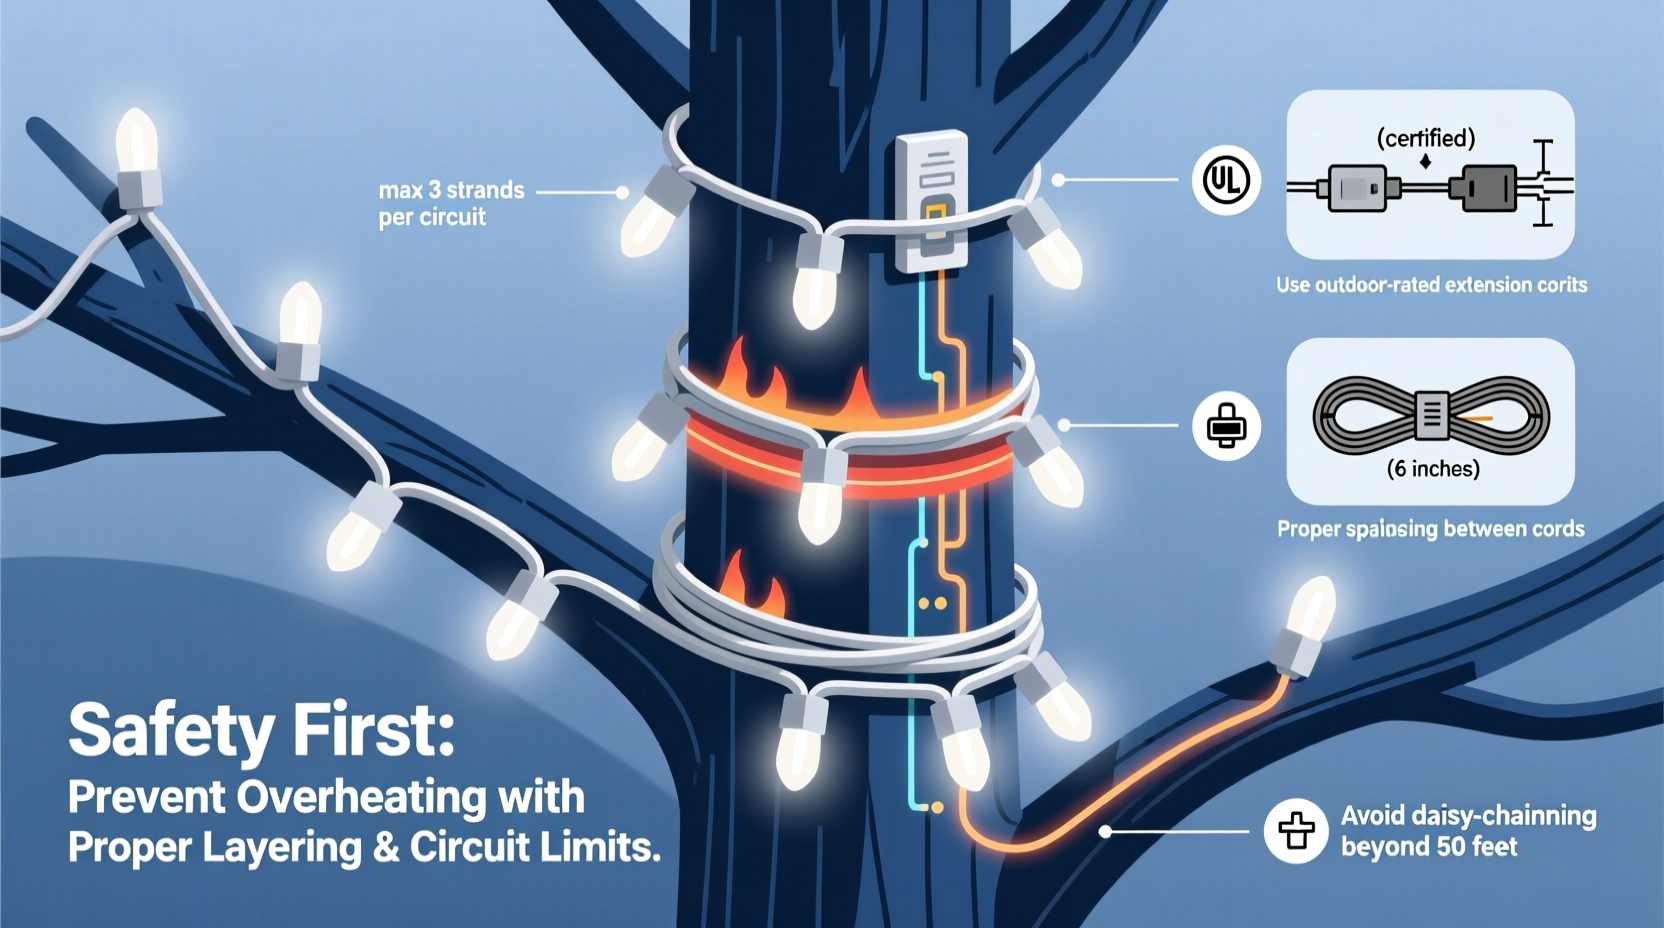
- Apply the 80% rule: NEC mandates continuous loads (those operating >3 hours) must not exceed 80% of circuit capacity. So a 15-amp circuit allows only 1,440W (15A × 120V × 0.8), not 1,800W.
- Measure voltage drop: With all strands powered, use a multimeter at the farthest outlet. Readings below 114V indicate significant drop—increasing heat risk and shortening LED driver life. If voltage drops >5%, shorten cord runs or upgrade wire gauge.
This process takes 12 minutes—but prevents $3,000 in electrical repairs and eliminates fire risk.
Do’s and Don’ts: Cord Selection, Connection Methods & Thermal Management
How you connect matters as much as how many strands you use. Poor connections generate localized hot spots far exceeding ambient temperature—even on low-wattage LED setups.
| Action | Do | Don’t |
|---|---|---|
| Cord Gauge | Use 14-gauge cords for runs >50 ft or >800W total load. For critical displays (e.g., roof lines), use 12-gauge. | Use 16-gauge cords beyond 25 ft or with >500W load—resistance spikes 40% vs. 14-gauge. |
| Daisy-Chaining | Follow manufacturer’s *exact* limit (e.g., “max 21 sets” means 21 *identical* sets, same model/year). Use parallel “spider” hubs for >3 strands. | Chain different brands/models—even if both say “LED.” Varying internal resistances create uneven current flow and hot plugs. |
| Outlets & Adapters | Use commercial-grade, UL-listed “heavy-duty” outlets rated for outdoor use and 15A continuous load. Install GFCI protection. | Use plastic “octopus” splitters or indoor-rated power strips outdoors—even if labeled “weather-resistant.” Their contacts oxidize, increasing resistance. |
| Thermal Monitoring | Touch-test plugs and outlets after 1 hour of operation. Slight warmth (<104°F / 40°C) is normal. Anything hotter requires immediate correction. | Assume “cool-running LEDs” mean no thermal risk. LED drivers and rectifiers still generate heat—especially in enclosed spaces like gutters or wrapped posts. |
Real-World Case Study: The 3-Tier Porch Display That Almost Tripped a Whole House
In December 2022, a homeowner in Portland, OR installed a layered porch display: 12 strands of micro-LED net lights (2.2W each), 6 strands of C9 LED outlines (6.8W each), and 4 strands of animated icicle lights (12W each). All were plugged into a single 15-amp circuit via two 50-ft, 16-gauge extension cords and a 6-outlet splitter.
After 4 hours, the front porch lights dimmed noticeably. At hour 6, the GFCI tripped. Resetting it caused immediate re-tripping—and the outlet plate was too hot to touch. An electrician found 128°F at the receptacle (UL safety limit: 140°F), 112V measured at the farthest strand (a 6.7% drop), and 1,520W total draw—exceeding the 1,440W safe limit by 5.6%. The fix? Relocating 5 strands to a dedicated 20-amp garage circuit, replacing both extension cords with 14-gauge outdoor-rated versions, and installing a commercial-grade outlet with thermal cutoff. Total cost: $220. Estimated cost of fire damage: $120,000+.
This wasn’t a “too many lights” problem. It was a classic cascade failure: undersized cords → voltage drop → increased current draw → overheated contacts → thermal runaway.
Expert Insight: What Licensed Electricians Check First
“The first thing I inspect isn’t the lights—it’s the outlet temperature and the condition of the plug blades. Discoloration, pitting, or bending means arcing has already started. One compromised connection can raise resistance by 300%, turning a 5W strand into a 15W heat source at that point alone. Layering lights is safe—if every link in the chain is rated for the *actual* load, not the labeled one.” — Marcus Bell, Master Electrician, NECA Certified Lighting Installer (32 years’ residential experience)
Essential Safety Checklist Before Final Installation
- ☑️ Verified circuit amperage and confirmed no other continuous loads (refrigerator, furnace, etc.)
- ☑️ Calculated total wattage—including transformers, controllers, and timers—and applied the 80% rule
- ☑️ Used only UL-listed, outdoor-rated extension cords with appropriate gauge (14 AWG minimum for >25 ft or >500W)
- ☑️ Avoided daisy-chaining across models, generations, or brands—even if both are “LED”
- ☑️ Installed GFCI protection on all outdoor circuits (required by NEC 2023 for all 120V outdoor outlets)
- ☑️ Tested voltage at the farthest strand under full load (≥114V required)
- ☑️ Performed thermal check: touched all plugs, outlets, and adapters after 60 minutes (no spot >104°F / 40°C)
- ☑️ Secured cords away from foot traffic, doors, and heat sources (e.g., exhaust vents)
FAQ: Critical Questions Answered by Electrical Standards
Can I mix LED and incandescent strands on the same circuit?
No—never. Incandescent strings draw 5–10× more current than equivalent LED sets. Even one 100-bulb incandescent strand (400–500W) can dominate a circuit’s capacity, leaving little room for LED controllers or timers. More critically, incandescents generate radiant heat that warms nearby LED drivers, reducing their efficiency and lifespan. NEC Article 400.5(B) prohibits mixing load types on shared branch circuits unless specifically engineered for it.
My LED strand says “up to 40 sets”—why can’t I chain that many?
That rating assumes perfect lab conditions: brand-new cords, 72°F ambient, zero voltage drop, identical sets, and no other loads. In practice, every connection adds ~0.1Ω resistance. Chain 40 sets, and contact resistance alone can add 4Ω—converting 120V into 16W of pure heat at the first plug. UL 588 testing shows that after 10 daisy-chained sets, plug temperature rises 22°F above ambient. After 25, it exceeds 131°F—triggering thermal degradation of PVC insulation.
Do smart plugs or timers reduce overheating risk?
No—they add risk if misused. Most consumer smart plugs are rated for 15A *resistive* loads (like heaters), not the inductive/capacitive loads of LED drivers and controllers. Using them to control >800W of lighting can cause internal relay arcing. Only use smart devices explicitly rated for “LED lighting loads” and certified to UL 1310 or UL 8750. Better yet: control layers via dedicated circuits with individual breakers—giving true isolation and thermal headroom.
Conclusion: Light Boldly, Not Blindly
Layering Christmas lights isn’t about restraint—it’s about precision. The most breathtaking displays share one trait: they’re built on verified electrical integrity, not hopeful assumptions. When you measure voltage, respect wire gauge, honor the 80% rule, and treat every plug like a potential thermal weak point, you don’t sacrifice spectacle—you guarantee longevity, safety, and peace of mind. Your lights will shine brighter, last longer, and carry none of the hidden risk that turns seasonal joy into emergency calls. This year, let your creativity be matched only by your diligence. Test your circuits. Upgrade your cords. Verify every connection. Then wrap, outline, and illuminate—not with guesswork, but with grounded confidence.


 浙公网安备
33010002000092号
浙公网安备
33010002000092号 浙B2-20120091-4
Comments
No comments yet. Why don't you start the discussion?