
Decorating a staircase with layered garlands transforms an ordinary space into a festive focal point. When done thoughtfully, the effect is rich, textured, and visually harmonious—like something from a designer showcase. But achieving that look requires more than just draping greenery randomly. The key lies in intentional layering and precise spacing. Without balance, garlands can appear cluttered or sparse, undermining the elegance you’re aiming for. This guide walks through the principles and practical steps to create a beautifully layered staircase display using multiple garlands with even, eye-pleasing distribution.
Why Layered Garlands Work on Staircases
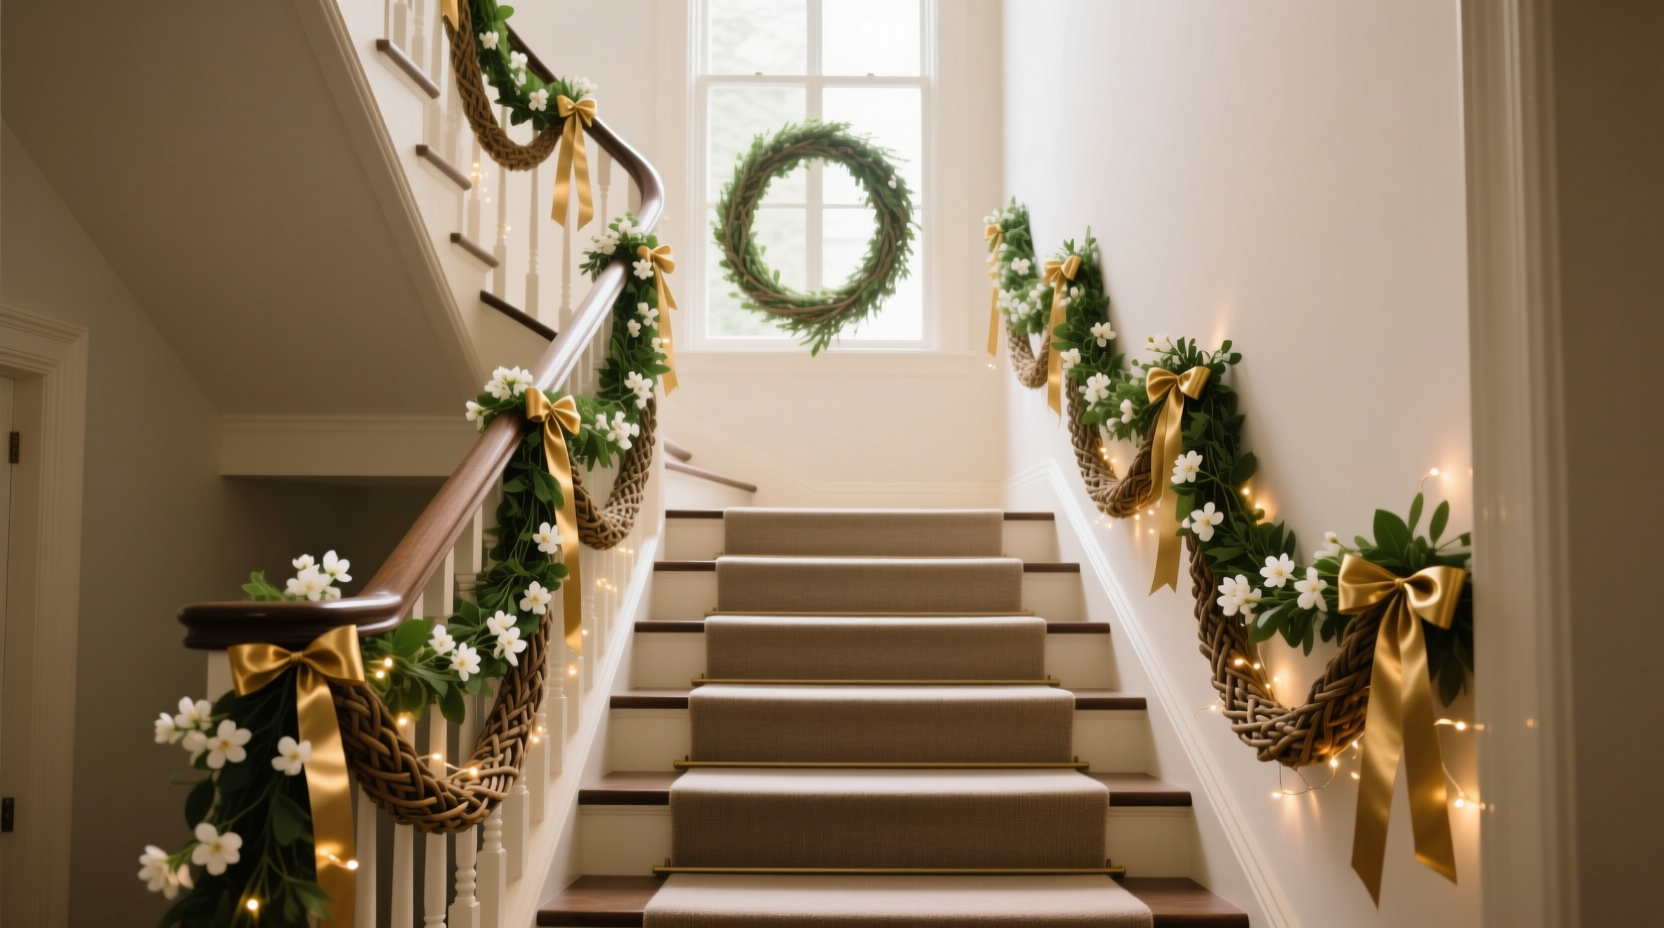
A staircase offers vertical movement and natural symmetry, making it an ideal canvas for decorative layering. Unlike flat surfaces, stairs provide depth, rhythm, and repetition—all of which enhance the visual impact of layered garlands. When multiple strands are used, they add dimension and fullness, mimicking the lushness of real evergreen branches while allowing for creative combinations of textures, colors, and materials.
The success of this technique depends not only on the quality of the garlands but also on their arrangement. A single garland may look thin or incomplete, especially on wide banisters. Layering compensates for that by building volume and drawing the eye upward. However, stacking them too closely or leaving awkward gaps breaks the flow. Balanced spacing ensures continuity and rhythm, turning your staircase into a curated design element rather than a haphazard decoration.
Selecting the Right Garlands for Layering
Not all garlands are created equal when it comes to layering. Choosing complementary styles ensures cohesion, while contrasting elements add interest. Consider the following factors when selecting your pieces:
- Length: Each garland should be long enough to span at least one full side of the staircase, ideally extending slightly beyond the top and bottom posts for a flowing effect.
- Diameter: Thicker garlands (3–5 inches) work well as base layers; thinner ones (1–3 inches) are better for overlaying.
- Texture and Color: Mix matte and glossy finishes, or combine warm-toned evergreens with silvery foliage like dusty miller or silver dollar eucalyptus.
- Weight: Heavier garlands made with real or high-density faux greenery may require additional anchoring.
- Flexibility: Choose pliable garlands that drape naturally over spindles without kinking.
For a cohesive yet dynamic look, select two to three garlands per side. One should serve as the foundation—typically fuller and darker in tone—while the others introduce contrast through lighter hues, metallic accents, berries, or pinecones.
“Layering isn’t about covering every inch—it’s about creating rhythm. Think of it like music: each garland plays a different note, but together they form a harmony.” — Lena Whitmore, Interior Stylist & Holiday Design Consultant
Step-by-Step Guide to Installing Layered Garlands
Installing multiple garlands with balanced spacing requires planning, measurement, and patience. Follow this sequence to achieve a polished result:
- Measure Your Banister: Use a flexible tape measure to determine the length of the handrail from newel post to newel post. Add 12–18 inches to allow for gentle draping at both ends.
- Choose a Base Garland: Start with the thickest, darkest, or most neutral garland. This will anchor the arrangement and hide any attachment hardware.
- Secure the First Garland: Using floral wire, zip ties, or clear mounting clips, attach the base garland along the underside of the handrail. Space fasteners every 8–12 inches, ensuring the garland rests evenly without sagging.
- Position Secondary Garlands: Take your second garland and place it parallel to the first, offset by 2–4 inches vertically. If the banister has spindles, weave the garland slightly behind or in front to create depth.
- Maintain Consistent Spacing: Use a small ruler or spacer block (like a wooden dowel cut to 3 inches) to keep uniform distance between layers throughout the run.
- Add Third Layer (Optional): For wider rails or dramatic effect, introduce a third, lighter garland. Place it opposite the second layer or interweave it subtly for asymmetry.
- Adjust Drape at Landings: At turns or landings, allow garlands to cascade gently down the post. Secure the end with discreet wire shaped into a spiral anchor.
- Incorporate Decorative Elements: Tuck in pinecones, ribbon bows, or fairy lights after all garlands are secured to avoid interference during installation.
Spacing Strategies for Visual Balance
Spacing is where most DIYers go wrong. Too tight, and the layers blur into a messy bundle; too far apart, and the effect looks disjointed. The goal is rhythmic repetition—consistent intervals that guide the eye smoothly up the staircase.
A general rule: maintain 2 to 4 inches of vertical separation between garland centers. On narrow banisters (under 3 inches wide), stick to 2–3 inches. On wider rails (4+ inches), you can safely increase to 3–4 inches to avoid a cramped appearance.
Horizontal spacing matters too. Avoid aligning the peaks and troughs of each garland directly over one another. Instead, stagger them slightly so that one garland dips where another rises. This creates a natural, organic flow that mimics real vines growing along a railing.
| Spacing Type | Recommended Distance | Purpose |
|---|---|---|
| Vertical (between layers) | 2–4 inches | Prevents visual crowding; allows each garland to stand out |
| Horizontal (along rail) | 8–12 inches between fasteners | Ensures secure hold without visible bunching |
| Drape Interval (over spindles) | Every 2–3 spindles | Creates soft loops without excessive slack |
Use a simple trick: before finalizing placement, step back every few feet and view the staircase from the bottom. Look for “hot spots” where garlands cluster or areas that feel bare. Adjust incrementally until the pattern feels even and relaxed.
Checklist: Preparing for Installation
Before hanging anything, gather these tools and materials:
- ✓ Measuring tape
- ✓ Scissors or wire cutters
- ✓ Floral wire (green or clear) or plastic zip ties
- ✓ Mounting clips (optional, for delicate banisters)
- ✓ Ladder or step stool
- ✓ Spacer tool (e.g., 3-inch wooden block)
- ✓ Gloves (to protect hands from prickly foliage)
- ✓ Garlands (pre-fluffed for realism)
Also, consider lighting. If adding string lights, weave them into the base garland before installing secondary layers. This prevents later disruption and ensures even glow distribution.
Real Example: A Victorian Home Staircase Transformation
In Portland, Oregon, homeowner Maria Tran renovated her 1892 Victorian home’s main staircase for the holidays. The wide cherrywood banister had always looked bare during winter months. She purchased three 12-foot garlands: one dense Fraser fir (base), one mixed eucalyptus and ivy (middle), and one pinecone-and-berried vine accent piece (top).
Following spacing guidelines, she installed the fir garland first, securing it every 10 inches with green floral wire looped under the rail. She then placed the eucalyptus strand 3 inches above it, weaving it slightly forward on alternating spindles. Finally, she added the lighter vine garland 3 inches above that, focusing on the central curve of the staircase for maximum visibility.
The result was a tiered, cascading effect that drew compliments from guests. From the entryway below, the layered greens created a sense of abundance without blocking sightlines. By maintaining consistent spacing and choosing varied textures, Maria achieved a custom look on a modest budget.
Common Mistakes and How to Avoid Them
Even experienced decorators make errors when layering garlands. Here are frequent pitfalls and solutions:
- Mistake: Overlapping garlands completely, hiding lower layers.
Solution: Offset each layer vertically and slightly horizontally to reveal all components. - Mistake: Using mismatched lengths, leading to uneven ends.
Solution: Trim all garlands to identical lengths before installation, or let one extend gracefully longer at the base. - Mistake: Ignoring weight distribution, causing sagging.
Solution: Reinforce heavy sections with extra fasteners or distribute bulk evenly. - Mistake: Skipping pre-fluffing, resulting in flat, artificial-looking greenery.
Solution: Fluff each garland thoroughly 24 hours before hanging to restore volume.
Frequently Asked Questions
Can I mix real and faux garlands?
Yes, but ensure they match in scale and texture. Real garlands dry out and shed, so place them lower or in less trafficked areas. Faux garlands offer durability and reusability, making them ideal for top layers exposed to touch.
How do I keep garlands from slipping on smooth railings?
Use non-slip mounting clips or apply double-sided carpet tape beneath fasteners. Avoid adhesives that could damage wood finishes. For extra grip, wrap the underside of the garland lightly with rubberized shelf liner before attaching.
Should garlands touch the wall behind the banister?
No. Maintain a small gap (½ to 1 inch) so the garlands project forward and cast subtle shadows, enhancing dimensionality. Direct contact flattens the look and may stain walls over time, especially with real greenery.
Final Thoughts and Next Steps
Layering multiple garlands on a staircase with balanced spacing is both an art and a science. It demands attention to proportion, texture, and rhythm—but the payoff is undeniable. A well-decorated staircase becomes a centerpiece, setting the tone for your entire holiday aesthetic.
The techniques outlined here—measured spacing, strategic layering, thoughtful material selection—are accessible to anyone, regardless of experience. With careful planning and a few basic tools, you can achieve a display that looks professionally styled and deeply personal.
Now that you understand the principles, it’s time to apply them. Measure your staircase, choose your garlands, and begin experimenting with arrangements. Don’t aim for perfection—aim for intentionality. Even small adjustments in spacing or texture can elevate the entire look.


 浙公网安备
33010002000092号
浙公网安备
33010002000092号 浙B2-20120091-4
Comments
No comments yet. Why don't you start the discussion?