
Layering necklaces is one of the most expressive ways to elevate an outfit, adding depth, texture, and personality to even the simplest ensemble. But as stylish as stacked chains can be, they often come with a frustrating downside: constant tangling. Knots not only waste time but can damage delicate chains and weaken clasps over time. The good news? With thoughtful selection, smart storage, and intentional wearing techniques, you can master tangle-free necklace layering that looks polished and feels effortless—every single day.
Choose the Right Chain Lengths and Styles
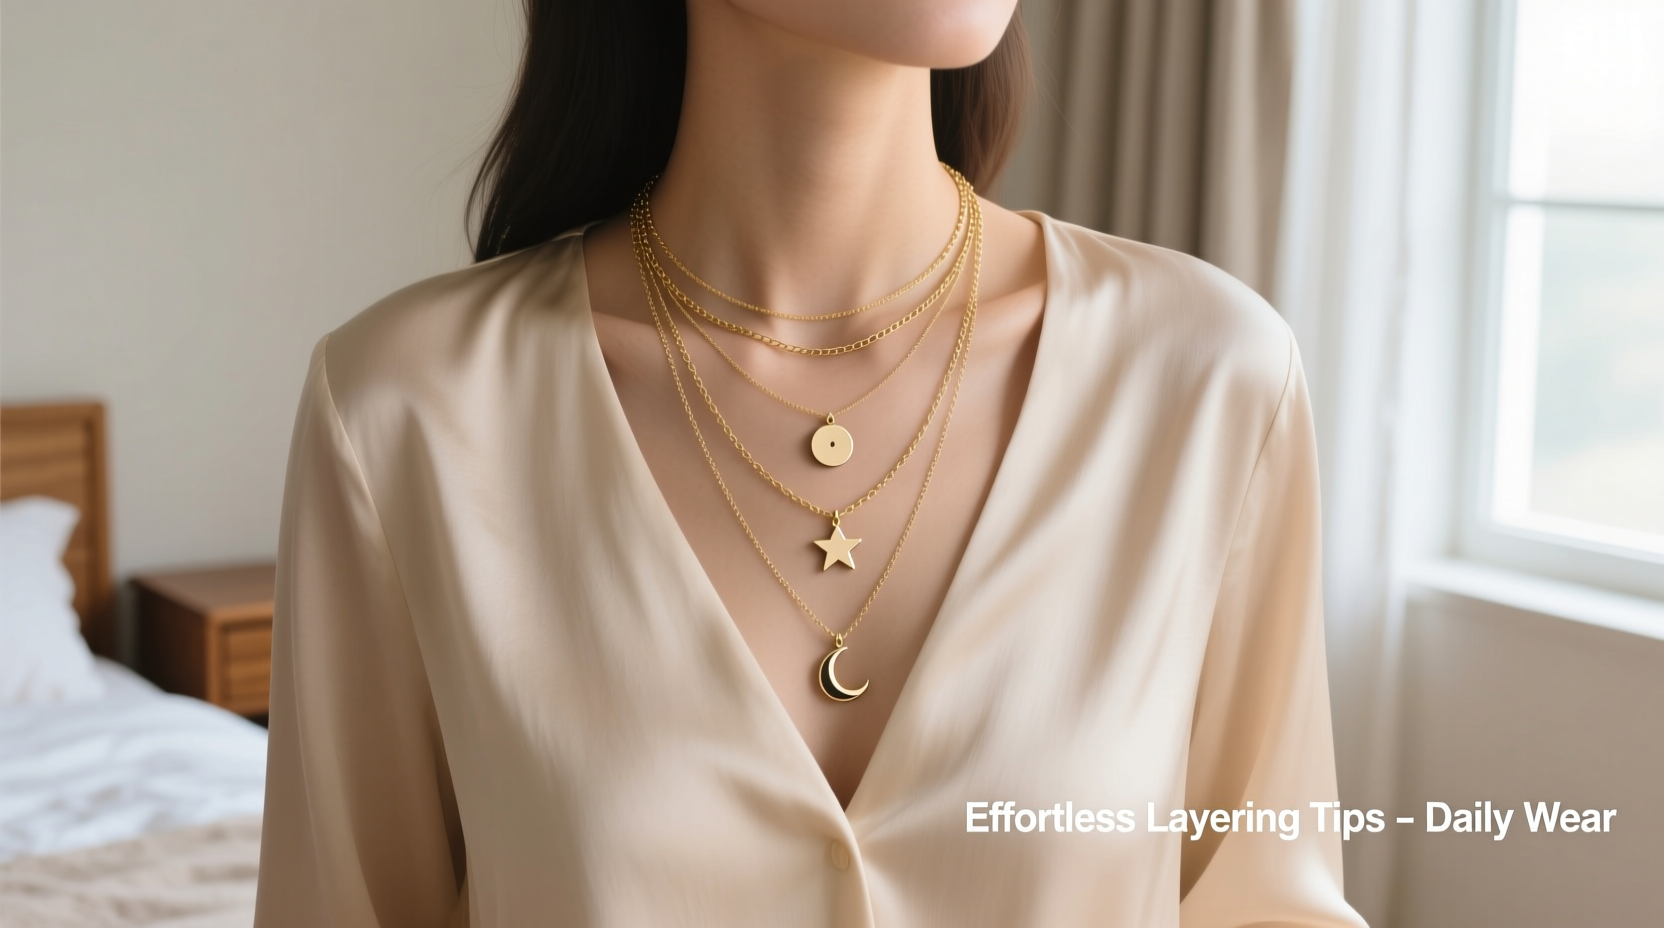
The foundation of a well-layered look lies in the strategic use of varying chain lengths. When multiple necklaces are too close in length, they naturally twist and overlap, increasing friction and the likelihood of knots. A balanced stack typically follows a 2-inch rule: each successive necklace should be at least two inches longer than the one above it. This creates distinct visual tiers and minimizes contact between chains.
For example, start with a choker at 14–16 inches, add a princess-length piece at 18 inches, then a matinee style at 20–22 inches. This staggered approach keeps each necklace in its own space, reducing entanglement while creating an elegant cascading effect.
Equally important is the choice of chain styles. Mixing delicate and bold pieces adds visual interest but requires careful pairing. Thin, fine chains like cable or box chains tangle more easily when paired with heavier or textured chains such as rope, figaro, or curb styles. To prevent this, place sturdier, thicker chains on the outside layers and reserve finer ones for the center or top tier where movement is more restricted.
Secure Your Necklaces Before Wearing
How you put on your necklaces matters just as much as how you choose them. Rushing through the process increases the chance of loops forming before the clasp even closes. Instead, adopt a deliberate routine.
Lay all selected necklaces flat on a clean surface before dressing. Fasten each clasp first, then drape them around your neck one at a time, starting from the longest to the shortest. This prevents shorter chains from slipping under longer ones during application, which is a common cause of twisting.
If you're working with magnetic or spring-ring clasps, ensure they're fully engaged. A loose clasp allows excess movement, leading to tangles throughout the day. For added security, consider upgrading to lobster clasps—they’re more reliable and less prone to accidental opening.
“Proper closure isn’t just about safety—it’s about stability. A securely fastened necklace moves as a single unit, drastically reducing the risk of knotting.” — Lila Monroe, Jewelry Designer & Stylist
Prevent Tangling During Storage
Tangling often begins long before you wear your jewelry—it starts in the drawer. Storing multiple necklaces loosely together is the fastest way to guarantee a knotted mess the next time you reach for them. Prevention starts with organization.
Invest in a dedicated jewelry stand with individual hooks or slots. Hanging necklaces vertically keeps them separated and allows gravity to maintain their natural shape. If space is limited, use a lined drawer organizer with compartments or fabric pouches. Each necklace should have its own designated space.
For travel, wrap each necklace individually around a soft cloth strip or a piece of cardboard, then secure the clasp over the end. Alternatively, use silicone travel cases designed specifically for jewelry—they cushion delicate chains and lock clasps in place.
| Storage Method | Best For | Risk Level |
|---|---|---|
| Jewelry Stand (Hooks) | Daily wear, multiple layers | Low |
| Fabric Pouches / Compartments | Sensitive finishes, travel | Low-Medium |
| Loose Drawer Toss | None – avoid | High |
| Cardboard Wrap (Travel) | Short trips, single pieces | Low |
| Ziplock Bag + Clasp Through Hole | Emergency organization | Medium |
A Step-by-Step Guide to Effortless Layering
Follow this simple five-step process every time you want to layer necklaces with confidence:
- Select 2–4 necklaces with varying lengths, ideally differing by at least two inches each.
- Check clasps and integrity—ensure no weak links or worn closures.
- Lay them out flat in order from longest to shortest.
- Clasp each necklace individually before placing them around your neck.
- Put them on from longest to shortest, adjusting gently to align layers.
Once worn, give a slight tug to each chain to settle it into place. Avoid shaking or pulling aggressively—if a chain shifts excessively, reconsider the combination. Overlayering increases movement and friction, making tangles inevitable.
After removing your jewelry, reverse the process: take off the shortest necklace first, followed by the others in descending order. This prevents longer chains from catching on shorter ones during removal.
Real-Life Example: Olivia’s Morning Routine
Olivia, a graphic designer based in Portland, used to spend ten minutes untangling her favorite gold pendant layers every other morning. Frustrated, she reevaluated her routine. She owned three thin chains: 16”, 18”, and 20” inches—all nearly identical in width and finish. They twisted constantly.
She replaced the middle chain with a slightly bolder 18-inch cable chain and began storing each piece on a small velvet hook rack. She also started putting them on in sequence, longest first. Within a week, the daily tangle sessions disappeared. Now, her layered look takes under a minute to assemble and stays intact throughout the workday—even during bike commutes.
Her change wasn’t about buying new jewelry; it was about refining her habits. “I realized I was treating my necklaces like accessories,” she said, “but they need care like instruments. Once I gave them structure, everything flowed better.”
Do’s and Don’ts of Necklace Layering
To help you avoid common pitfalls, here’s a quick-reference guide:
| Do’s | Don’ts |
|---|---|
| Space lengths by at least 2 inches | Mix too many similar-length chains |
| Use different chain textures | Layer more than 4 delicate chains |
| Store necklaces separately | Throw them into a pile at night |
| Fasten clasps before draping | Put on multiple unclasped chains at once |
| Clean chains weekly with soft cloth | Wear jewelry while swimming or showering |
Following these guidelines doesn’t mean sacrificing creativity. In fact, constraints often inspire better design. Limiting yourself to three well-chosen pieces forces intentionality, resulting in a more cohesive and wearable look.
FAQ: Common Questions About Layering Necklaces
Can I layer necklaces made of different metals?
Absolutely. Mixing metals—like pairing rose gold with silver or yellow gold—is not only acceptable but fashionable. Just ensure the overall aesthetic is balanced. For instance, if you’re wearing a silver choker, balance it with a longer yellow gold chain rather than clustering mixed metals at the same level.
How do I clean tangled necklaces safely?
Never pull apart knots forcefully. Instead, lay the necklace on a flat surface and use a fine needle or pin to gently loosen the knot from the inside out. Dip a cotton swab in rubbing alcohol to lubricate stubborn areas if needed. After untangling, wash the chain with mild soap and water, then dry thoroughly with a microfiber cloth.
Is there a maximum number of necklaces I should layer?
While there’s no hard rule, exceeding four layers significantly increases tangling risk and visual clutter. For everyday wear, stick to 2–3 complementary pieces. Save bold, high-volume stacks for special occasions when you can monitor and adjust them throughout the event.
Final Thoughts: Make Layering Effortless, Not Stressful
Necklace layering should enhance your style, not complicate your mornings. The key lies in preparation: choosing the right combinations, storing them properly, and adopting a consistent wearing routine. It’s not about perfection—it’s about consistency. Small changes, like spacing lengths correctly or using a simple hook rack, compound over time into a seamless, tangle-free experience.
Think of your jewelry collection as a curated wardrobe. Each piece has its role, and when combined thoughtfully, they tell a story. With these strategies, you’ll spend less time wrestling with knots and more time enjoying the confidence that comes from wearing your style with ease.


 浙公网安备
33010002000092号
浙公网安备
33010002000092号 浙B2-20120091-4
Comments
No comments yet. Why don't you start the discussion?