
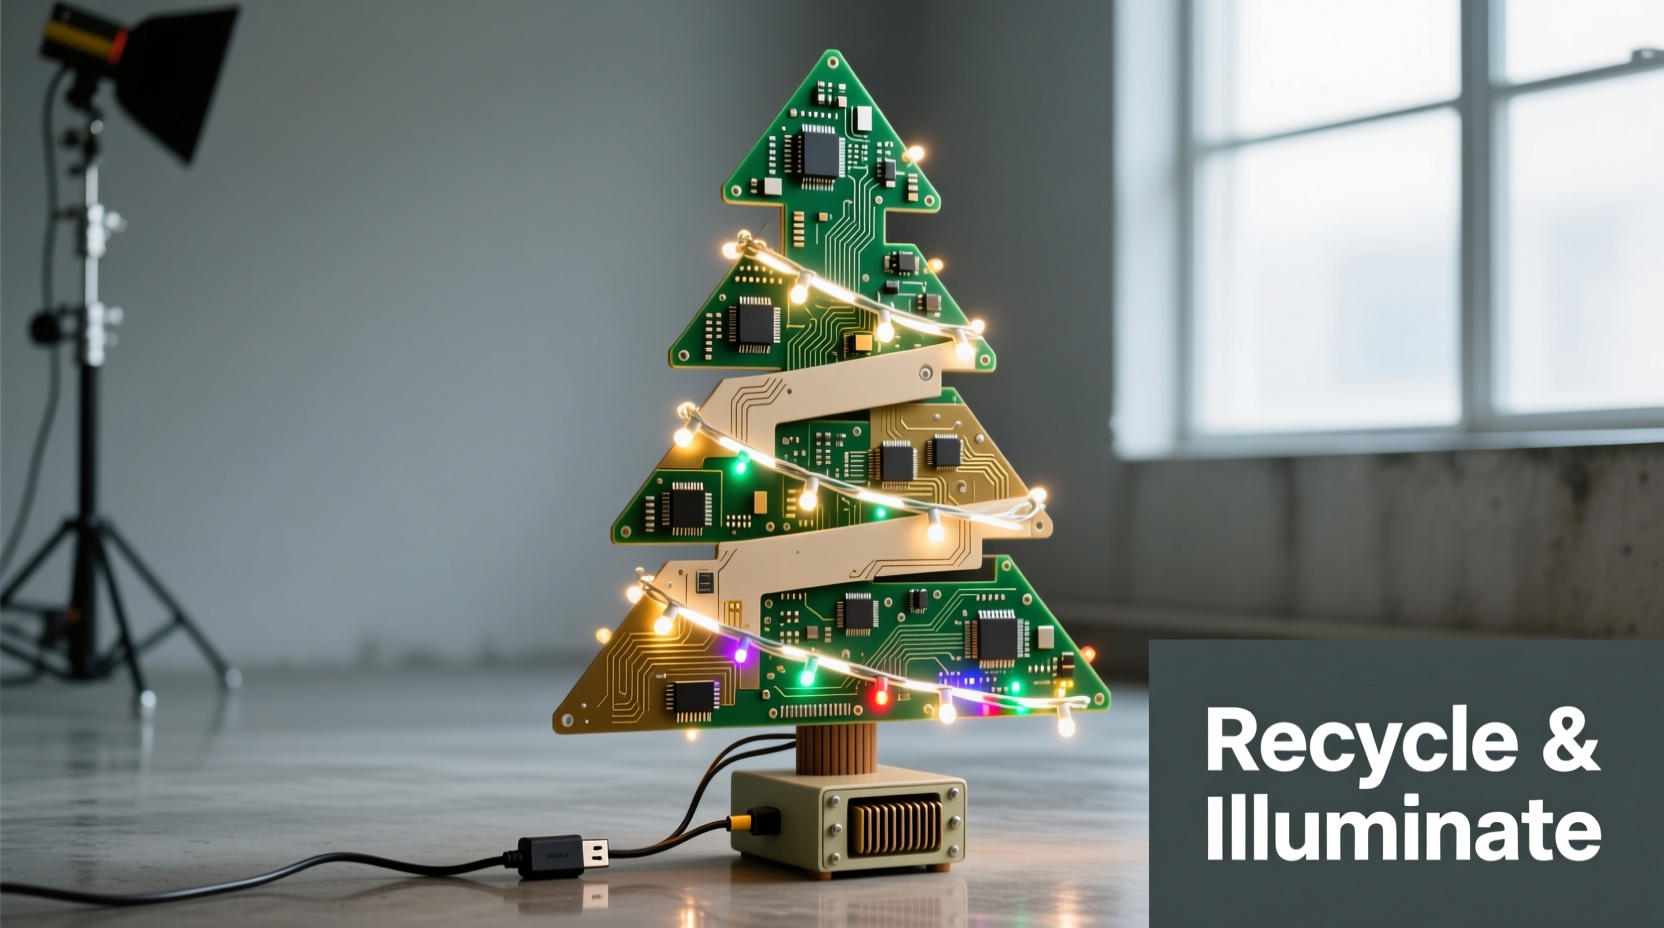
In an age where sustainability meets innovation, the holiday season offers a unique opportunity to blend tradition with technology. Instead of discarding old electronics, why not transform them into a centerpiece that celebrates both the spirit of Christmas and the ingenuity of modern recycling? Creating a Christmas tree from recycled circuit boards and LED lights is more than a craft project—it’s a statement. It combines environmental responsibility with artistic expression, resulting in a striking decoration that glows with nostalgia and futurism alike.
This guide walks you through every phase of building your own electronic evergreen, from sourcing materials safely to assembling a stable, shimmering structure. Whether you're a hobbyist, tinkerer, or eco-conscious decorator, this project rewards patience and precision with unforgettable results.
Gathering Materials: What You’ll Need
The foundation of any successful DIY project lies in preparation. Before cutting or soldering, ensure you have all necessary components on hand. Most items can be sourced from old electronics, thrift stores, or surplus suppliers.
- Recycled circuit boards (from computers, printers, routers, etc.)
- LED string lights (preferably warm white or multicolor, battery- or USB-powered)
- Sturdy base (wood, acrylic, or metal)
- Metal rod or dowel (for central support)
- Drill and drill bits
- Strong adhesive (epoxy or industrial-strength glue)
- Wire cutters and pliers
- Safety gear (gloves, goggles, mask)
- Sandpaper (fine grit)
- Optional: clear lacquer or sealant for protection
Design Planning: Structure and Aesthetics
Unlike traditional trees, this version requires deliberate engineering. Circuit boards are rigid and uneven, so planning layer placement ensures balance and visual appeal.
Start by sketching a rough outline of your tree. Most designs follow a conical shape, with larger layers at the bottom tapering toward the top. Decide how many tiers you want—typically five to seven for a tabletop model (12–24 inches tall). Each tier should decrease in diameter by 1.5 to 2 inches.
Next, sort your circuit boards by size and color. Green PCBs dominate, but gold-plated or copper-rich boards add contrast. Consider arranging them to create symmetry or intentional asymmetry, depending on your preferred aesthetic. Some builders alternate orientations to mimic pine needles; others group by component density for texture.
“Upcycling e-waste into art transforms perceived junk into cultural commentary. This kind of project bridges design, ecology, and digital heritage.” — Dr. Lena Torres, Sustainable Design Researcher, MIT Media Lab
Step-by-Step Assembly Guide
With materials gathered and design planned, it’s time to build. Follow this sequence carefully to ensure structural integrity and electrical safety.
- Prepare the Base: Select a circular or star-shaped wooden base (6–8 inches in diameter). Drill a central hole to fit your support rod. Secure the rod vertically using epoxy or a metal bracket.
- Cut and Sand Boards: Using wire cutters or a rotary tool, trim larger boards into consistent shapes—triangles, ovals, or trapezoids work well. Smooth sharp edges with sandpaper to prevent injury.
- Create Tiers: Attach the largest board layer near the base, drilling small holes to slide onto the central rod. Use spacers (metal washers or plastic sleeves) between layers for even spacing (about 1.5–2 inches apart).
- Secure Each Layer: Once positioned, apply strong adhesive around the contact point between the board and rod. Allow drying time as per manufacturer instructions before adding the next tier.
- Integrate LED Lights: Begin wrapping LED strings from the bottom up. Weave wires carefully behind components to hide them. Clip excess wire with pliers, ensuring connections remain intact. Avoid piercing circuit traces to prevent shorts.
- Add Final Touches: Place the smallest board at the top. Consider topping it with a salvaged IC chip as a star, or a small soldered diode that glows when powered.
- Test and Seal: Power on the lights to confirm functionality. If satisfied, apply a thin coat of clear lacquer to protect exposed metals from oxidation—do not spray directly on LEDs.
Safety and Environmental Considerations
Working with electronic waste demands caution. While most consumer-grade circuit boards pose minimal risk once disconnected, certain precautions are essential.
Dust from cutting PCBs may contain fine particles of fiberglass, lead, or brominated flame retardants. Always wear a respirator, gloves, and eye protection during cutting and sanding. Work in a well-ventilated area, preferably outdoors or under a fume extractor.
Never use boards from CRT monitors, microwaves, or industrial machinery without expert assessment—they may harbor hazardous components. When in doubt, skip it.
On the positive side, repurposing e-waste reduces landfill burden. According to the Global E-Waste Monitor, only 17.4% of electronic waste was formally recycled in 2023. Projects like this keep functional materials in circulation longer, aligning with circular economy principles.
Do’s and Don’ts of Circuit Board Crafting
| Do | Don’t |
|---|---|
| Use battery-powered LED strings for safer handling | Plug into mains voltage without proper insulation |
| Label layers during assembly to avoid confusion | Stack too many heavy boards without reinforcing the core |
| Seal exposed copper to prevent corrosion | Use water-based cleaners on bare circuits |
| Involve kids under supervision with pre-cut pieces | Allow unsupervised access to sharp tools or soldering irons |
| Document your build for social sharing or future replication | Dispose of scraps in regular trash—recycle responsibly |
Real Example: The Maker Faire Tree That Went Viral
In 2022, Brooklyn-based engineer Rafael Nguyen debuted his “Silicon Spruce” at the New York Maker Faire. Constructed entirely from decommissioned server boards and reclaimed fairy lights, the 3-foot-tall tree drew crowds not just for its glow, but for its story.
Rafael sourced materials from a local IT recycling center, selecting boards with visible heat sinks and gold traces for visual interest. He designed a modular system: each tier could be disassembled for transport, with magnetic connectors linking power between levels. The final product ran on a single USB power bank, drawing less than 5 watts.
What started as a weekend experiment became a talking point about urban e-waste reuse. Within weeks, tech blogs and green living sites featured the build. Today, Rafael runs workshops teaching others to create their own versions—proving that one person’s obsolete hardware can become another’s holiday heirloom.
Customization and Creative Variations
While the classic green-and-gold tree remains popular, there’s room for personalization. Consider these adaptations:
- Color Themes: Use black-painted boards with blue LEDs for a cyberpunk aesthetic, or red PCBs (rare but available in some gaming consoles) for a festive twist.
- Interactive Elements: Add motion sensors or sound-reactive modules so lights pulse to music.
- Miniature Versions: Craft tiny desktop models using Arduino shields or Raspberry Pi boards as full tiers.
- Educational Displays: Label components (“Capacitor,” “Resistor”) to teach electronics basics during holiday gatherings.
Some artists embed QR codes linking to stories about the device each board came from—turning decoration into digital archaeology.
Frequently Asked Questions
Can I use any type of LED lights?
Yes, but low-voltage options (3V–5V) are safest. Avoid AC-powered strings unless enclosed in insulated housing. Battery-operated sets offer greater flexibility and reduce fire risk.
Is it safe to leave the tree plugged in overnight?
If using a reputable LED set with built-in current regulation and low heat output, yes—especially if powered via USB. However, never leave unattended for extended periods. For peace of mind, use a timer switch to limit operation to evening hours.
Where can I get circuit boards if I don’t have old electronics?
Many schools, libraries, and repair shops accept donations of broken devices. Online marketplaces like eBay or Etsy sell bulk lots of clean, tested PCBs. Some cities also host e-waste drop-off events where limited materials may be available for creative reuse.
Checklist: Build Readiness
Before starting, verify you’ve completed these steps:
- ☐ Collected enough circuit boards for 5–7 tiers
- ☐ Selected and tested LED lighting system
- ☐ Prepared sturdy base and central support rod
- ☐ Acquired safety gear and ventilation setup
- ☐ Designed layout (sketch or digital mockup)
- ☐ Set up workspace with protective covering
- ☐ Confirmed disposal method for leftover scraps
Conclusion: Light Up the Holidays—Sustainably
A Christmas tree made from recycled circuit boards and LED lights is more than decoration. It’s a conversation starter, a tribute to innovation, and a tangible act of environmental stewardship. In reimagining what belongs in holiday decor, you challenge conventions and honor both past technology and future responsibility.
Every soldered joint, every repurposed trace, tells a story of renewal. As lights flicker across silicon pathways once buried inside forgotten machines, they remind us that beauty often lies not in perfection—but in transformation.


 浙公网安备
33010002000092号
浙公网安备
33010002000092号 浙B2-20120091-4
Comments
No comments yet. Why don't you start the discussion?