
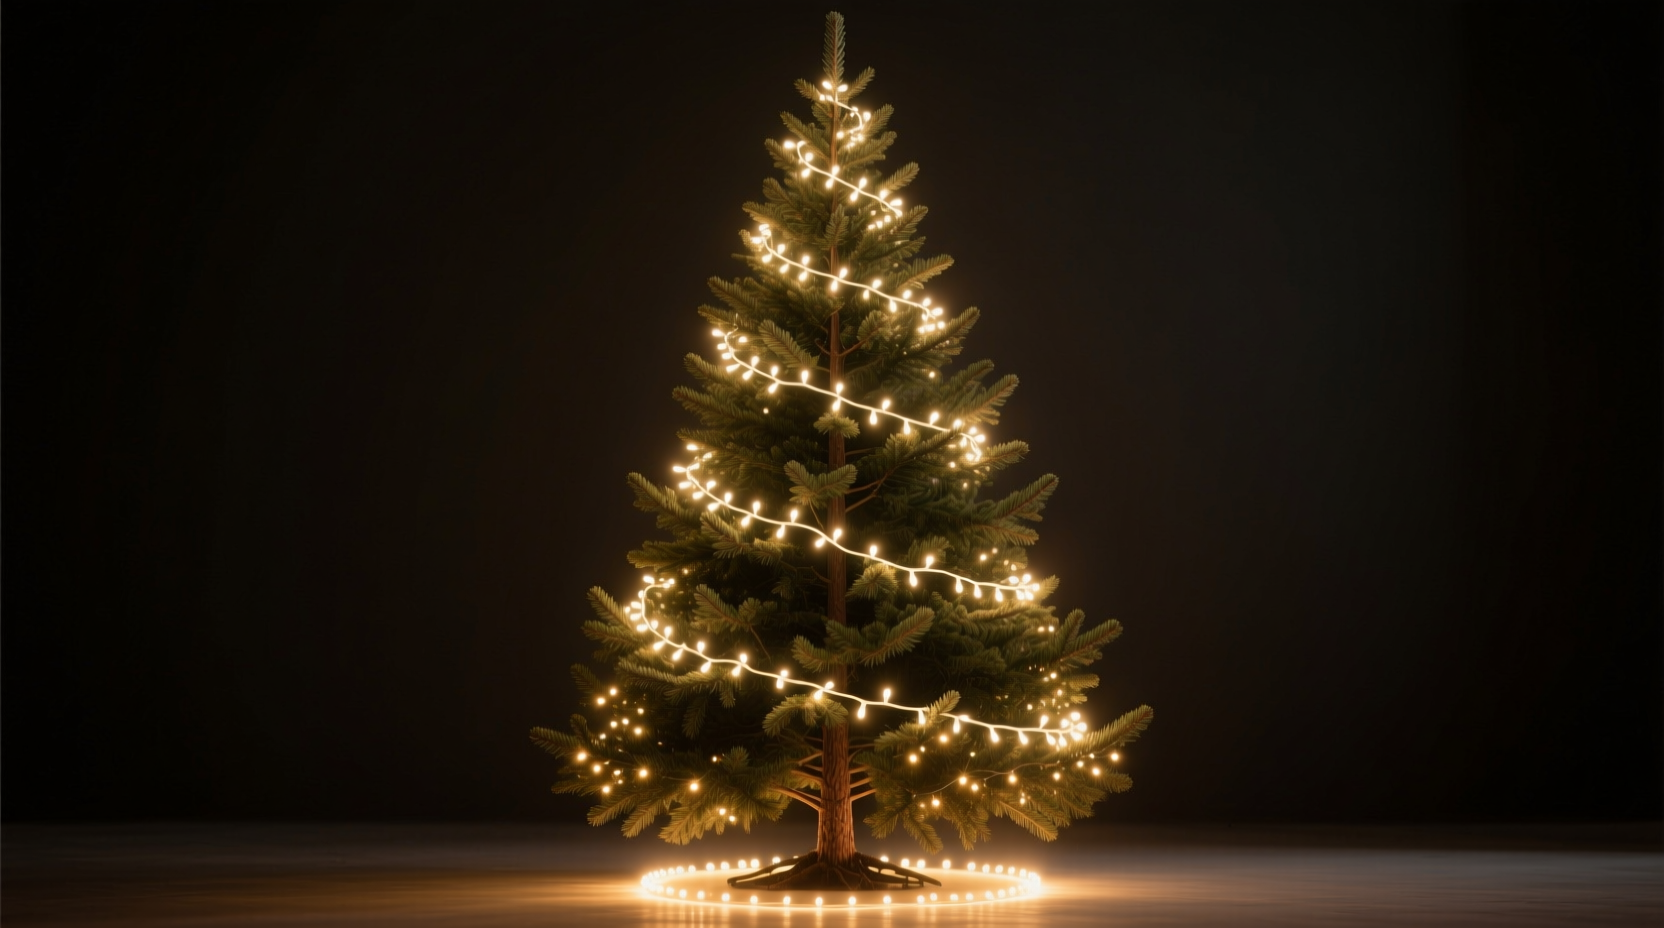
A Christmas tree doesn’t need glittering baubles or tinsel to command attention. In fact, when done right, a tree adorned solely with lights can appear richer, more elegant, and surprisingly fuller than one weighed down by decorations. The secret lies not in what you add—but how you use light as both illumination and illusion.
By focusing on strategic lighting techniques, thoughtful bulb selection, and deliberate placement, you can create the visual impression of volume, depth, and lushness. This approach is ideal for minimalist aesthetics, modern interiors, or anyone seeking a serene, luminous centerpiece without clutter. It’s also a smart solution when ornaments are unavailable, broken, or simply unwanted.
Contrary to popular belief, fewer elements don’t mean less impact. When stripped of distractions, light becomes the star—and with precision, it can sculpt space, define form, and trick the eye into seeing abundance where none physically exists.
The Science of Light and Perception
Human vision interprets density and fullness through contrast, shadow, and brightness distribution. A sparse area under low light appears thinner; a well-lit section with layered highlights feels dense and rich. This principle applies directly to Christmas trees: even a modestly sized or slightly bare tree can seem luxuriant if light is used to emphasize volume.
Lights placed deep within the branches cast shadows forward, creating depth. Bulbs clustered at varying heights break up flat silhouettes. Warm-toned LEDs reflect off nearby needles, enhancing perceived foliage. Together, these effects simulate the visual cues our brains associate with a full, healthy tree.
Interior designer and holiday lighting specialist Miriam Tran explains:
“Light isn’t just functional—it’s architectural. On a Christmas tree, it defines shape, suggests mass, and draws the eye where you want it. A perfectly lit tree without ornaments can feel more complete than an overloaded one with poor lighting.” — Miriam Tran, Interior Lighting Consultant
This philosophy shifts the focus from decoration to design. Instead of hanging ornaments to fill gaps, you use light to eliminate the perception of gaps altogether.
Choosing the Right Lights for Maximum Fullness
Not all string lights create the same effect. Some enhance fullness; others highlight thin spots. The choice of bulb type, color temperature, wire finish, and spacing determines how convincingly your tree appears lush.
| Bulb Type | Effect on Fullness | Best For |
|---|---|---|
| C6 Wide-Angle LED | High – emits broad glow, illuminates surrounding needles | Fir, spruce, or dense trees needing soft diffusion |
| Microlights (2mm) | Medium – subtle sparkle, good for layering | Artificial trees with fine tips or slim profiles |
| C9 Shatterproof | Low to Medium – bold but spaced; may emphasize gaps | Large trees where statement lighting matters more than density |
| Fairy Lights (Battery-Operated) | High – excellent for inner-layer coverage and hidden clusters | Adding secondary layers and filling core shadows |
Color temperature plays a critical role. Warm white (2700K–3000K) mimics candlelight and blends naturally with greenery, making reflections softer and more organic. Cool white (5000K+) creates sharper contrasts that can accentuate branch structure—sometimes revealing thin areas. For a full appearance, warm white is nearly always preferable.
Step-by-Step Guide: Lighting Technique for Visual Fullness
Applying lights correctly is more important than the number of bulbs. Follow this five-phase method to maximize perceived volume:
- Prepare the Tree Structure
Fluff every branch outward and upward. Rotate each tip so the underside faces out slightly—this increases surface area for light reflection. For artificial trees, spend 10–15 minutes shaping before lighting begins. - Start from the Inside
Begin with a single strand of warm-white microlights. Feed it into the central trunk area, wrapping loosely around the main pole. Place small loops every 8–10 inches inside the core. These internal lights cast ambient glow outward, eliminating dark centers—a common cause of “hollow” appearance. - Weave Radially from Trunk to Tip
Take your primary string (C6 or similar) and begin at the top rear of the tree. Weave the cord in and out of branches, moving down in a spiral. Do not wrap around the perimeter like a candy cane. Instead, insert the bulb into the branch cluster, pull through, then emerge farther out. This “zig-zag” method ensures lights sit within the foliage, not just on the surface. - Layer by Zone
Divide the tree into thirds: top, middle, base. Apply one strand per zone, but vary the density. Use tighter spacing (3–4 inches between bulbs) in the lower two-thirds, where fullness is most expected. The top third can have slightly wider spacing but include a few upward-facing bulbs to draw the eye skyward. - Add Accent Clusters
Use short battery-powered fairy light strands (with on/off switches) to create glowing “nests” in sparse areas. Tuck them behind mid-level branches where natural gaps occur. These localized hotspots trick the brain into perceiving denser growth.
After installation, turn off room lights and observe the tree from multiple angles. Walk around it slowly. Any dark patches? Add micro-lights there. Does the top feel weak? Insert a vertical mini-strand along the central stem. Refinement is part of the process.
Checklist: Achieving a Full-Looking Tree with Lights Only
- ✅ Fluff and shape all branches before installing lights
- ✅ Use warm-white bulbs (2700K–3000K) for natural glow
- ✅ Begin with internal core lighting to eliminate shadows
- ✅ Weave lights radially—not wrapped around the outside
- ✅ Layer multiple strands: one main + one or two accent sets
- ✅ Focus density on lower and middle sections
- ✅ Test in darkness and adjust problem areas
- ✅ Hide cords against the trunk or backside whenever possible
- ✅ Secure loose ends with twist ties or floral pins (not tape)
- ✅ Use battery-operated micro-lights for targeted bright zones
Real Example: Transforming a Sparse Artificial Tree
Sarah K., a graphic designer in Portland, inherited a pre-lit artificial tree from her parents. While functional, it had visible gaps near the base and a thin upper crown. She wanted a festive presence but disliked cluttered ornament styles.
She added three 100-light strands of warm-white C6 LEDs, weaving them from the inside out using the radial technique. She supplemented with two 20-light battery microlight strings tucked into the left and right mid-sections where branches were weakest. Finally, she fluffed every PVC needle by hand over two evenings, adjusting angles for maximum light catch.
The result? Guests assumed the tree was newly purchased and heavily decorated. One commented, “It looks like it’s glowing from within.” Sarah achieved the illusion of fullness not by adding bulk, but by mastering light placement.
Common Mistakes That Make Trees Look Thinner
Even with quality lights, errors in application can undermine the goal. Avoid these pitfalls:
- Wrapping lights like a cylinder – This places bulbs on the surface, leaving the interior dark and hollow-looking.
- Using only cool-white or multicolor bulbs – Harsh tones expose structure; rainbow colors distract from form.
- Skipping the fluffing step – Compressed branches reflect less light and appear scrawny.
- Overloading the top – Concentrating lights at the peak makes the base seem darker and sparser by comparison.
- Ignoring the backside – Even if against a wall, partial rear lighting prevents a “flat” profile when viewed from the side.
One often-overlooked factor is power source placement. If using plug-in strings, ensure the outlet is nearby and cords don’t dangle visibly. Exposed wires break immersion and reduce elegance. For freestanding setups, battery packs hidden in the tree stand or base skirt maintain clean lines.
Frequently Asked Questions
How many strings of lights do I need for a full look?
A general rule is 100 lights per foot of tree height. For example, a 6-foot tree needs at least 600 bulbs. However, quality of placement matters more than quantity. Six hundred well-woven bulbs will outperform 1,000 poorly installed ones.
Can I achieve this with pre-lit trees?
Yes, but most pre-lit trees under-light the interior and base. Enhance them by adding 1–2 supplemental strands using the radial weave method. Focus on filling the lower third and core areas where factory strings are often sparse.
Do LED or incandescent lights work better for fullness?
Modern warm-white LEDs are superior. They run cooler, last longer, and offer higher lumen output per watt. Their consistent brightness across strands ensures even coverage. Incandescents can yellow over time and generate heat that warps nearby branches.
Final Thoughts: Less Can Be More
A Christmas tree made radiant with lights alone is not a compromise—it’s a deliberate design choice. It speaks to restraint, intentionality, and a deeper understanding of how light shapes space. Without ornaments competing for attention, the viewer sees the tree as a living sculpture of glow and shadow.
The techniques outlined here go beyond seasonal decor. They teach observation, patience, and the art of suggestion. You’re not hiding emptiness—you’re redefining fullness through perception.
Whether you're embracing minimalism, recovering from lost decorations, or simply exploring new aesthetic territory, remember: a truly full-looking tree isn't measured in ornaments hung, but in warmth created.


 浙公网安备
33010002000092号
浙公网安备
33010002000092号 浙B2-20120091-4
Comments
No comments yet. Why don't you start the discussion?