
Crafting personalized photo ornaments is more than a seasonal activity—it’s a way to preserve memories in a tangible, meaningful format. With just your smartphone and a standard home printer, you can create unique decorations that reflect personal moments, family milestones, or cherished friendships. Whether it's for the holidays, a gift exchange, or year-round display, these handmade ornaments offer emotional value that store-bought versions simply can’t match.
The process doesn’t require advanced tools or artistic training. What matters most is attention to detail, thoughtful image selection, and a few basic supplies. This guide walks you through every stage—from capturing the right photo on your phone to printing, cutting, and finishing your ornament with care. By the end, you’ll have not only a beautiful keepsake but also a repeatable method for future projects.
Why Make Your Own Photo Ornaments?
Commercial ornaments often lack personality. Mass-produced designs may be festive, but they don’t tell your story. Custom photo ornaments bridge the gap between sentiment and decoration. They turn everyday snapshots into artful displays that spark conversation and nostalgia.
Creating them at home also saves money. A single specialty ornament from a boutique shop can cost $10–$20. In contrast, materials for a DIY version—cardstock, glue, ribbon—cost less than $1 per unit when bought in bulk. Plus, you control the design, size, and finish, allowing for creative freedom.
“Personalized ornaments are among the most emotionally resonant gifts people give during the holidays. They signal thoughtfulness and connection.” — Dr. Laura Simmons, Cultural Anthropologist specializing in modern gift-giving traditions
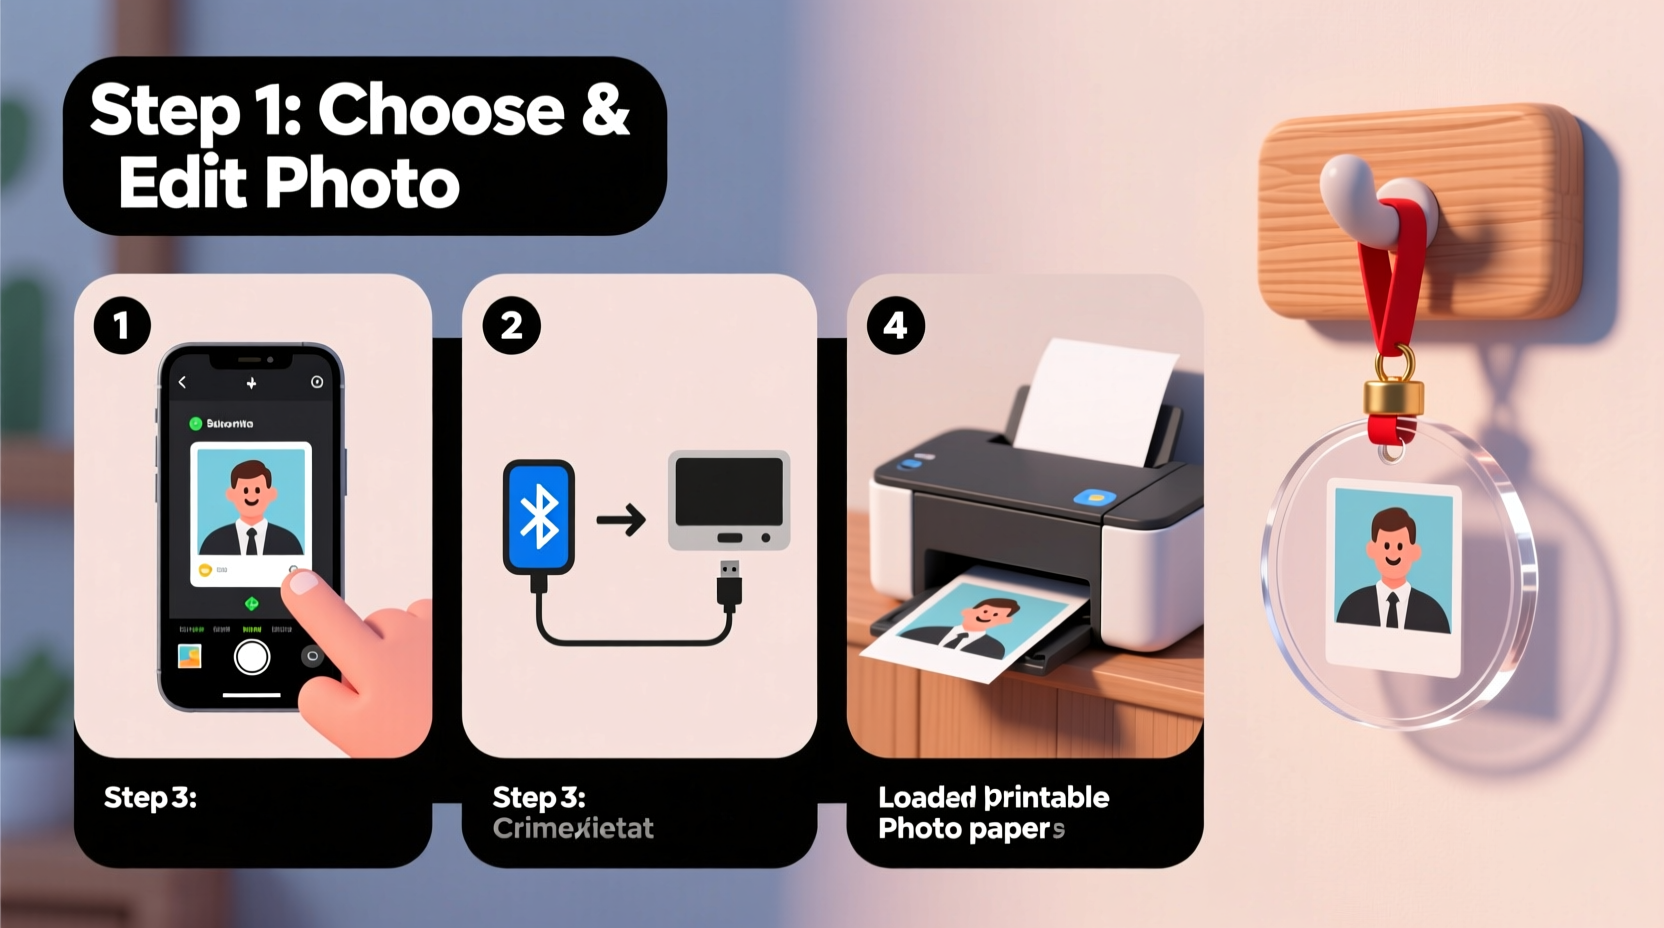
Step-by-Step Guide: From Smartphone to Finished Ornament
The journey from digital image to physical ornament involves five core stages. Follow this sequence carefully to ensure professional-looking results.
- Capture or Select the Right Photo
Use your smartphone camera to take a new photo or choose one from your gallery. Ideal images are well-lit, focused, and emotionally significant—such as a child’s first snowfall, a pet mid-play, or a quiet moment between loved ones. - Edit and Resize the Image
Open the photo in your phone’s editing app (or use free tools like Snapseed or Adobe Express). Crop the image to fit your intended ornament shape—typically square or circular. Adjust brightness if needed, especially for backlit photos. - Transfer to Computer or Print Directly
If your printer supports wireless printing, send the image directly from your phone via AirPrint (iOS) or Google Cloud Print (Android). Otherwise, transfer the file via email, cloud storage, or USB cable to a computer connected to the printer. - Print on Suitable Paper
Select heavyweight photo paper or cardstock (minimum 200 gsm) for durability. Set your printer to high-quality photo mode. Always do a test print on regular paper first to check sizing and alignment. - Cut, Laminate, and Assemble
Carefully cut out the printed photo using scissors or a craft knife. For added protection, apply clear self-adhesive laminating sheets or dip in Mod Podge for a sealant coat. Punch a small hole at the top and thread with ribbon, twine, or metallic cord.
Materials Checklist
Gather these items before starting to streamline your workflow:
- Smartphone with camera
- Photo editing app (built-in or third-party)
- Computer (optional, depending on printing method)
- Inkjet or laser printer
- Heavyweight photo paper or cardstock
- Scissors or precision craft knife
- Hole punch or needle tool
- Ribbon, yarn, or decorative cord (12–18 inches per ornament)
- Laminating sheets or clear sealant (Mod Podge, clear nail polish, or spray fixative)
- Glue stick or double-sided tape (if layering elements)
Choosing the Best Photos: Do’s and Don’ts
Not all photos translate well to small-format ornaments. Use this table to evaluate your selections.
| Do | Don't |
|---|---|
| Choose images with strong focal points (faces, pets, landmarks) | Use cluttered backgrounds that distract from the subject |
| Pick well-lit photos; avoid flash glare or shadows | Select dark or blurry images that lose detail when reduced in size |
| Opt for close-ups over wide-angle shots | Include too many people where faces aren’t clearly visible |
| Consider color harmony with your decor theme | Use low-resolution images that pixelate when enlarged |
Real Example: A Grandmother’s First DIY Ornament
Maria, a 72-year-old grandmother from Portland, had never used her smartphone for anything beyond calls and texts. When her granddaughter suggested making matching ornaments for Christmas, she was hesitant. Using a simple tutorial, Maria learned to open her photo gallery, select a picture of the two of them baking cookies last winter, and crop it into a square.
She emailed the image to her son, who printed it on thick cardstock. Together, they cut the circles, sealed them with clear contact paper, and tied red velvet ribbons through punched holes. At the family gathering, each member received one. “I never thought I could make something so special,” Maria said. “Now I look at my phone differently—I see memories waiting to be shared.”
This example shows that technical skill isn’t the barrier many assume. With minimal guidance, even beginners can produce touching, high-quality results.
Enhancing Durability and Presentation
A photo ornament should last beyond a single season. Protect your work with sealing techniques that guard against moisture, dust, and handling.
For long-term preservation, consider these options:
- Self-adhesive laminating sheets: Cut slightly larger than the photo and press smoothly to avoid bubbles.
- Mod Podge Outdoor: Provides UV and water resistance. Apply thin coats on both sides, letting dry completely between layers.
- Clear nail polish (edge-only): Brush along cut edges to prevent fraying without altering the surface.
- Spray sealant: Use matte or glossy acrylic sealer in a well-ventilated area for an even finish.
For presentation, pair your ornament with a small kraft box or organza bag. Add a handwritten tag: “Handmade with love from [Name]” or “Memory from [Year].” These touches elevate the perceived value and make gifting more personal.
Frequently Asked Questions
Can I use any type of printer for this project?
Yes, both inkjet and laser printers work, but inkjets typically deliver better photo quality. Ensure you’re using photo-safe paper, especially with inkjet models, to prevent smudging. Laser printers handle thicker stock well but may struggle with vibrant color reproduction compared to dedicated photo printers.
What if I don’t have a computer—can I print directly from my phone?
Absolutely. Most modern printers support wireless protocols like AirPrint (Apple) or Mopria (Android). Open your photo in the Gallery or Photos app, tap Share > Print, and select your device. Make sure both your phone and printer are on the same Wi-Fi network. Some apps like Google Photos also offer direct printing to compatible machines.
How do I prevent the ribbon from tearing the paper?
Punch a hole slightly away from the edge (about ¼ inch) and reinforce it with a metal eyelet, sticker, or small washer. Alternatively, use a needle to pierce the hole and thread the ribbon through twice, tying a secure knot behind the ornament to distribute tension.
Advanced Tips for Repeat Projects
Once you’ve mastered the basics, experiment with layered designs:
- Create a double-sided ornament by gluing two prints together back-to-back.
- Add a decorative border using colored paper or washi tape around the photo’s edge.
- Incorporate text by adding a printed caption below the image: “Our First Christmas Together” or “Est. 2023.”
- Use die-cut shapes (hearts, stars, trees) as templates for themed ornaments.
For families or classrooms, set up a production line: one person selects photos, another handles printing, a third cuts, and a final station assembles. This approach speeds up bulk creation while fostering collaboration.
Conclusion: Turn Memories Into Meaning
Creating a custom photo ornament with your smartphone and printer is more than a craft—it’s an act of storytelling. Each step, from selecting the image to threading the final ribbon, connects you to a moment worth remembering. You don’t need expensive equipment or years of experience. You only need intention, a few common supplies, and the willingness to try.
These ornaments become heirlooms. They’re passed down, rediscovered in storage boxes, and remembered long after the tree comes down. Start small: pick one photo, print it, shape it, hang it. Let that first piece inspire a tradition. Whether you're decorating your own tree or giving a gift that says “you matter,” the impact is lasting.


 浙公网安备
33010002000092号
浙公网安备
33010002000092号 浙B2-20120091-4
Comments
No comments yet. Why don't you start the discussion?