
The holiday season often brings with it a wave of consumerism—plastic-wrapped calendars filled with chocolates, mass-produced decorations, and single-use packaging. But there’s a growing movement toward mindful celebration: one that values sustainability, craftsmanship, and personal connection. Creating a DIY advent calendar from vintage tins is more than just a craft project; it’s an invitation to slow down, repurpose forgotten items, and build something meaningful. These tins don’t just hold daily surprises—they become keepsakes, reusable long after December 25th has passed.
Vintage tins—once used for tea, biscuits, or candies—are increasingly easy to find at thrift stores, flea markets, or even tucked away in family attics. Their durability, nostalgic charm, and compact size make them ideal containers for a 24-day countdown. When transformed into an advent calendar, each tin becomes both a numbered door and a standalone gift box, allowing for thoughtful customization. Whether you’re making one for a child, a partner, or yourself, this project blends creativity with practicality in a way few seasonal traditions do.
Why Choose Vintage Tins?
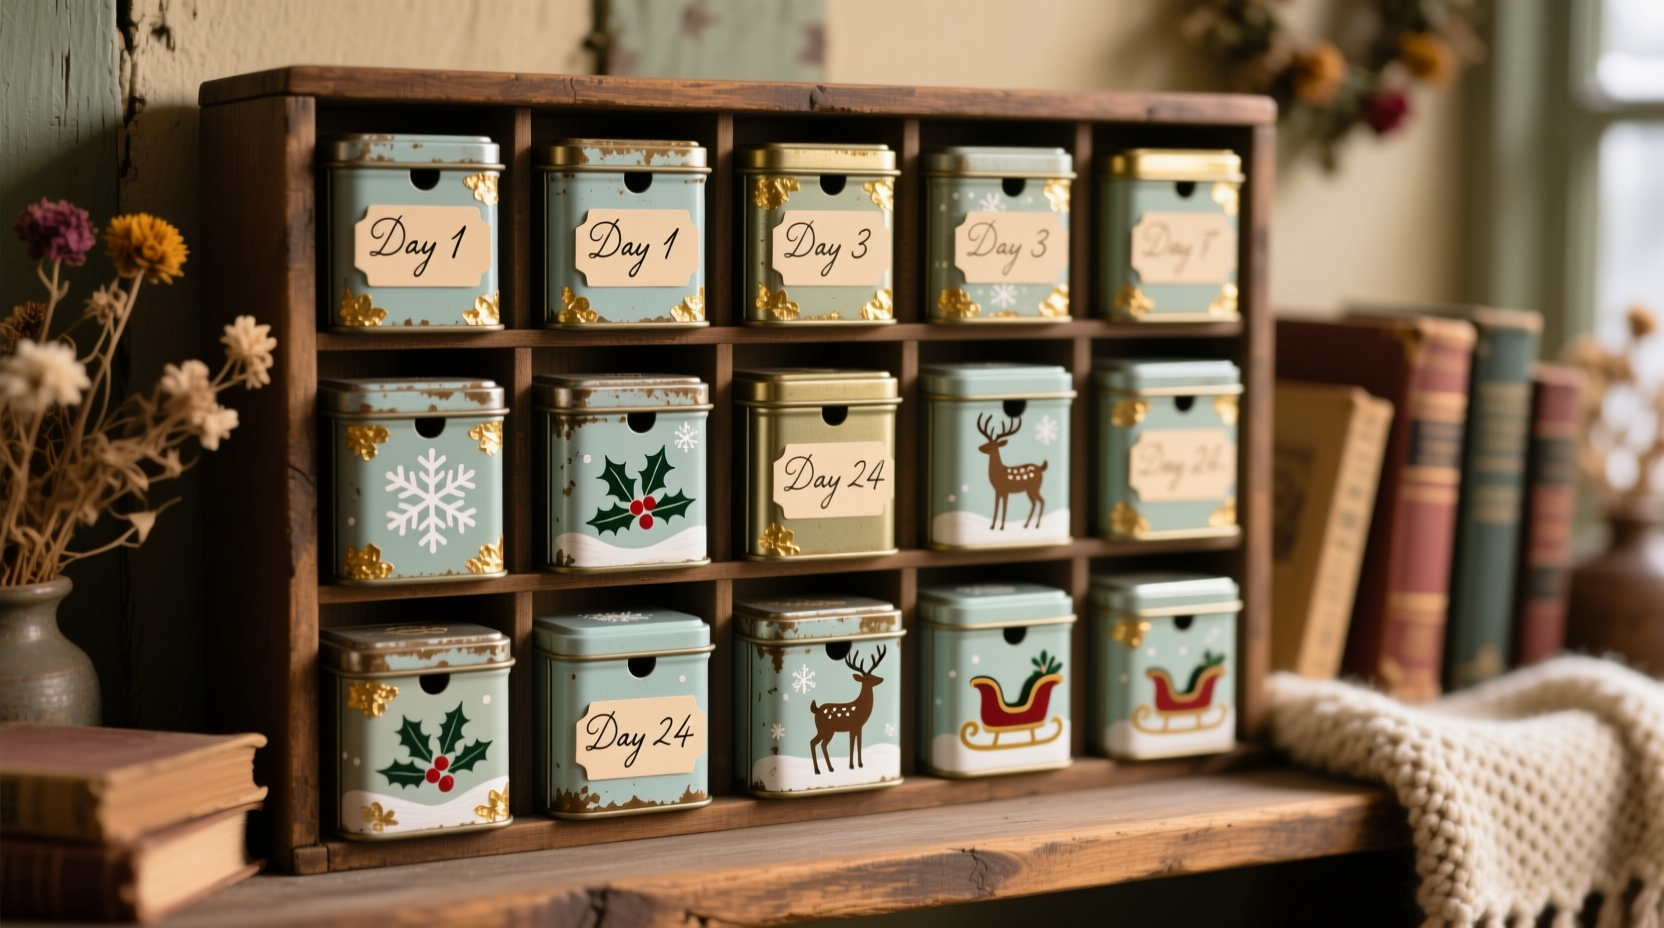
Modern advent calendars are often designed for one-time use. Once the last chocolate is eaten or toy removed, the cardboard structure ends up in the recycling bin—or worse, landfill. In contrast, vintage tins are built to last. Made from sturdy metal, they resist dents, moisture, and wear far better than paper-based alternatives. More importantly, they carry character. The faded labels, embossed patterns, and subtle patina speak of past decades, adding emotional depth to your holiday ritual.
Repurposing these tins also aligns with sustainable living principles. According to the U.S. Environmental Protection Agency, over 1 million tons of holiday-related waste are generated each week between Thanksgiving and New Year’s Day. By reusing existing materials instead of buying new ones, you reduce demand for resource-intensive manufacturing and lower your environmental footprint.
“Objects with history embedded in their surfaces create stronger emotional connections than anything off the shelf.” — Clara Nguyen, Sustainable Design Curator
Each tin tells a story—not just through its original branding but through what you choose to place inside. This dual function—as both container and calendar—is what sets this project apart. After Christmas, the recipient can reuse the tins for storing spices, buttons, jewelry, or office supplies, extending their usefulness well beyond the holiday season.
Gathering Materials: A Practical Checklist
Before diving into assembly, take time to collect all necessary components. Planning ahead ensures a smooth workflow and prevents mid-project delays. Below is a comprehensive checklist to guide your preparation.
Materials Checklist
- 24 vintage tins – Varying sizes are acceptable as long as they can be arranged cohesively on a display surface or board.
- Number labels (1–24) – Use printable stickers, hand-painted numbers, or metallic markers.
- Adhesive – Strong glue dots, hot glue, or magnetic strips if mounting on a metal board.
- Filling items – Small gifts such as tea sachets, handwritten notes, mini bath salts, local candies, seeds, or tiny ornaments.
- Decorative elements – Twine, ribbon, lace, dried flowers, or fabric scraps for visual cohesion.
- Display method – Wooden tray, framed pegboard, hanging fabric banner, or wall-mounted grid system.
- Protective lining (optional) – Tissue paper or felt inserts to cushion contents and enhance presentation.
When selecting tins, prioritize those with intact lids and minimal rust. Light surface oxidation can be cleaned gently with vinegar and baking soda, but deep corrosion compromises structural integrity. Look for uniform shapes—round, square, or rectangular—to simplify arrangement. Avoid overly large or heavy tins unless your display method can support them securely.
Step-by-Step Assembly Process
Creating the calendar involves organizing, labeling, filling, and arranging the tins. Follow this timeline to complete the project efficiently without sacrificing quality.
- Week 1: Source and Clean Tins
Collect 24 tins over several days. Wipe interiors and exteriors with a damp cloth. For stubborn residue, soak in warm soapy water for 10 minutes, then scrub gently with a non-abrasive sponge. Dry thoroughly to prevent moisture buildup. - Day 8: Sort and Plan Layout
Lay tins on a table to experiment with configurations. Group by size, color, or pattern. Decide whether to arrange numerically or in a thematic design (e.g., tree shape, snowflake, or cascading rows). - Day 9–10: Label Each Tin
Apply numbers clearly on the lid or front edge. If painting, use enamel paint for durability. Allow 24 hours to cure before handling. - Day 11–14: Prepare Fillings
Curate small gifts thoughtfully. Include a mix of consumables, experiences (like “movie night voucher”), and sentimental tokens. Wrap delicate items in tissue paper for protection. - Day 15: Fill Tins
Insert one item per tin corresponding to its number. Seal carefully to avoid accidental opening. - Day 16: Finalize Display Structure
Mount tins onto chosen base. Use adhesive pads spaced evenly to distribute weight. Ensure stability—especially if hanging on a wall. - Day 17: Add Finishing Touches
Incorporate decorative accents like miniature pinecones, cinnamon sticks tied with twine, or LED fairy lights woven around the display.
Design Variations and Creative Ideas
No two calendars need to look alike. Personalization elevates this project from craft to heirloom. Consider tailoring themes based on the recipient’s interests.
| Theme | Recommended Fillings | Suggested Tin Style |
|---|---|---|
| Coffee Lover | Single-origin beans, flavored syrups, artisan mugs, brewing tips | Old coffee cans, matte black or red tins with script lettering |
| Kid-Friendly | Mini puzzles, stickers, crayons, bedtime story cards | Brightly colored tins with cartoon motifs or animal shapes |
| Skin Care Enthusiast | Face masks, lip balms, essential oils, bath bombs | Smooth silver or pastel-colored tins with minimalist labels |
| Gardener’s Calendar | Seed packets, plant markers, herbal teas, gardening quotes | Tins with floral prints or botanical illustrations |
| Memory Lane | Photos, handwritten memories, ticket stubs, voice recording QR codes | Faded label tins evoking nostalgia—think 1950s kitchenware |
You might also vary the reveal mechanism. Instead of simply lifting the lid, attach a small string tag with a clue leading to another part of the house where the actual gift is hidden. This turns the calendar into an interactive experience, especially engaging for children.
“One year, I hid tiny LEGO figures inside each tin. My son spent weeks building a winter village from the pieces—he still talks about that Christmas.” — Daniel Reed, father of two
Avoiding Common Pitfalls: Do’s and Don’ts
Even well-intentioned projects can go awry without attention to detail. Refer to this guide to sidestep frequent mistakes.
| Action | Do | Don’t |
|---|---|---|
| Labeling | Use waterproof ink or sealed stickers to prevent smudging | Write numbers with regular pen that may fade or rub off |
| Filling | Balance variety—include treats, tasks, and treasures | Fill every tin with candy only, risking monotony |
| Assembly | Leave space between tins for easy access and visual breathing room | Pack too tightly, making removal difficult |
| Storage Post-Holiday | Store empty tins with silica gel packets to absorb moisture | Stack without padding, causing scratches or dents |
| Allergies | Check dietary restrictions before including food items | Assume all recipients can eat nuts or dairy-based sweets |
Another common oversight is neglecting accessibility. Ensure the person opening the calendar can easily lift the lid—especially important for elderly recipients or young children. If a tin proves difficult to open, consider replacing the lid with a lighter-weight alternative or adding a small pull tab made from ribbon.
Frequently Asked Questions
Can I use other types of containers besides tins?
Yes, though tins offer superior durability and reusability. Alternatives include small fabric pouches, wooden boxes, or glass jars. However, these may not last as long or provide the same retro aesthetic. Metal tins also protect contents better from light and humidity.
What if I can’t find 24 matching tins?
Uniformity isn’t required. In fact, eclectic collections often have more charm. Focus on a unifying element—such as consistent labeling style, shared color accents, or coordinated fillings—to tie diverse tins together visually.
How do I store the calendar between uses?
Disassemble if mounted permanently. Store tins separately in a labeled box with dividers to prevent scratching. Keep fillings stored in vacuum-sealed bags if reusable (e.g., vouchers, small toys). Reassemble each year with fresh contents tailored to the recipient’s current interests.
Real-Life Example: The Heirloom Kitchen Calendar
Sophie Langley, a schoolteacher from Vermont, began making tin advent calendars after inheriting her grandmother’s collection of 1940s spice tins. Rather than displaying them statically, she transformed them into a family tradition. Each year, she refills the 24 tins with recipes—one per day—that reflect her heritage: gingerbread from her Danish grandfather, mincemeat pie inspired by her English aunt, and spiced cider passed down through generations.
Instead of hiding chocolates, she rolls each recipe into a scroll tied with twine. On certain days, she includes ingredients needed for that night’s dinner, turning the calendar into a culinary journey. Her children now help plan next year’s menu in July, discussing which dishes to feature. The tins themselves have become treasured objects—scratched, slightly tarnished, but full of meaning.
“It’s not about perfection,” Sophie says. “It’s about presence. Opening that little tin each morning slows us down. We talk about where the recipe came from, who cooked it before us. That connection matters more than any store-bought surprise.”
Final Thoughts and Call to Action
Making a DIY advent calendar from vintage tins is more than a seasonal activity—it’s an act of intentionality. It challenges the throwaway culture of modern holidays and replaces it with something enduring. Each tin holds not just a gift, but a moment of anticipation, a piece of history, and a gesture of care.
This project doesn’t require expensive tools or artistic mastery. What it demands is attention: to detail, to memory, to the people you celebrate with. Whether you source tins from a yard sale or revive ones gathering dust in your pantry, you’re giving discarded objects new purpose—and creating a tradition that could outlive you.


 浙公网安备
33010002000092号
浙公网安备
33010002000092号 浙B2-20120091-4
Comments
No comments yet. Why don't you start the discussion?