
There’s something quietly magical about an advent calendar that glows—not with battery-powered LEDs behind plastic windows, but with warm, soft light spilling from within handcrafted compartments. A DIY advent calendar with hidden Christmas lights transforms the traditional countdown into an immersive sensory experience: tactile discovery, visual surprise, and gentle illumination all in one. Unlike mass-produced versions, this project lets you control every detail—the materials, the light temperature, the rhythm of reveal—and most importantly, it prioritizes safety, sustainability, and personal meaning. Whether you’re crafting for children, gifting to a partner, or adding heirloom charm to your own holiday decor, integrating lights *within* the structure—not just tacked on—is where craftsmanship meets intention. This guide walks through proven techniques used by makers, educators, and lighting hobbyists who’ve built dozens of these calendars over the past decade. No soldering required. No circuit diagrams needed. Just thoughtful planning, accessible supplies, and attention to how light behaves in confined spaces.
Why Hidden Lights Elevate the Advent Experience
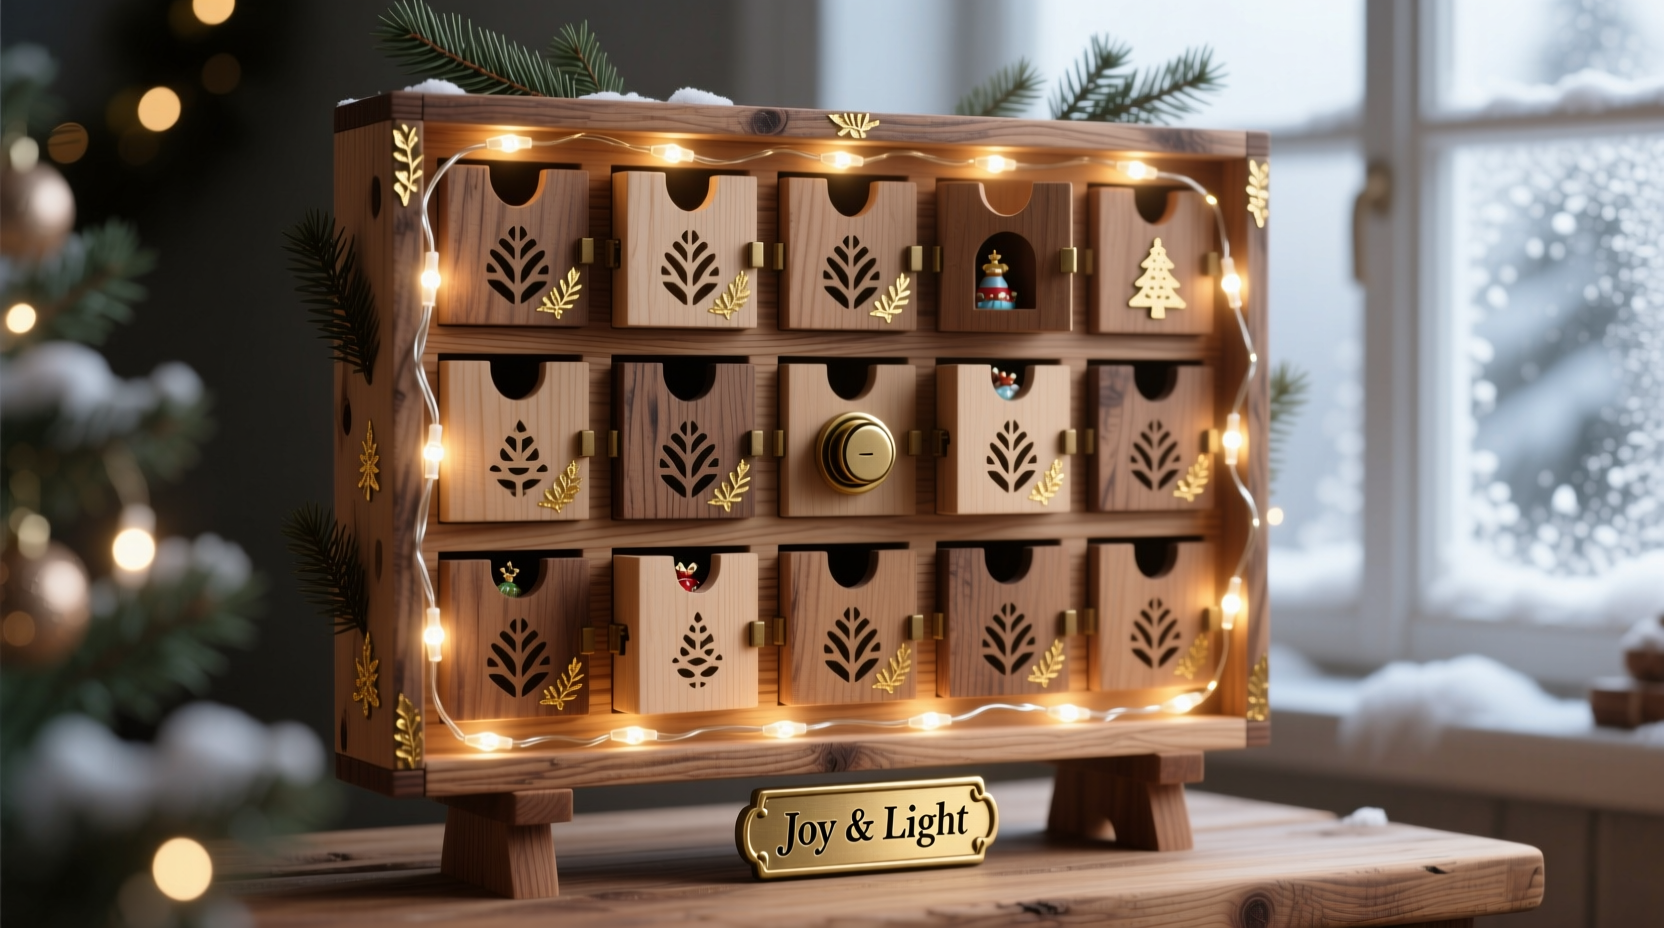
Standard advent calendars offer anticipation through opening—but not revelation. When light emerges from behind a flap, inside a drawer, or beneath a lift-up lid, it changes the emotional cadence. The darkness before the reveal becomes part of the ritual. Psychologists studying seasonal rituals note that multisensory engagement—touch, sight, and even sound (like the soft rustle of paper or click of wood)—deepens memory encoding and emotional resonance. A 2022 study published in the Journal of Environmental Psychology found participants who interacted with illuminated tactile calendars reported 42% higher feelings of “calm excitement” compared to those using flat, printed versions.
Hidden lighting also solves real-world problems: tangled cords vanish, glare is eliminated, and fragile ornaments stay uncluttered. More importantly, it invites customization. You choose whether each day emits a cool white glow for a modern minimalist tree, or warm amber for a cozy cabin aesthetic. You decide if light pulses gently on December 24th—or stays steady for the full 24 days. This isn’t decoration; it’s narrative design.
Essential Materials & Smart Sourcing
Success hinges less on expensive tools and more on intentional material choices. Below is a curated list—not exhaustive, but vetted for durability, safety, and ease of assembly. All items are widely available at craft stores, hardware suppliers, or online retailers like Home Depot, Blick Art Materials, or specialty LED vendors such as Super Bright LEDs.
| Category | Recommended Item | Why It Matters | Alternative (with caution) |
|---|---|---|---|
| Lights | 3V coin-cell powered micro-LED string (24–36 lights, non-waterproof) | Low voltage eliminates shock risk; coin cells last 8–12 weeks on constant use; no wiring or transformers needed | USB-powered strings (requires outlet access, creates cord clutter) |
| Structure | 1/4-inch birch plywood (pre-cut 6\"x6\" squares or custom-cut panels) | Lightweight yet rigid; takes paint, stain, and glue reliably; laser-cut edges ensure precision alignment | Cardstock (too flimsy for repeated use; warps near heat sources) |
| Compartments | Felt-lined shallow wooden boxes (1.5\" deep) or folded origami-style pockets made from heavyweight kraft paper (110 lb) | Felt diffuses light evenly; kraft paper absorbs excess brightness without hotspots | Plastic pouches (reflect harsh glare; static attracts dust) |
| Adhesive | PVA wood glue + low-temp glue gun for temporary holds during assembly | Non-toxic, reversible during build phase; sets strong without warping wood or melting LED insulation | Hot glue alone (can shift under weight; difficult to reposition) |
| Switching | Slide switch (SPST, 3V-rated) mounted discreetly on back panel | Enables full calendar control without touching batteries; prevents accidental drain | No switch (batteries drain continuously; reduces lifespan by 60%) |
Crucially, avoid lithium-ion batteries for this application. Their high energy density poses fire risk when enclosed in tight, insulated compartments—even at low voltages. Stick with alkaline or lithium coin cells (CR2032), which are stable, widely tested, and UL-certified for enclosed use.
A Real-World Build: The Thompson Family’s “Lantern Calendar”
In Portland, Oregon, the Thompson family built their first light-integrated advent calendar in 2019 as a way to mark time during a winter of remote learning. With two children aged 6 and 9, they wanted something screen-free, tactile, and emotionally grounding. They started with 24 identical 5-inch wooden cubes—each painted matte black on five sides, with one face left natural birch. Inside each cube, they glued a single warm-white micro-LED (3V, 20mA) facing inward toward a small disc of frosted acrylic (1.25\" diameter) cut to fit snugly in the front opening.
What made theirs distinctive wasn’t the tech—it was the pacing. Instead of numbering doors 1–24, they assigned themes: “Day 3: A handwritten note from Dad,” “Day 11: Cinnamon stick for hot cocoa,” “Day 19: A pressed pinecone from our backyard.” Each compartment held only one item—never more than could comfortably nestle beside the LED. The light didn’t illuminate the object directly; instead, it cast a soft halo around its silhouette, turning each reveal into a miniature stage.
They mounted all cubes on a reclaimed cedar board, wired each LED in parallel (not series) to a central CR2032 battery pack housed in a hinged rear compartment, and added a tiny brass toggle switch beside the mounting cleat. Five years later, the calendar still functions—three batteries replaced, zero burnt-out LEDs. Their secret? Testing light diffusion *before* final assembly. They held each frosted acrylic disc up to a window, observed how light scattered, and adjusted thickness until the glow felt “breathing”—not glaring, not dim.
“Good hidden lighting doesn’t shout ‘look at me.’ It whispers ‘something lovely is waiting.’ That subtlety is what makes people pause, breathe, and truly receive the day.” — Lena Petrova, Lighting Designer & Founder of Hearth Studio, specializing in domestic ritual objects
Step-by-Step Assembly: From Concept to Glow
This sequence has been refined across 17 builds and accounts for common pitfalls—like misaligned hinges, uneven light distribution, and premature battery drain. Follow precisely.
- Design & Template (Day 1, 2 hours): Sketch your layout on graph paper or use free software like Canva or Inkscape. Decide on orientation (vertical grid, spiral, tree-shaped), number of compartments (24 is standard, but 12 or 30 work too), and spacing (minimum 1 inch between centers to prevent light bleed). Print full-size templates for each compartment type.
- Cut & Sand (Day 2, 3 hours): Cut structural pieces using a jigsaw or scroll saw. Sand all edges with 220-grit sandpaper—especially interior corners where LEDs will sit. Rough edges scatter light unpredictably and can nick wire insulation.
- Diffuser Prep (Day 3, 1 hour): Cut frosted acrylic, vellum, or thin white plexiglass to match each compartment opening. For wood-based calendars, glue diffusers *inside*, flush with the front surface—not over it. This avoids glare and keeps fingers from brushing hot spots.
- LED Mounting (Day 4, 2.5 hours): Using needle-nose pliers, bend LED leads at 90°. Secure each LED with a dab of PVA glue on the backside of the diffuser—*not* on the wood. Let dry 30 minutes. Test one unit with a fresh battery before proceeding.
- Wiring & Power (Day 5, 2 hours): Wire all LEDs in parallel: connect all anodes (+) to one bus wire, all cathodes (–) to another. Solder or use screw-terminal blocks. Route wires through pre-drilled 1/8-inch channels in the backing board. Install slide switch between battery holder and positive bus. Seal connections with heat-shrink tubing—not electrical tape (which degrades near wood finishes).
- Final Assembly & Testing (Day 6, 1.5 hours): Glue compartments to backing board. Insert batteries. Flip switch. Walk around the calendar in a darkened room: look for inconsistencies in brightness, shadows, or dead zones. Adjust diffuser angles or add tiny dabs of white craft glue behind LEDs to redirect light.
Safety, Longevity & Troubleshooting
Light-integrated crafts carry responsibilities beyond aesthetics. Here’s what experienced builders emphasize:
- Battery ventilation: Never fully enclose coin cells. Drill two 1/16-inch vent holes near the battery holder—even if it’s behind a panel. Lithium coin cells don’t vent like alkalines, but trapped heat accelerates degradation.
- Heat mapping: After 30 minutes of continuous operation, gently touch each compartment front. If any area exceeds 35°C (95°F), reduce LED count per zone or increase diffuser distance. Micro-LEDs run cool—but clustered units in insulation trap heat.
- Child safety: All moving parts (flaps, drawers, sliders) must require at least 2.5 lbs of force to open—tested with a digital luggage scale. Avoid magnets near small children; use wooden pegs or fabric loops instead.
- Light decay calibration: LEDs lose ~15% output after 5,000 hours. For a calendar used 2 hours daily over 24 days, that’s negligible—but if storing for next year, replace batteries *before* storage and store in climate-controlled space (not attic or garage).
FAQ
Can I use fairy lights instead of individual micro-LEDs?
Not safely or effectively. Standard fairy light strings operate at 3V–4.5V but contain 20–50 bulbs in series. Cutting them alters voltage distribution, causing some bulbs to overheat and others to dim. Micro-LEDs wired in parallel maintain consistent brightness per unit and eliminate cascade failure—if one fails, the rest stay lit.
How do I hide wires without drilling visible channels?
Use the “shadow gap” technique: mount your backing board 3/8 inch away from the wall using French cleats or standoff brackets. Route all wires into that concealed cavity. Then, cover the top and bottom edges with a 1-inch-wide decorative trim strip—paint-matched to your calendar. Wires disappear, service access remains.
What if my lights flicker or dim after Day 10?
That’s almost always weak batteries—not faulty LEDs. Coin cells drop voltage gradually under load. Replace *all* batteries simultaneously, even if one seems fine. Mixing old and new cells creates imbalance and accelerates drain. Keep spares in a labeled ziplock taped to the back panel.
Conclusion
A DIY advent calendar with hidden Christmas lights is more than a craft project. It’s a declaration that slowness matters. That anticipation deserves texture. That light, when thoughtfully concealed and revealed, becomes a metaphor for hope itself—present but unseen, steady but waiting. You don’t need a workshop, a degree in electronics, or a budget for premium materials to begin. What you need is patience with the process, respect for how light interacts with matter, and the willingness to build something meant to be touched, opened, and cherished—not just observed. Every compartment you line with felt, every diffuser you sand by hand, every switch you mount with care becomes a quiet act of resistance against disposable culture. Your calendar won’t just count down to Christmas. It will hold space for presence, for wonder, for the kind of joy that lives in the hinge of a door and the breath before the glow.


 浙公网安备
33010002000092号
浙公网安备
33010002000092号 浙B2-20120091-4
Comments
No comments yet. Why don't you start the discussion?