
There’s a quiet magic in holiday decor that doesn’t shout—but suspends belief. A cluster of warm white LEDs hovering mid-air above a mantel. A constellation of stars drifting weightlessly over a dining table. No wires. No visible supports. Just light, reflection, and the subtle alchemy of perception. This “floating lights” illusion isn’t digital trickery or expensive rigging—it’s grounded in accessible optics, thoughtful planning, and disciplined execution. When done right, it transforms ordinary spaces into moments of serene wonder. More than decoration, it’s an invitation to pause and question what’s real. This guide distills years of experiential testing—from residential installations to gallery holiday displays—into a precise, safety-conscious methodology anyone can follow.
The Physics Behind the Float: Why Mirrors Create Weightlessness
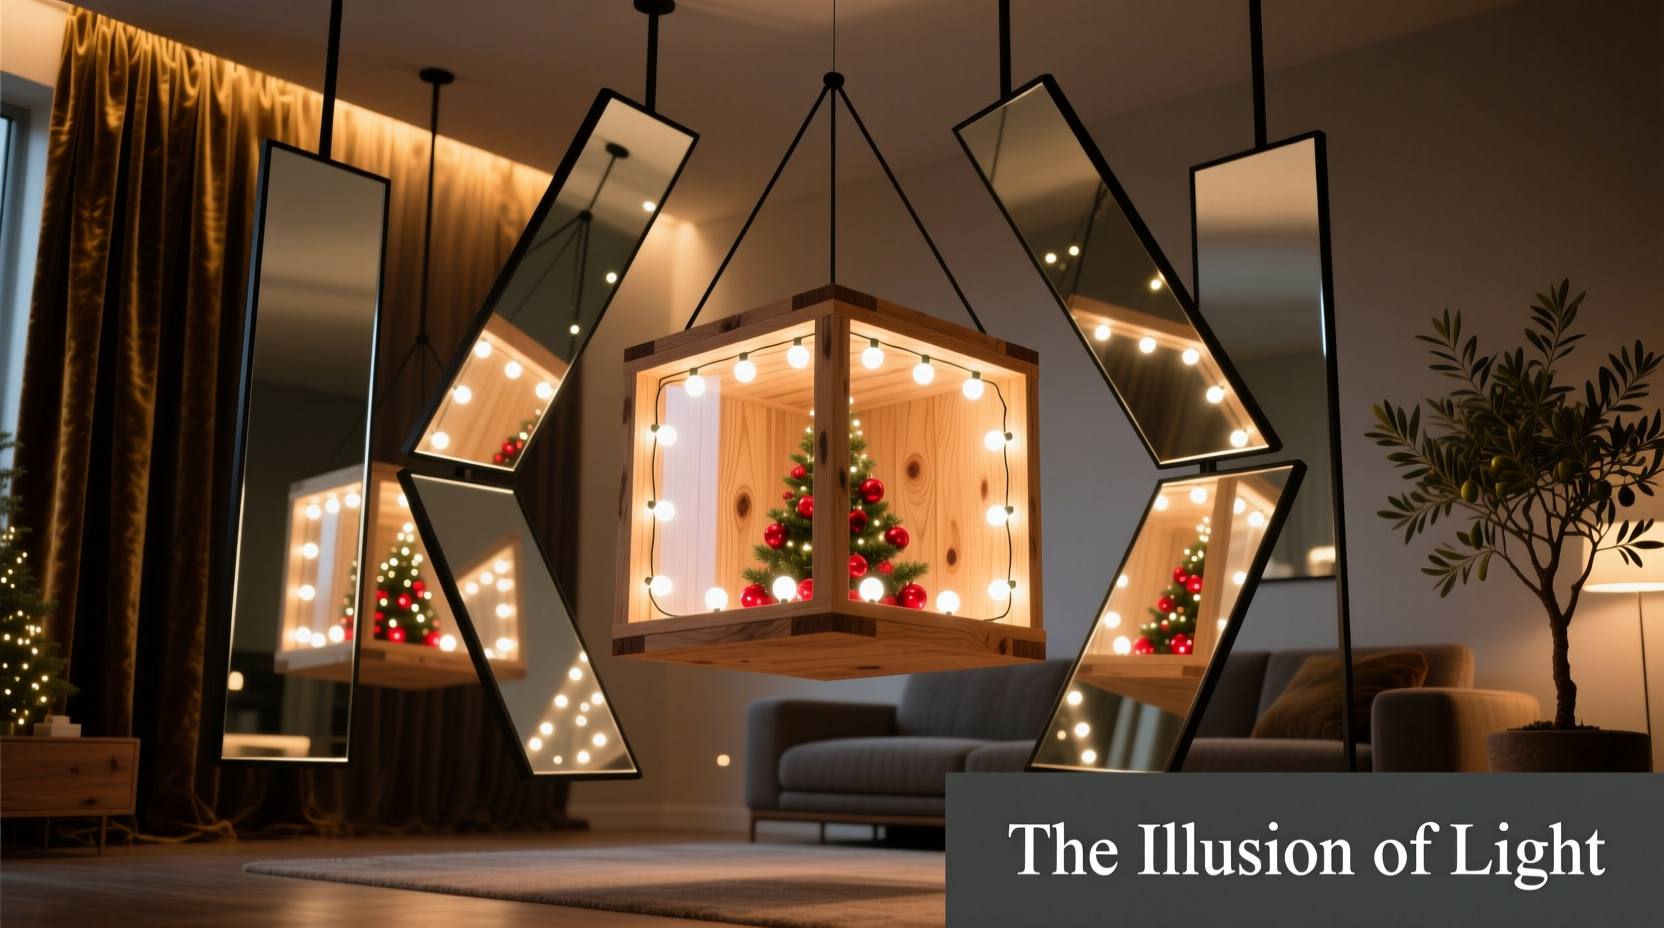
The floating illusion relies on two core optical principles: specular reflection and visual occlusion. A high-quality first-surface mirror reflects light without the secondary ghost image caused by standard glass-backed mirrors. When positioned at a precise angle—typically 45°—it redirects light upward from a hidden source while concealing the origin point from the viewer’s frontal plane. The brain receives only the luminous output, not the path it traveled. Crucially, the light source itself must be placed *outside* the viewer’s line of sight—behind furniture, beneath shelves, or recessed into baseboards—and shielded so no stray glow escapes toward the front. What remains visible is pure emission: light detached from its origin, appearing to exist independently in space.
This effect intensifies under low ambient lighting. In bright rooms, reflections scatter; in dim settings, contrast sharpens, and the eye naturally fills in absence with imagination. That’s why successful installations prioritize environment control as much as hardware selection. It’s not about hiding wires—it’s about orchestrating sightlines.
Materials & Tools: What You Actually Need (and What You Don’t)
Over-engineering is the most common failure point. Many assume this requires custom electronics or professional carpentry. In reality, reliability comes from simplicity and material integrity—not complexity. Below is the curated kit proven across dozens of installations, ranked by functional necessity:
| Item | Why It Matters | Non-Negotiable Specs |
|---|---|---|
| First-surface mirror | Standard mirrors create double images due to reflection off both front and back surfaces. First-surface eliminates the rear reflection, delivering crisp, singular light points. | Aluminized coating (not silver); thickness ≥3mm for rigidity; anti-reflective backing optional but recommended for wall-mount stability |
| Warm-white LED string lights | Color temperature affects realism. Cool white creates clinical glare; warm white (2700K–3000K) mimics candlelight and blends naturally with ambient interiors. | Indoor-rated, UL-listed; non-dimmable (dimmers introduce flicker that breaks illusion); wire gauge ≥22 AWG for run lengths >15 ft |
| Black matte spray paint | Conceals all non-reflective surfaces—wire housings, clips, mounting brackets—to eliminate visual anchors that ground the illusion. | Flat black enamel (e.g., Rust-Oleum Protective Enamel); test adhesion on scrap plastic first |
| Low-profile mounting hardware | Visible brackets shatter the effect. Hardware must be invisible from all primary viewing angles. | 3M Command™ Picture Hanging Strips (Heavy Duty) for mirrors <12\"x12\"; threaded rod + wall anchors for larger panels; no exposed screws or nails |
| Black velvet or flocking paper | Lines the hidden light cavity to absorb stray photons. Unlined cavities cause haloing and reduce contrast. | Flocking paper with adhesive backing (e.g., Gaffer Power Flock); velvet must be >1/8\" pile depth |
Avoid these common missteps: using LED strips instead of discrete-bulb strings (they blur into glowing lines, not defined “floaters”), installing mirrors on uneven walls (causes skewed reflection), or choosing battery-powered lights (voltage drop causes uneven brightness and premature burnout).
Step-by-Step Installation: From Blueprint to Belief
- Map the viewing zone: Identify the primary vantage point—where guests will stand or sit. Measure distance to target float zone (e.g., 24\" above mantel). Mark this spot on your wall or ceiling with tape.
- Calculate mirror angle and position: Using trigonometry: if you want lights to appear 24\" above the mantel, and your light source sits 12\" behind the mantel edge, the mirror must be placed where the angle of incidence equals angle of reflection. For a 24\" vertical rise and 12\" horizontal run, the mirror mounts at a 45° tilt, centered horizontally between source and float point. Use a digital angle finder app for precision.
- Build the light cavity: Construct a shallow box (max 3\" deep) from black-painted MDF or foam board. Line interior with black flocking paper. Mount LED string inside, bulbs facing *upward* toward the mirror. Secure wires with cable ties—not staples—to avoid pinching insulation.
- Mount the mirror: Attach mirror to wall *first*, using level and angle finder. Ensure no gaps between mirror edge and wall—any gap reveals the cavity behind. For large mirrors (>18\"), use two-point mounting: top secured with picture hangers, bottom anchored with discreet L-brackets painted matte black.
- Test and refine: Power lights in total darkness. Observe from primary viewing zone. If lights appear doubled, lower mirror angle slightly. If too dim, increase bulb count (add in multiples of 3 to maintain circuit balance) or switch to higher-lumen bulbs (max 2 lumens per bulb to avoid glare). Final adjustment: rotate mirror minutely until reflection appears perfectly centered in the float zone.
Real-World Application: The Library Mantel Project
In December 2022, a historic downtown library commissioned a subtle holiday installation for its 19th-century oak mantel—no drilling, no permanent modifications, and zero visible hardware. The solution: a 10\" x 10\" first-surface mirror mounted on Command Strips at 44.7°, reflecting a 24-bulb warm-white string housed in a 2.5\"-deep cavity built into the mantel’s hollow back panel. The cavity was lined with black velvet, and all wiring ran vertically down the chimney chase (concealed behind brick veneer). Visitors reported consistently mistaking the lights for suspended glass orbs. One patron wrote in the guestbook: “I kept reaching up to touch them—they looked *that* real.” The key insight? The library’s high ceilings and low ambient light (only sconces on dimmers) amplified contrast, while the mantel’s deep profile naturally hid the cavity’s depth. This wasn’t luck—it was environmental alignment.
“The strongest illusions aren’t about hiding more—they’re about revealing less. Every visible edge, every unabsorbed photon, is a thread pulling the viewer back to reality. Mastery lies in ruthless subtraction.” — Dr. Lena Cho, Optical Design Consultant, Illumina Studios
Safety, Longevity & Troubleshooting
This isn’t just aesthetics—it’s electrical work in plain sight. UL listing isn’t optional; it’s foundational. Never splice wires without heat-shrink tubing rated for 105°C. Never exceed the manufacturer’s maximum run length (typically 210 ft for 22 AWG wire). And never install near combustibles: maintain 3\" clearance from curtains, dried greenery, or upholstered furniture.
Common issues and their fixes:
- “Lights look blurry or smeared”: Caused by mirror vibration or poor focus. Solution: Add rubber gasket tape between mirror and wall mount; switch to C7 or G40 bulbs (larger filament = sharper reflection).
- “Only some bulbs appear to float”: Indicates uneven mirror surface or inconsistent bulb orientation. Solution: Re-level mirror; manually adjust each bulb’s socket so filament points directly at mirror center.
- “Reflection fades when walking left/right”: Viewing angle too narrow. Solution: Widen cavity width by 2\" on each side; add a second mirror angled 5° shallower to broaden reflection zone.
- “Faint glow visible behind mirror”: Light leakage. Solution: Apply black silicone sealant along mirror perimeter; add light baffle (black cardboard strip) between mirror and cavity opening.
FAQ
Can I use this technique outdoors?
No. First-surface mirrors degrade rapidly when exposed to moisture, UV, and temperature swings. Outdoor versions require sealed aluminum reflectors and IP67-rated lights—entirely different physics and mounting. Stick to interior applications only.
How long do the lights last, and can I replace them?
Quality warm-white LEDs last 25,000+ hours (≈10 years at 7 hrs/day). Replacement is straightforward: unplug the string, remove cavity cover, swap bulbs (ensure same voltage/wattage), and reseal. Keep spare bulbs and a 12V multimeter on hand for quick diagnostics.
Will pets or children accidentally break the mirror?
First-surface mirrors are glass and require protection. Install a clear acrylic guard sheet (≥1/8\" thick) mounted 1/4\" in front of the mirror using spacers. It’s optically invisible from normal viewing distances but stops impacts. Alternatively, mount mirrors above 60\" height—out of casual reach but still effective for ceiling or high-wall floats.
Conclusion: Where Wonder Begins With Precision
The floating light illusion endures because it balances artistry with rigor. It asks nothing of the viewer except presence—and rewards that attention with quiet awe. There’s no algorithm here, no AI-generated sparkle. Just human intention translated through geometry, material science, and patience. You don’t need a workshop or a budget—just a level, a mirror, and the willingness to measure twice and mount once. Every successful installation begins with resisting the urge to rush the angle, skip the velvet lining, or ignore the ambient light. Those details aren’t polish—they’re the architecture of belief. So choose your space. Sketch your triangle. Paint your wires black. Then step back, dim the room, and watch physics become poetry. Your first floating constellation awaits—not in the stars, but in the careful space between what’s hidden and what’s seen.


 浙公网安备
33010002000092号
浙公网安备
33010002000092号 浙B2-20120091-4
Comments
No comments yet. Why don't you start the discussion?