
A modern twist on holiday tradition, the floating orb tree topper combines elegance with engineering. Instead of a static star or angel, this dynamic centerpiece hovers above your tree, glowing in customizable colors and patterns. Using magnetic levitation and addressable LED strips, you can craft a mesmerizing display that captures attention and sparks conversation. This guide walks through every step—from selecting components to final calibration—so you can create a futuristic focal point for your festive decor.
Understanding the Core Technologies
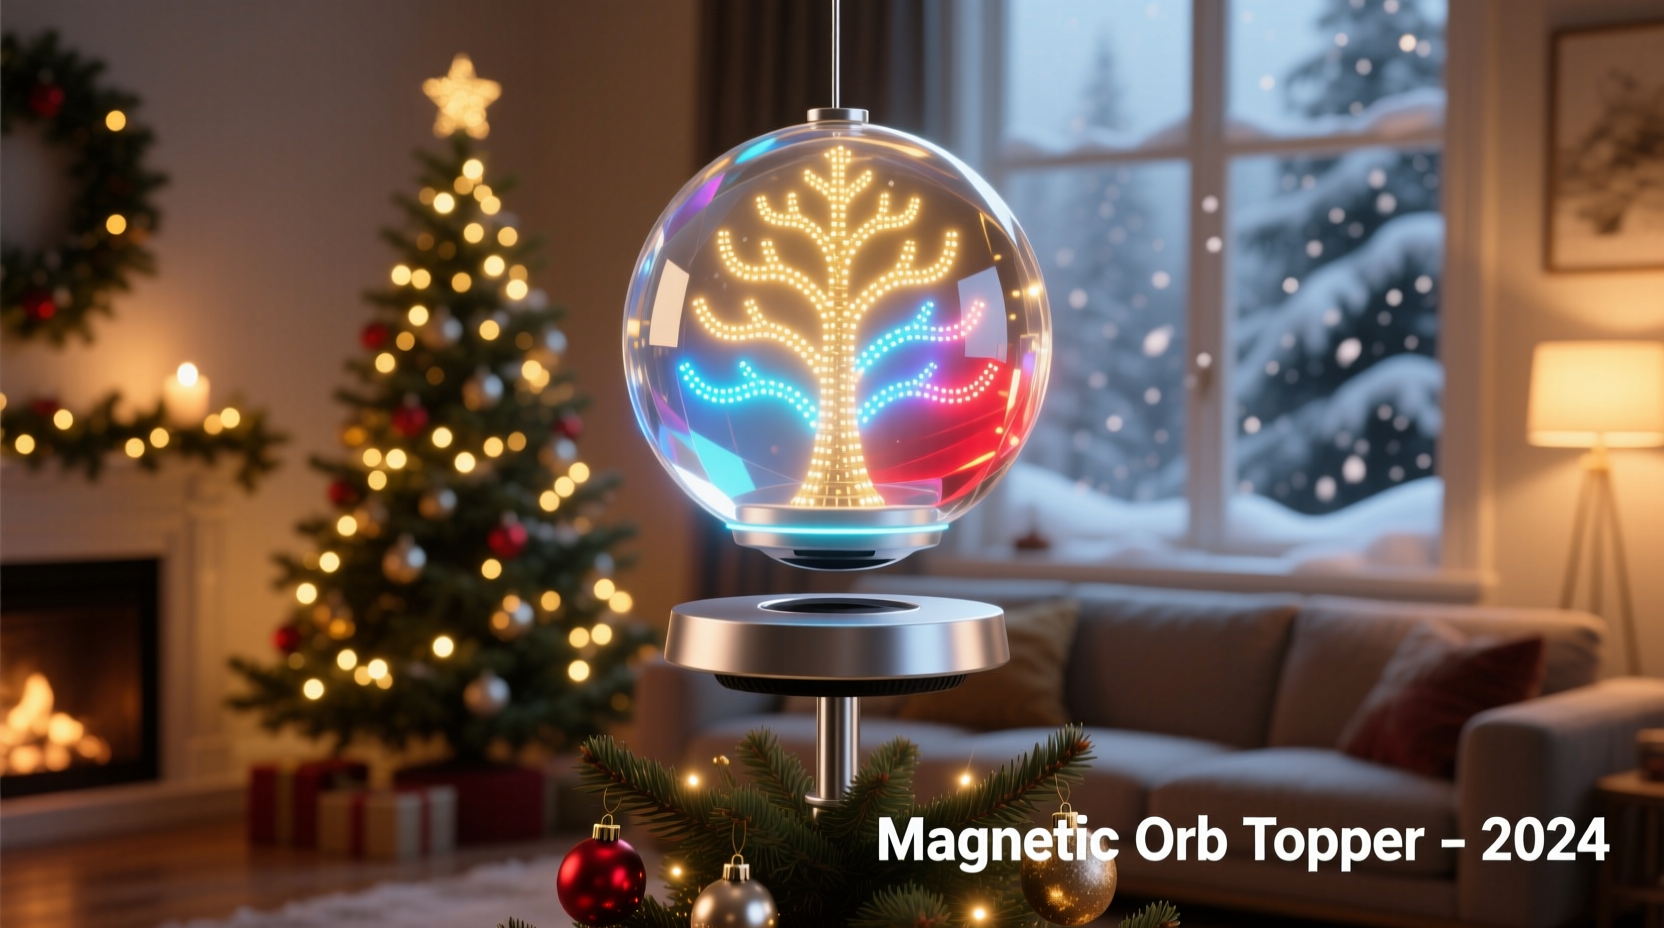
The magic behind the floating orb lies in two key technologies: magnetic levitation and programmable lighting. Magnetic levitation suspends an object in mid-air using opposing magnetic fields, counteracting gravity without physical support. Meanwhile, programmable LEDs—such as WS2812B (NeoPixel) strips—allow precise control over color, brightness, and animation sequences via microcontrollers like Arduino or ESP32.
When combined, these systems produce a visually striking effect: a softly glowing sphere rotating gently in space, cycling through seasonal hues or pulsing to music. The result is not only decorative but also a demonstration of accessible DIY electronics. While the concept may sound complex, each component is commercially available and manageable with basic soldering and coding skills.
“Levitating displays transform ordinary spaces into experiences. It’s no longer just about decoration—it’s about engagement.” — Dr. Lin Zhao, Mechatronics Researcher at MIT Media Lab
Materials and Tools Checklist
Before beginning assembly, gather all necessary parts and tools. Precision in sourcing ensures compatibility and reduces troubleshooting later.
Essential Components
- Magnetic levitation kit (e.g., Levitron-style base with electromagnet and Hall effect sensor)
- Lightweight spherical object (polystyrene or 3D-printed hollow globe, ~8–12 cm diameter)
- WS2812B addressable LED strip (6–12 LEDs depending on orb size)
- Arduino Nano or ESP32 development board
- Mini lithium polymer battery (3.7V, 500–800mAh) with charging module
- Small reed switch or wireless activation module (optional for power saving)
- Neodymium ring magnet (for attachment to orb, matching levitation frequency)
- Thin, flexible wires (28–30 AWG silicone-coated)
- Hot glue gun, electrical tape, heat shrink tubing
- Clear acrylic spray sealant (to protect LEDs and wiring)
Software Requirements
- Arduino IDE or PlatformIO
- FastLED or NeoPixel library installed
- Sample code for floating orb effects (available online)
Step-by-Step Assembly Guide
Building the floating orb requires careful integration of mechanical stability, electrical safety, and aesthetic design. Follow this sequence to ensure success.
- Prepare the Orb: Choose a lightweight sphere. If using polystyrene, drill a small top hole (5 mm) to route wires. Wrap the inside evenly with the LED strip, securing it with minimal hot glue. Avoid excess weight—balance is critical for levitation.
- Mount the Magnet: Attach the neodymium ring magnet to the bottom center of the orb. Ensure it's level and centered. Misalignment causes wobbling or failure to levitate. Use epoxy for a strong bond, letting it cure fully before testing.
- Wire the Electronics: Solder thin leads from the LED data input to the Arduino’s digital pin (e.g., D6), and connect power lines (VCC and GND). Integrate the battery across the same voltage rails. Keep joints clean and insulated with heat shrink tubing.
- Program the Microcontroller: Upload a test sketch using the FastLED library. Start with a simple rainbow cycle to verify functionality. Example:
#include <FastLED.h> #define NUM_LEDS 12 #define DATA_PIN 6 CRGB leds[NUM_LEDS]; void setup() { FastLED.addLeds<WS2812B, DATA_PIN, GRB>(leds, NUM_LEDS); } void loop() { fill_rainbow(leds, NUM_LEDS, millis()/10); FastLED.show(); delay(20); } - Integrate Power Management: For extended runtime, include a reed switch triggered by a handheld magnet. This allows you to turn the orb on/off without handling fragile wires. Alternatively, use a low-power sleep mode with timer wake-up if using ESP32.
- Seal and Finish: Once tested, apply a light coat of clear acrylic sealant to protect the internal circuitry from static and dust. Avoid spraying directly onto connectors. Let dry completely in a dust-free environment.
- Calibrate Levitation: Place the orb within 1–2 cm of the levitation base. Adjust sensitivity potentiometers on the base board until the orb stabilizes. Some kits require fine-tuning of PID values via firmware for smooth hovering.
Design Optimization: Do’s and Don’ts
Success depends not only on correct assembly but also on thoughtful design choices. The table below outlines best practices.
| Do | Don’t |
|---|---|
| Use lightweight materials (foam, thin plastic) | Add heavy batteries or metal supports inside the orb |
| Balance the magnet precisely at the center of mass | Offset the magnet, causing tilt or spin instability |
| Test LED patterns before final sealing | Assume all LEDs are functional after installation |
| Use dimmable animations to extend battery life | Run full-brightness white constantly |
| Place the base on a stable, non-metallic surface | Install near speakers, phones, or other magnetic sources |
Real-World Example: The Holiday Showcase Upgrade
In Portland, Oregon, hobbyist engineer Marcus Tran replaced his family’s traditional tinsel-covered star with a custom-built floating orb for their 7-foot fir. He used a 10 cm polystyrene ball wrapped with 8 NeoPixels, powered by a 700mAh LiPo battery. After calibrating the levitation base over two evenings, he programmed seasonal light themes: warm white pulses for Christmas Eve, animated snowflakes on New Year’s, and soft pink gradients for Valentine’s Day.
The orb ran for 48 hours continuously before requiring a recharge. Relatives initially thought it was a store-bought luxury item—only realizing its DIY origin when Marcus demonstrated the open-source code on his phone. Inspired by the reaction, he now hosts annual workshops teaching others to build their own versions.
Troubleshooting Common Issues
Even well-assembled orbs may encounter problems. Here are frequent challenges and solutions:
- Orb won’t levitate: Check if the base is level and free from vibrations. Verify magnet polarity and distance. Recalibrate the Hall sensor threshold.
- LEDs flicker or go dark: Likely due to voltage drop. Use shorter wires or add a 100µF capacitor across the power lines near the LEDs.
- Battery drains too fast: Reduce brightness in code (use
FastLED.setBrightness(50)instead of 255). Implement motion-activated lighting using a PIR sensor. - Orb spins uncontrollably: Imbalance in weight or magnet alignment. Re-center the magnet and remove any asymmetrical attachments.
- Microcontroller resets during operation: Insufficient current supply. Ensure the battery can deliver at least 500mA peak load.
Frequently Asked Questions
Can I make the orb responsive to music?
Yes. Connect a sound sensor (like the MAX9814 or analog microphone module) to an analog pin on the Arduino. Use FFT (Fast Fourier Transform) libraries to analyze audio frequencies and map them to LED intensity or color shifts. For example, bass beats could trigger red flashes, while high notes produce blue ripples.
Is magnetic levitation safe around children and pets?
The levitation base uses low-voltage DC power and poses minimal electrical risk. However, the floating orb is fragile and should be placed out of reach. Small magnets inside present a choking hazard if disassembled. Always supervise young children around the display.
How long does the average build take?
For a beginner with basic electronics experience, expect 6–8 hours over two days: one for assembly and wiring, another for coding, testing, and tuning. Experienced makers can complete it in a single afternoon.
Final Thoughts and Creative Extensions
The floating orb tree topper is more than a holiday decoration—it’s a gateway to creative electronics. Once mastered, the same principles can be applied to levitating planters, ambient night lights, or interactive art installations. Consider upgrading with Wi-Fi control via ESP32, allowing remote color changes through a smartphone app. You might even sync multiple orbs to create a synchronized aerial display.
With increasing accessibility of compact sensors, efficient batteries, and open-source code libraries, there’s never been a better time to blend craftsmanship with technology. Whether you're impressing guests or simply enjoying the quiet wonder of a glowing sphere defying gravity, this project offers both immediate delight and lasting satisfaction.


 浙公网安备
33010002000092号
浙公网安备
33010002000092号 浙B2-20120091-4
Comments
No comments yet. Why don't you start the discussion?