
A floating shelf Christmas tree merges minimalist design with festive tradition—a sculptural wall installation that draws attention without occupying floor space. Unlike freestanding trees or string-light silhouettes, this version uses real wood shelves arranged in a precise coniferous profile: wider at the base, tapering upward through three to five staggered tiers. The magic lies not just in the visual rhythm, but in how each shelf appears to hover—no visible screws, no protruding hardware, no compromise on load-bearing integrity. Done right, it holds ornaments, small lights, and even lightweight garlands while maintaining clean sightlines and structural confidence. This isn’t DIY theater; it’s precision carpentry adapted for holiday storytelling.
Why Staggered Tiers Beat Uniform Shelves
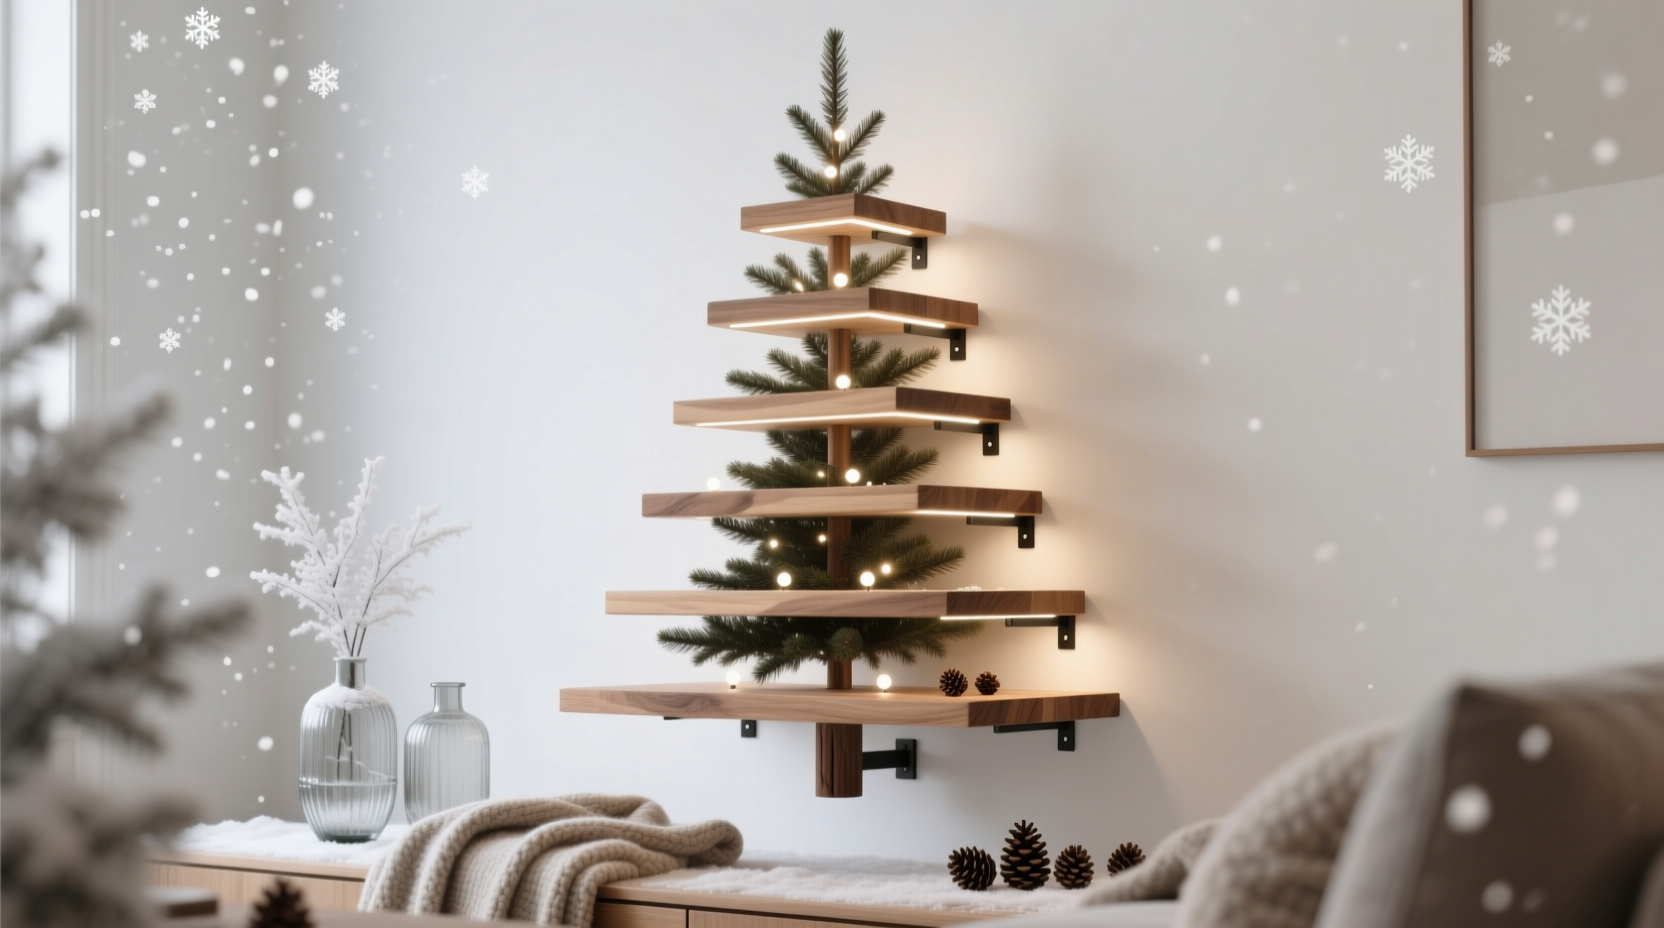
Uniformly spaced, same-length shelves create a rigid, ladder-like effect—functional but visually flat. A true tree silhouette depends on two interlocking principles: vertical rhythm and horizontal variation. Staggered tiers introduce intentional asymmetry: each shelf is offset vertically (by 6–10 inches) and shortened horizontally (by 4–8 inches per tier), mimicking natural branch layering. This creates depth perception—your eye reads the composition as a cohesive form, not a stack of planks. More importantly, staggering shifts weight distribution across multiple anchor points, reducing shear stress on any single bracket or wall stud. It also allows for strategic ornament placement: heavier items near the base, delicate glass baubles toward the top, where shelves are narrower and lighter.
The Hidden Bracket System: Engineering, Not Illusion
“Hidden” doesn’t mean invisible—it means intelligently concealed. True concealment relies on three elements: bracket placement, shelf design, and wall integration. Surface-mounted L-brackets or floating shelf kits with visible metal rods undermine the aesthetic. Instead, use heavy-duty French cleats or custom-fabricated steel Z-brackets recessed into routed channels on the shelf’s underside. These mount directly to wall studs (never drywall anchors alone) and carry loads far exceeding typical ornament weight. For a 5-tier tree with 12-inch-deep shelves, each bracket must support at minimum 35 lbs—factoring in dynamic load from hanging ornaments and accidental contact.
The critical detail: routing. Each shelf requires a ¾-inch-deep, 1¼-inch-wide channel along its entire back edge—precisely centered and parallel to the shelf’s long axis. This channel accepts the vertical leg of the Z-bracket, which itself is mounted flush to the wall with lag bolts into solid stud framing. When the shelf slides onto the bracket, the front edge projects cleanly; only a subtle ⅛-inch gap remains between shelf back and wall—too narrow to see from a normal viewing distance. No paint-matching required. No filler gaps. Just calibrated precision.
“The difference between a ‘floating’ shelf and a *truly* floating shelf is tolerance control. We rout channels to ±0.005 inches and drill bracket holes with jig-guided repeatability. That’s what keeps the shelf level—and your sanity intact.” — Marcus Lin, Architectural Woodworker & Founder, Timberline Joinery Co.
Materials, Tools, and Wall Readiness Checklist
Success begins before the first cut. This project demands material integrity, tool accuracy, and wall intelligence—not just enthusiasm. Below is the non-negotiable checklist. Skip one item, and you risk misalignment, sagging, or worse: detachment.
- Locate and mark every wall stud behind the planned installation area using a calibrated stud finder (not a magnetic one).
- Verify wall type: Solid wood framing? Concrete block? Plaster over lath? Each requires different fasteners and mounting strategy.
- Use kiln-dried, furniture-grade hardwood (walnut, white oak, or maple)—no MDF or particleboard. Minimum thickness: 1 inch.
- Acclimate wood for 72 hours in the room where it will be installed to prevent post-mount warping.
- Confirm your level is calibrated (check against a known vertical surface) and your drill has adjustable torque settings.
Step-by-Step Build Timeline
This sequence assumes a 5-tier tree (base to tip), 60 inches tall overall, with shelves ranging from 36 inches wide (base) down to 12 inches (top). Adjust dimensions proportionally for smaller or larger walls.
- Design & Layout (Day 1, 2 hours): Sketch full-scale elevation on kraft paper taped to the wall. Mark stud centers. Determine exact vertical spacing: base shelf at 30″ above floor, then +8″, +9″, +10″, +11″ for successive tiers (increasing intervals mimic natural growth taper). Note shelf lengths: 36″, 30″, 24″, 18″, 12″.
- Cut & Rout (Day 2, 4 hours): Rip shelves to width and length on a table saw with zero-clearance insert. Sand edges smooth. Use a plunge router with straight bit and edge guide to mill ¾″ × 1¼″ channels along the back edge of each shelf, centered and extending full length. Rout a ¼″-deep, ½″-wide dado 1″ from the front edge on the underside of each shelf—this hides cord for battery-operated micro-lights later.
- Bracket Fabrication & Mounting (Day 3, 3 hours): Cut Z-brackets from ¼″ steel plate (or order pre-bent). Drill pilot holes for ¼″ × 3″ lag bolts into each bracket’s vertical leg. Mount brackets to wall studs using a laser level for absolute horizontal alignment. Verify all brackets sit at identical height relative to floor using a 6-ft level bridged across them.
- Finish & Install (Day 4, 3 hours): Apply two coats of water-based polyurethane (matte or satin) to all shelves—sand lightly between coats. Let cure 24 hours. Install shelves by sliding each onto its bracket, front edge first, then gently lowering until fully seated. Check level across front edge of each shelf; adjust bracket height if needed before final tightening.
- Decorating Logic (Day 5, 1 hour): Start at the base: place heaviest ornaments (wood, ceramic, weighted glass) on lower shelves. Use clear acrylic ornament hangers for mid-tier pieces. Reserve top shelf for a single statement piece—a brass star, felt bird, or miniature lantern—anchored with museum putty.
Staggered Tier Dimensions & Structural Load Table
Proportional scaling matters. Too-steep a taper looks spindly; too-shallow feels top-heavy. The table below reflects tested ratios for stability and visual harmony in standard 8-foot ceilings. All shelves are 12″ deep, 1″ thick, and mounted with dual Z-brackets per shelf (except top tier, which uses one).
| Tier Position | Shelf Width (in) | Vertical Offset from Base (in) | Max Ornament Load (lbs) | Bracket Spacing (in) | Min Stud Requirement |
|---|---|---|---|---|---|
| Base (Tier 1) | 36 | 0 | 45 | 24 (centered) | 2 adjacent studs |
| Middle-Low (Tier 2) | 30 | 8 | 38 | 20 (centered) | 2 adjacent studs |
| Mid (Tier 3) | 24 | 17 | 30 | 16 (centered) | 1 full stud |
| Middle-High (Tier 4) | 18 | 27 | 22 | 12 (centered) | 1 full stud |
| Top (Tier 5) | 12 | 38 | 15 | Single center bracket | 1 full stud |
Real-World Case Study: The Brooklyn Apartment Installation
Maya R., a graphic designer in a 1920s walk-up with plaster-and-lath walls, wanted a tree that honored her minimalist aesthetic but avoided the “renter’s guilt” of drilling into historic surfaces. Her wall had irregular stud spacing—every 16 inches horizontally, but offset by 3 inches on alternating rows. Standard bracket systems failed during initial testing: one shelf sagged ¼ inch within 48 hours. Solution? She switched to custom-fabricated French cleats with angled registration pins. Each cleat was screwed into solid lath backing (verified with a borescope camera), then reinforced with toggle bolts behind plaster. She used reclaimed walnut, stained with iron acetate to deepen grain contrast. The result: a 4-tier tree (32″–16″) that survived three holiday seasons—including a toddler’s curious tug—without shifting. Key takeaway: adapt the system to your wall’s truth, not your ideal.
FAQ
Can I install this on drywall without hitting studs?
No. Drywall alone cannot safely support the cumulative weight—even with high-strength toggle bolts. The base tier alone exerts over 40 lbs of downward force plus lateral torque when ornaments sway. If studs are inaccessible (e.g., behind built-ins), consult a structural engineer about installing a hidden plywood ledger board anchored to framing, then mounting brackets to that.
What’s the safest way to hang lights without drilling into shelves?
Use battery-powered micro-LED string lights with adhesive-backed clips. Attach clips to the underside of each shelf’s front edge—inside the ¼″ dado routed earlier—so light strings run upward along the front face, casting soft ambient glow without visible wires. Avoid plug-in lights: cord strain risks shelf movement over time.
How do I clean and maintain the shelves year after year?
Dust weekly with a microfiber cloth. Once annually, wipe with diluted pH-neutral wood cleaner (1 tsp Castile soap per quart warm water), then immediately dry. Never use silicone-based polishes—they build up and obscure grain. Re-coat with one thin layer of polyurethane every 3 years, lightly scuff-sanding first. Store shelves flat and stacked with spacers in a climate-controlled closet—not in attic heat or basement humidity.
Conclusion
A floating shelf Christmas tree is more than decor—it’s a declaration of intentionality. Every staggered tier reflects careful observation of nature’s geometry. Every hidden bracket embodies respect for craftsmanship over convenience. Every finished installation proves that restraint, precision, and structural honesty can coexist with warmth and celebration. You don’t need a workshop full of tools—just a reliable level, a quality router, and the willingness to measure twice and cut once. Your wall is ready. Your materials are waiting. Your first shelf—cut, routed, finished—is already taking shape in your mind. Build it not as a seasonal gesture, but as an heirloom structure: something your future self will admire, your guests will ask about, and your home will hold as quietly essential.


 浙公网安备
33010002000092号
浙公网安备
33010002000092号 浙B2-20120091-4
Comments
No comments yet. Why don't you start the discussion?