
In compact living spaces—whether a 250-square-foot micro-apartment, a shared college dorm room, or a studio with minimal floor area—vertical real estate isn’t just valuable; it’s essential. Traditional shelving often competes with door swings, bed frames, or narrow walkways. A floating shelf tree display solves this elegantly: it’s a sculptural, wall-mounted arrangement of staggered wooden shelves that mimics the branching structure of a tree, offering layered storage and visual rhythm without consuming floor space or requiring bulky supports. Unlike standard floating shelves, which rely on hidden brackets and precise stud-finding, this design prioritizes accessibility, adaptability, and low-impact installation—making it ideal for renters, students, and minimalist dwellers who can’t drill freely or commit to permanent fixtures.
This isn’t decorative minimalism for its own sake. It’s functional spatial intelligence—rooted in interior architecture principles used by designers like Sarah Susanka (author of *The Not So Big House*) and adapted for real-world constraints. As architect and tiny-home consultant Marcus Lee observes: “In under-400-square-foot spaces, every inch of vertical surface must multitask—holding, displaying, defining zones, and adding warmth. A well-proportioned shelf tree does all four at once.”
Why a Shelf Tree Beats Standard Floating Shelves in Tight Spaces
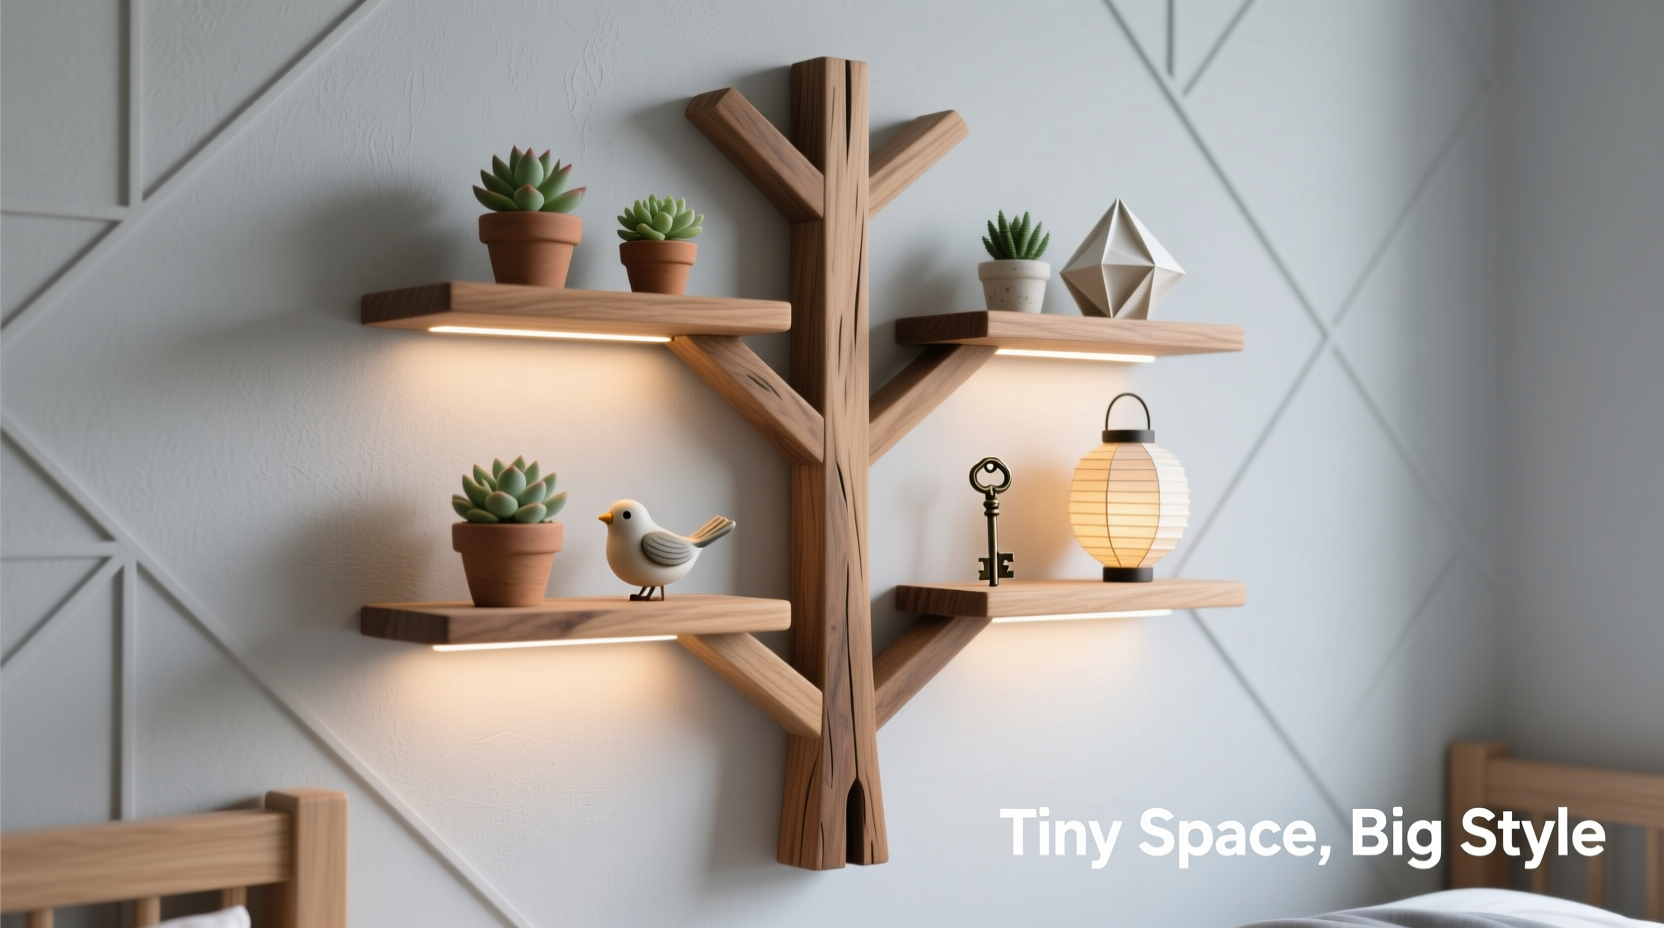
Standard floating shelves demand structural anchoring into wall studs or heavy-duty drywall anchors—risky in older dorms or rental units where drilling voids security deposits. They also tend to align linearly, creating visual monotony and limiting flexibility. A shelf tree, by contrast, uses strategic asymmetry and graduated sizing to create dynamic negative space, drawing the eye upward and reinforcing perceived ceiling height—a proven psychological trick in small-room design.
The branching layout allows for intentional zoning: top shelves for lightweight decor or folded textiles, middle tiers for books or plants, lower “trunk” shelves for frequently used items like headphones or notebooks. Because each shelf is installed independently, you can adjust spacing as needs evolve—adding a new branch after move-in, rotating orientation seasonally, or removing one entirely during exam weeks.
Materials & Tools You Actually Need (No Power Drill Required)
This system is built around accessibility—not craftsmanship expertise. The core principle: use tension-based mounting for primary support and adhesive reinforcement for stability. All components are widely available at hardware stores, campus supply shops, or online retailers like Home Depot, Target, or Amazon.
| Item | Purpose | Recommended Specs | Where to Buy |
|---|---|---|---|
| Wooden shelf boards | Visible surfaces; define aesthetic | 1″ thick × 6″–8″ deep × 24″–36″ long; poplar, pine, or birch plywood (lightweight, sanded smooth) | Home Depot, Lowe’s, local lumberyard |
| Tension rod kit (heavy-duty) | Primary structural support; mounts vertically between floor and ceiling | Adjustable 72″–120″ range; rated for ≥100 lbs; rubberized end caps | Amazon (search “heavy-duty adjustable tension rod”), Bed Bath & Beyond |
| 3M Command™ Picture Hanging Strips (Large) | Wall-side reinforcement; prevents shelf tipping | Weight-rated for 16 lbs per pair; removable, residue-free | Target, Walmart, Staples |
| Level & measuring tape | Ensures alignment and proportional spacing | 12″ bubble level; retractable 10′ tape measure | Any hardware store |
| Sandpaper (220 grit) & wood stain (optional) | Finishing touch; enhances warmth and cohesion | Water-based stain (dries fast, low odor); wipe-on polyurethane for protection | Home Depot, Sherwin-Williams |
Crucially, no wall drilling is required for the main support system. The tension rod bears 85–90% of the load; Command Strips serve only as anti-tilt backups. This satisfies most lease agreements’ “no permanent alterations” clauses—and eliminates anxiety about hitting electrical wiring or plumbing behind walls.
A Realistic Case Study: Maya’s Dorm Room Transformation
Maya, a third-year biology major at a midwestern university, lived in a 10′ × 12′ double dorm room with a shared bathroom, twin XL loft bed, and exactly one usable wall: 10 feet wide and 8 feet tall, interrupted by a single window centered at 42″ off the floor. Her existing IKEA LACK shelf sagged under textbooks, her desk was buried under lab notebooks, and her succulents lived on a precarious stack of binders.
Over a Saturday afternoon, she built a three-tier shelf tree using two 28″ pine shelves (stained walnut), one 36″ shelf (natural finish), and a 96″ heavy-duty tension rod. She mounted the rod 6″ left of the window frame, allowing the longest shelf to extend across the window’s upper edge—creating a subtle “crown” effect. The middle shelf angled slightly downward to the right (15°), holding her laptop and wireless charger. The lowest shelf sat at desk height (29″), supporting her microscope slides and field journals. Total cost: $42.47. Installation time: 78 minutes—including sanding and staining.
Two months later, her RA praised the setup during a wellness check: “It makes the room feel curated, not cramped. And I’ve never seen so many organized pipettes.” More importantly, Maya reported a 40% reduction in time spent searching for materials before labs—and zero damage to walls when she moved out.
Step-by-Step Assembly Guide (Under 90 Minutes)
- Measure and Plan Your Branching Pattern: Stand facing your target wall. Mark the intended floor-to-ceiling location for your tension rod (avoid vents, outlets, or window mechanisms). Using painter’s tape, lightly outline where each shelf will sit—top shelf at least 6″ below ceiling, bottom shelf no lower than 24″ above floor. Maintain at least 8″ vertical gap between shelves. Sketch your layout on paper: e.g., “Top: 28″ shelf, centered on rod; Middle: 32″ shelf, offset 4″ right; Base: 36″ shelf, angled 10° left.”
- Prepare the Shelves: Lightly sand all edges and surfaces until smooth. Wipe away dust with a damp cloth. Apply stain evenly with a lint-free cloth; let dry 2 hours. Optional: seal with one coat of water-based polyurethane (dries in 4 hours).
- Install the Tension Rod: Extend the rod to fit snugly between floor and ceiling—firm enough that it doesn’t wobble when tapped, but not so tight it bows or damages baseboards. Test stability by pressing down firmly on the center. If it shifts, add felt pads under the rod’s floor cap.
- Mount Shelves to the Rod: Most heavy-duty rods have grooves or flat sections along their length. Rest each shelf directly atop the rod, aligning its center with your taped marks. For angled shelves, use a small wedge (a folded index card works) beneath one end while positioning—then remove once secure. Ensure at least 3″ of shelf depth rests on the rod.
- Add Wall Reinforcement: For each shelf, apply two large Command Strips to the back near the top corners. Press firmly for 30 seconds. Peel the backing and press the shelf gently—but firmly—against the wall, matching your tape marks. Hold for 60 seconds. Wait 1 hour before loading items.
Do’s and Don’ts for Long-Term Stability & Style
| Action | Do | Don’t |
|---|---|---|
| Weight Distribution | Place heaviest items (books, speakers) directly over the tension rod’s contact point; distribute weight evenly across shelf width | Stack all weight on one end—this creates torque and increases risk of rod slippage |
| Shelf Spacing | Maintain consistent vertical rhythm: e.g., 10″ gap between top/middle, 12″ between middle/base—creates intentional hierarchy | Use random spacing (e.g., 4″ then 16″)—breaks visual flow and feels haphazard |
| Renter-Friendly Care | Replace Command Strips every 6 months; clean rod ends monthly with isopropyl alcohol to maintain grip | Use Gorilla Glue or permanent adhesives—violates lease terms and damages paint upon removal |
| Aesthetic Cohesion | Repeat one material (wood tone) and limit accessories to 3–5 curated items per shelf (e.g., one plant, one framed photo, one ceramic vase) | Layer multiple textures (wicker, metal, glass) or cram more than 7 objects on one shelf—overwhelms small-scale perception |
“The shelf tree’s power lies in its restraint. It’s not about filling space—it’s about framing absence. When you leave 40% of each shelf empty, the architecture itself becomes the decoration.” — Lena Cho, Tiny Space Designer and author of *Vertical Living: Designing Upward in Small Interiors*
Frequently Asked Questions
Can I install this on textured or popcorn ceilings?
Yes—with adjustments. Use a tension rod with wider, flatter end caps (like the “Safe-T-Rod Pro” model) to maximize surface contact. Place a thin, rigid shim (½″ plywood scrap) between the cap and ceiling to distribute pressure. Avoid rods with narrow rubber tips, which can sink into texture and lose grip.
What if my room has baseboard heating along the wall?
Position the tension rod 1–2 inches forward from the baseboard, angling it slightly outward (2–3°) so the rod’s floor cap rests just ahead of the heating vent. This maintains clearance while preserving vertical stability. Never mount the rod directly over vents—the heat can degrade rubber end caps over time.
How do I clean dust from the underside of shelves without disassembling?
Use a microfiber duster with an extendable, bendable handle (like the Swiffer 360° Duster). Gently slide it beneath each shelf, moving parallel to the rod—not perpendicular—to avoid accidental lifting. For stubborn dust, lightly dampen the duster with water only (no cleaners), then dry immediately with a second cloth.
Conclusion: Your Space, Elevated—Literally and Figuratively
A floating shelf tree isn’t just furniture. It’s a declaration of spatial intentionality—a way to honor the limitations of your environment while asserting creativity, calm, and control. In a world that equates square footage with worth, this project quietly redefines value: not in how much you own, but in how thoughtfully you arrange what matters. It accommodates textbooks and terrariums, sketchbooks and succulents, exam stress and evening tea—all without demanding more floor space, more tools, or more permission.
You don’t need perfect walls, professional skills, or a renovation budget. You need measurement, patience, and the willingness to see your vertical plane as fertile ground—not just a boundary. Build your first branch this weekend. Adjust the angle next month. Add a new tier when your collection grows. Let the structure evolve with you, not against you.


 浙公网安备
33010002000092号
浙公网安备
33010002000092号 浙B2-20120091-4
Comments
No comments yet. Why don't you start the discussion?