
Creating a levitating Christmas ornament is more than just a festive decoration—it’s a fusion of science, creativity, and seasonal charm. By harnessing the principles of magnetic levitation and basic electronic control, you can suspend a small ornament mid-air, giving your holiday display a futuristic glow. This project is accessible to hobbyists with minimal experience in electronics, provided they follow safety guidelines and work methodically. With affordable components and careful assembly, you can craft a talking point for your tree or mantel that blends tradition with innovation.
Understanding Magnetic Levitation Basics
Magnetic levitation, or maglev, occurs when an object is suspended in air without physical support, held aloft by magnetic forces. In this project, we use electromagnetic stabilization to counteract gravity. The key principle involves balancing repulsive and attractive magnetic forces so that the ornament remains stable in three-dimensional space.
There are two primary types of magnetic levitation: passive and active. Passive systems rely solely on permanent magnets and diamagnetic materials—these are simpler but often unstable. Active systems use sensors and electromagnets controlled by a feedback loop, adjusting the magnetic field hundreds of times per second to maintain equilibrium. For a reliable, visually impressive levitating ornament, an active system is recommended.
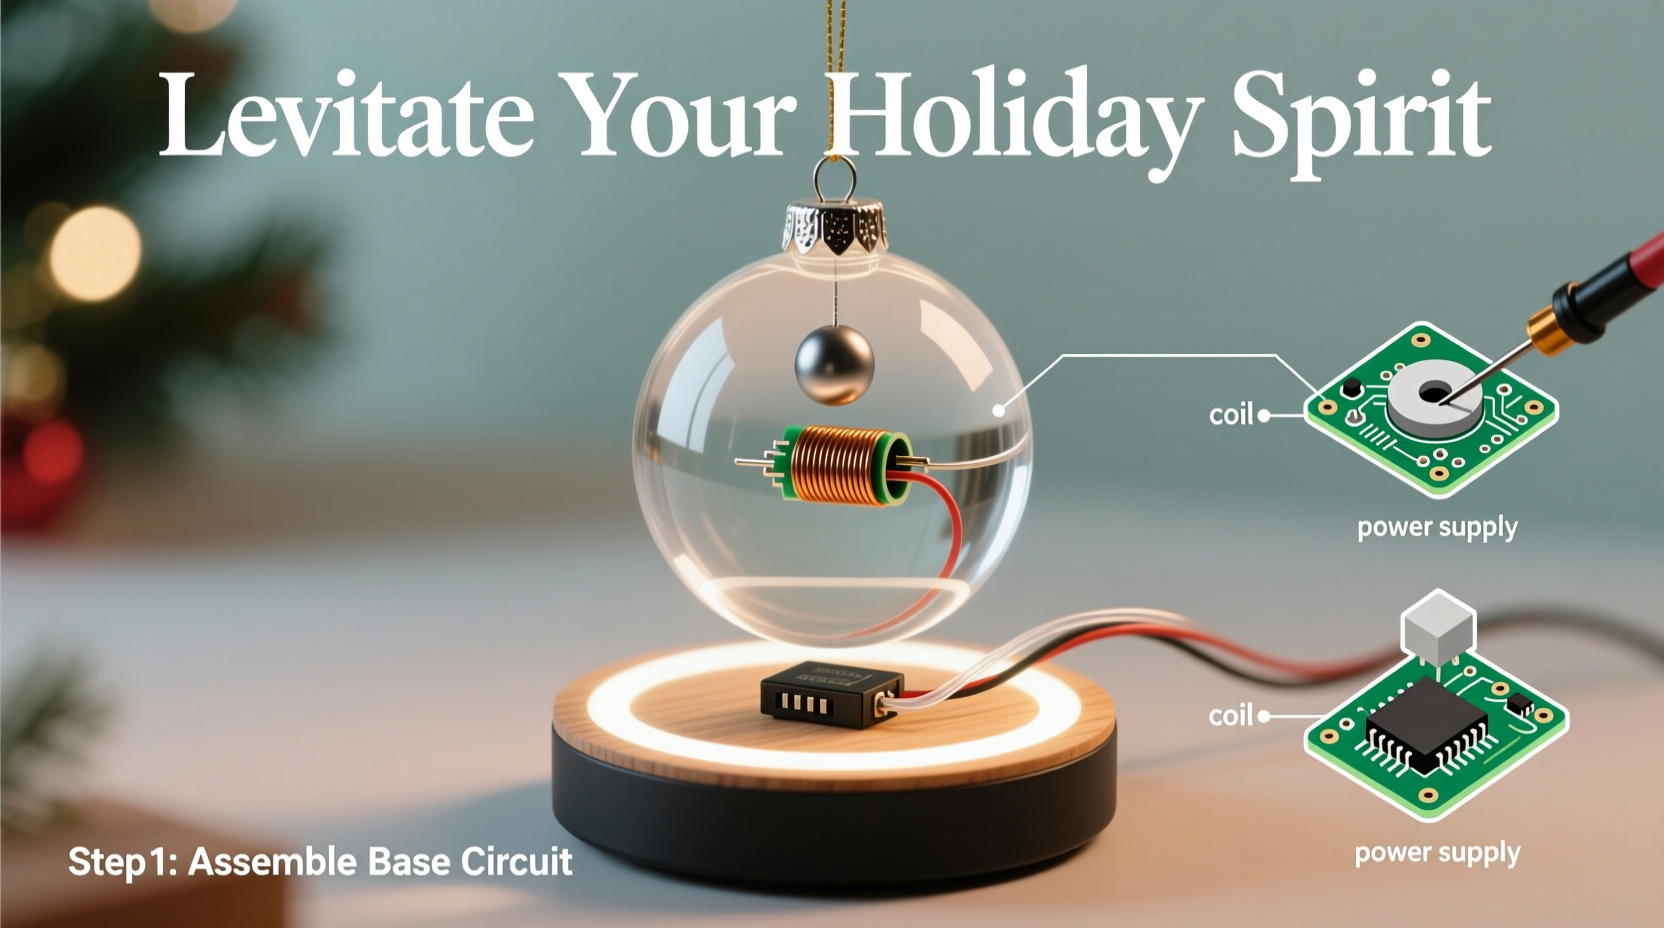
The core components include:
- A base unit housing an electromagnet and control circuitry
- A Hall effect sensor to detect the position of the floating magnet
- A small permanent magnet embedded in the ornament
- A microcontroller (such as an Arduino) to process sensor data and regulate current
This setup allows real-time adjustments, ensuring the ornament doesn’t drift or fall during operation.
Materials and Tools Required
Before beginning construction, gather all necessary parts. Most can be sourced online from electronics retailers or salvaged from old devices. Below is a comprehensive checklist to guide your preparation.
✅ Checklist: What You’ll Need
- Arduino Nano or compatible microcontroller
- Hall effect sensor (e.g., A1302 or SS49E linear type)
- Electromagnet (12V solenoid or custom-wound coil)
- Power supply (5–12V DC adapter or USB power bank)
- N35 or N52 neodymium disc magnet (10–15mm diameter)
- Breadboard and jumper wires
- Transistor (e.g., TIP120 Darlington pair) for driving the electromagnet
- Resistors (10kΩ pull-up resistor for sensor)
- Soldering iron and solder (optional, for permanent connections)
- 3D-printed or hand-carved ornament shell (lightweight plastic or wood)
- Hot glue gun, wire cutters, multimeter
Choose lightweight materials for the ornament itself—anything over 20 grams may exceed the lifting capacity of small electromagnets. Foam, balsa wood, or thin plastic spheres work best.
Step-by-Step Assembly Guide
Follow this sequence to build a functional levitating ornament system. Each step builds upon the last, culminating in a smoothly floating decoration.
Step 1: Mount the Electromagnet and Sensor
Secure the electromagnet at the center of your base platform. Position the Hall effect sensor directly beneath where the floating magnet will hover—typically 2–4 cm above the coil. Use hot glue or mounting brackets to keep both components fixed and aligned vertically.
Step 2: Wire the Circuit
Connect the components as follows:
- VCC and GND of the Hall sensor to 5V and ground on the Arduino
- Analog output of the sensor to A0 on the Arduino
- Base pin of the transistor to digital pin D9 via a 1kΩ resistor
- Emitter to ground, collector to the negative terminal of the electromagnet
- Positive terminal of the electromagnet to the positive rail (connected to power supply)
Ensure the transistor can handle the electromagnet’s current draw—use a heatsink if necessary.
Step 3: Upload Control Code
Program the Arduino with a proportional control algorithm. The code reads the sensor value, compares it to a target “hover point,” then adjusts PWM output to the transistor accordingly.
Example logic:
int sensorPin = A0;
int pwmPin = 9;
int target = 512; // Midpoint of analog read (adjust empirically)
void setup() {
  pinMode(pwmPin, OUTPUT);
}
void loop() {
  int pos = analogRead(sensorPin);
  int error = target - pos;
  int pwmValue = constrain(error * 0.8, 0, 255);
  analogWrite(pwmPin, pwmValue);
}
Tune the multiplier (0.8 in this case) until the response is smooth—not too aggressive, not too sluggish.
Step 4: Embed Magnet in Ornament
Attach the neodymium magnet securely inside the bottom of your ornament. Balance is crucial: ensure the weight distribution keeps the ornament level while floating. Test with temporary adhesive first.
Step 5: Power and Calibrate
Power the system and slowly bring the ornament into range. Adjust the target value in code until stable levitation occurs. Fine-tune positioning by slightly raising or lowering the sensor.
Optimization and Troubleshooting Table
Even well-assembled systems may require adjustment. Use this reference to diagnose and fix common issues.
| Issue | Possible Cause | Solution |
|---|---|---|
| Ornament vibrates or wobbles | Gain too high in control loop | Reduce multiplier in code; add damping |
| Ornament won't lift | Insufficient magnetic force or misalignment | Use stronger magnet or electromagnet; align components precisely |
| System overheats | Transistor or coil drawing excess current | Add heatsink; check for short circuits; limit duty cycle |
| Sensor readings fluctuate | Electrical noise or loose wiring | Use shielded wires; secure connections; add capacitor across power lines |
| Ornament drifts sideways | Lack of lateral stability | Add guide rails or optical sensors for horizontal correction |
For enhanced performance, consider upgrading to a PID (Proportional-Integral-Derivative) controller, which provides finer control and reduces oscillation over time.
Real-World Example: A Maker’s Holiday Project
Daniel Reyes, a high school robotics teacher in Portland, introduced this project to his students as part of a holiday STEM workshop. Using 3D-printed star-shaped ornaments painted in gold and red, each team built their own levitation base from kits he pre-assembled.
“At first, most groups struggled with instability,” Daniel noted. “But once they understood how the sensor feedback worked, they started tweaking the code and even added LED lighting inside the stars.”
One student team integrated a motion sensor that dimmed the lights when no one was nearby, conserving energy. Their final display—a row of five levitating stars rising above a model village—became the centerpiece of the school’s winter fair.
This example shows how a simple concept can evolve into a multidisciplinary project combining physics, coding, and artistry.
“Magnetic levitation isn’t magic—it’s measurable, adjustable, and deeply educational. When students see something float because of their own calculations, it clicks.” — Dr. Lena Park, Educational Technologist at MIT Media Lab Outreach
Frequently Asked Questions
Can I use a battery to power the ornament?
Yes, a 9V battery or rechargeable USB power bank works well for short-term displays. However, continuous operation drains batteries quickly due to the electromagnet’s power draw. For long-term use, a wall adapter is more practical and cost-effective.
Is this safe around children and pets?
The voltages used are low and generally safe, but neodymium magnets pose a choking hazard and can interfere with pacemakers or electronic devices. Keep the setup out of reach of young children and supervise closely during operation.
Can I make multiple ornaments levitate at once?
Technically possible, but challenging. Each levitation system requires its own sensor and control loop. Stacking them vertically risks magnetic interference. A better approach is to place separate units side by side, each controlling one ornament independently.
Enhancing Your Design
Once the basic levitation works, consider enhancements to elevate both function and aesthetics.
- LED Integration: Embed addressable LEDs (like WS2812B) inside the ornament for color-changing effects synchronized with music or timers.
- Wireless Control: Add a Bluetooth module to adjust brightness or levitation height via smartphone app.
- Silent Operation: Replace the standard coil with a laminated-core electromagnet to reduce audible hum.
- Themed Designs: Craft ornaments shaped like snowflakes, angels, or miniature sleighs to match your decor.
For outdoor use, seal all electronics against moisture and use weather-resistant coatings on wooden or porous materials.
Final Thoughts and Encouragement
Building a levitating Christmas ornament bridges the gap between tradition and technology. It’s not merely about making something float—it’s about sparking wonder, learning through doing, and creating something uniquely yours. Whether you’re introducing kids to electronics, impressing guests, or simply enjoying a hands-on holiday project, this endeavor offers lasting satisfaction.
The components are reusable. If one design fails, iterate and improve. Every glitch teaches something new. And when you finally see that ornament hovering steadily, glowing softly above its base, you’ll know the effort was worth it.


 浙公网安备
33010002000092号
浙公网安备
33010002000092号 浙B2-20120091-4
Comments
No comments yet. Why don't you start the discussion?