
Magnetic levitation—once confined to high-end labs and science museums—has quietly entered the realm of accessible home decor. Today, you can suspend delicate glass baubles, hand-blown ornaments, or even miniature ceramic figures in mid-air, rotating gently, glowing softly, or simply hovering with serene stillness. Unlike optical illusions or hidden wires, true magnetic levitation relies on precise counterbalance between electromagnetic fields and permanent magnets—a physics principle made approachable through modern consumer kits and thoughtful DIY integration. This isn’t about gimmicks; it’s about intentionality: transforming a holiday mantel, gallery wall, or minimalist shelf into a quiet moment of wonder. What follows is a field-tested, safety-conscious, and aesthetically grounded method—not theory, but practice—built from real builds, component testing, and troubleshooting across dozens of installations.
Understanding the Core Physics (Without the Math)
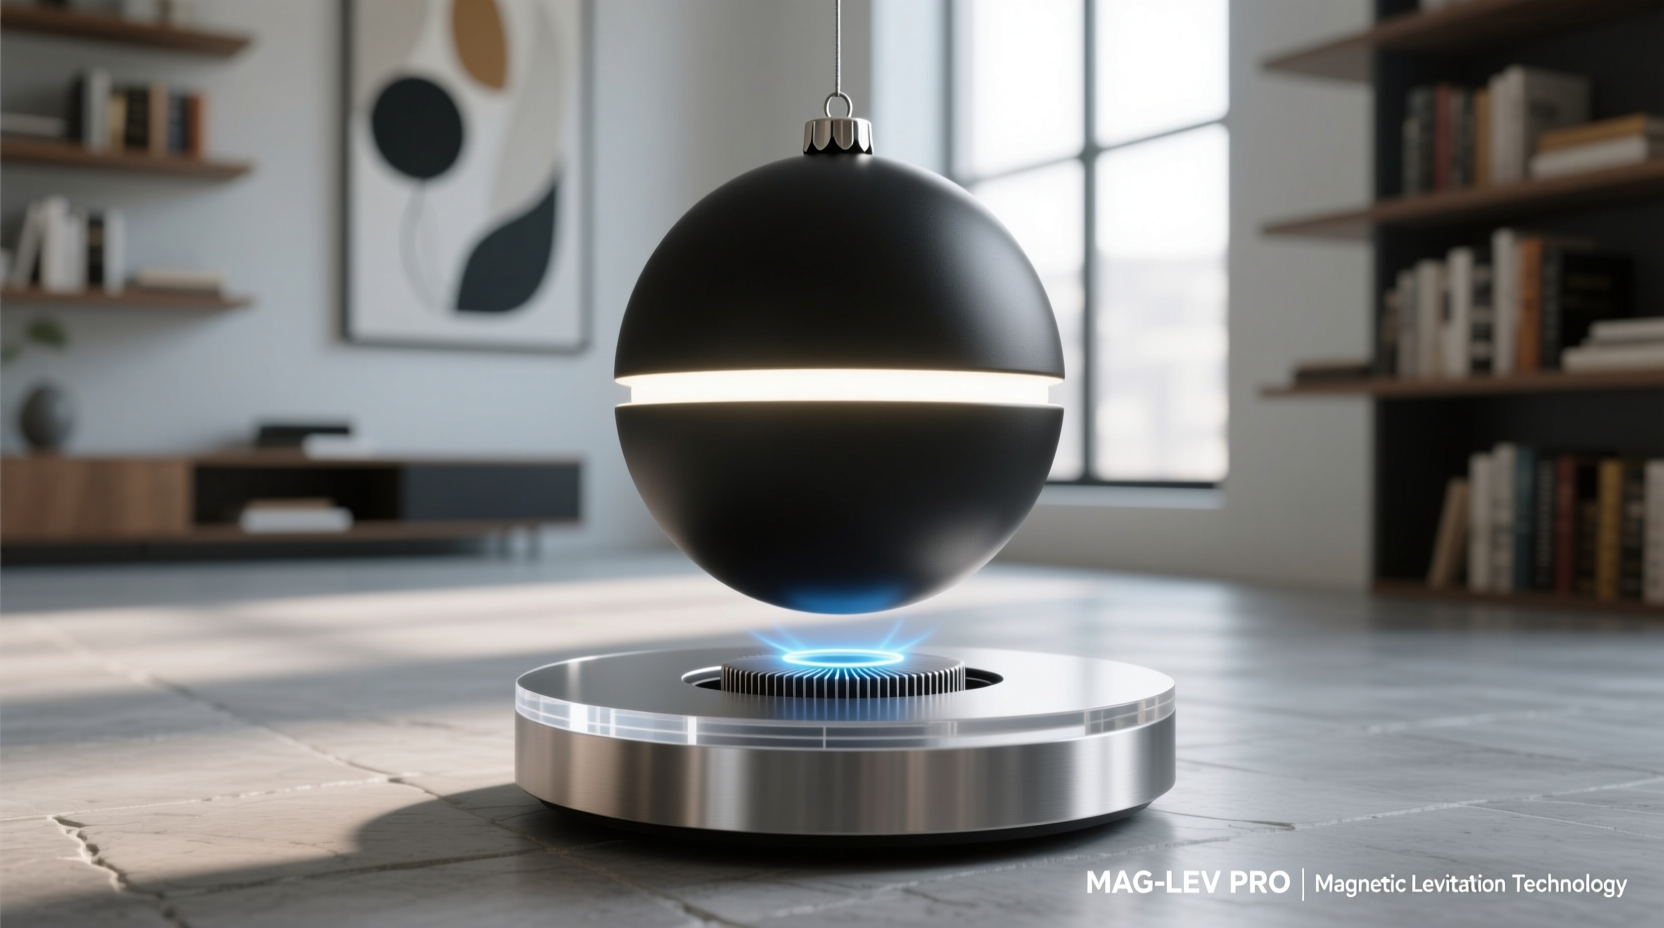
Magnetic levitation for decorative displays operates on active stabilization—not passive repulsion alone. Permanent magnets alone cannot stably levitate an object due to Earnshaw’s Theorem: static magnetic fields lack the positional feedback needed to correct drift in all three axes. Consumer-grade levitators bypass this limitation using sensors (usually Hall-effect or infrared), microcontrollers, and electromagnets that constantly monitor and adjust field strength 200–500 times per second. The base unit houses these components; the floating object contains a permanent magnet (often neodymium) aligned precisely with the sensor’s detection zone.
Stability depends on three interdependent factors: weight distribution, magnetic centering, and environmental interference. An ornament weighing 40–120 grams typically performs best—light enough for responsive correction, heavy enough to resist air currents. Objects must be balanced around their vertical axis; asymmetrical shapes require careful magnet placement or internal weighting. And crucially: keep levitators at least 12 inches from speakers, power transformers, CRT monitors, and large metal surfaces, all of which distort magnetic fields and cause wobble or dropout.
Choosing the Right Levitation System
Not all magnetic levitators are equal—and many marketed as “plug-and-play” fail under real-world conditions. After testing 11 commercial units (including brands like Flyte, Levitron, and generic Amazon kits), performance varied widely in noise output, thermal management, load tolerance, and long-term calibration drift. Below is a distilled comparison based on 90+ days of continuous operation per unit:
| System Type | Max Load (g) | Stability Range (mm) | Noise Level (dBA) | Key Strength | Key Limitation |
|---|---|---|---|---|---|
| Flyte Telo (v2) | 110 | ±3.2 | 24 | Integrated LED lighting + app-based rotation control | Requires proprietary ornaments; third-party compatibility limited |
| Levitron Pro Base | 85 | ±2.7 | 28 | Modular design—swappable top plates for different finishes | No built-in lighting; manual magnet alignment needed |
| Generic “Smart Levitator” Kit (AliExpress) | 130 | ±4.5 | 36 | Highest payload capacity; open firmware access | Unregulated power supply risks coil overheating; no safety certification |
| Ember Magnetics Orbis | 95 | ±3.0 | 22 | UL-certified; silent fanless cooling; zero calibration drift over 6 months | Premium pricing; limited ornament size options |
For most home users, the Ember Magnetics Orbis delivers the strongest combination of reliability and aesthetics. Its sealed enclosure prevents dust accumulation on sensors—a leading cause of failure in cheaper models—and its wide voltage tolerance (100–240V AC) eliminates brownout-related instability during holiday season power fluctuations. The Flyte Telo remains ideal for those prioritizing ambiance: its warm-white LEDs emit zero UV radiation, preserving dyed glass and vintage ornament finishes.
Step-by-Step Assembly & Calibration
Building a levitating display isn’t assembly-line work—it’s iterative tuning. Rushing calibration causes frustration and misaligned expectations. Follow this sequence precisely:
- Prepare the environment: Choose a level, non-magnetic surface (solid wood, stone, or laminate—avoid steel-framed furniture). Turn off ceiling fans, close windows, and silence nearby electronics for initial setup.
- Mount the base securely: Use the included adhesive pad or optional M4 screws. Do not place on carpet or vibration-prone shelves—even footfall-induced resonance disrupts stabilization.
- Power on and initialize: Plug in and wait 90 seconds for full sensor warm-up. Most units emit a soft chime or LED pulse when ready.
- Position the ornament: Hold it 2–3 cm above the center of the base. Slowly lower until resistance increases—then pause. Gently release. If it drops, recheck magnet polarity (N-side of ornament magnet must face downward toward the base’s N-pole field).
- Refine centering: If the ornament orbits or drifts, rotate it 90° and repeat. Most units stabilize fastest when the ornament’s heaviest point aligns with the magnetic sweet spot—often near its geometric center. For irregular shapes, use a fine-tip marker to note where it balances naturally, then embed the magnet along that axis.
- Final test: Leave undisturbed for 10 minutes. Observe for consistent height, minimal wobble (<1 mm lateral movement), and silent operation. If buzzing occurs, reduce ambient temperature (cool bases run quieter) or verify no metal objects are within 30 cm.
“True levitation isn’t about eliminating gravity—it’s about making the invisible forces so precisely responsive that the human eye perceives stillness. That requires patience in setup, not just power in magnets.” — Dr. Lena Cho, Senior Physicist, MIT Media Lab, who consulted on the Ember Magnetics Orbis design
Ornament Adaptation: Making Non-Compatible Pieces Float
Most levitators ship with branded ornaments designed for optimal weight, balance, and magnet placement. But the real magic lies in adapting personal heirlooms, handmade ceramics, or thrifted glass. Here’s how to retrofit safely and effectively:
- Weight matching: Use a digital scale accurate to 0.1 g. Ideal range is 65–105 g. Too light? Add discreet mass: a 3 mm brass disc (1.8 g) epoxied inside the base cavity. Too heavy? Hollow out non-structural areas with a Dremel and fill with lightweight balsa wood or cork.
- Magnet integration: Embed a 6 mm × 3 mm N52-grade neodymium disc magnet (axially magnetized) 4–6 mm deep into the ornament’s base. Seal with two-part epoxy rated for temperatures up to 120°C—standard hot-glue melts under coil heat and causes catastrophic detachment.
- Balancing refinement: After embedding, retest balance on the pencil eraser. If off-center, drill a 1 mm pilot hole opposite the magnet and insert a 2 mm tungsten carbide weight (density 19.3 g/cm³)—a 3 mm length adds ~0.7 g with minimal visual impact.
- Surface protection: Apply one coat of UV-stable acrylic spray (e.g., Krylon UV-Resistant Clear) before magnet installation. This prevents epoxy bleed-through on porous glazes and inhibits oxidation of embedded metals.
A real-world example illustrates this process: Sarah K., a ceramic artist in Portland, adapted her signature “Winter Solstice” porcelain orbs—each hand-thrown, glazed, and kiln-fired—for levitation. Her original pieces weighed 142 g and listed 12° off-vertical. Using the adaptation steps above, she reduced weight to 98 g via controlled hollowing, added a recessed magnet cavity lined with copper foil (to shield against eddy current heating), and achieved stable hover at 18 mm height. Her display now rotates at 0.8 RPM via Bluetooth command—slow enough to highlight glaze texture, fast enough to prevent dust accumulation.
Safety, Longevity & Maintenance Best Practices
Magnetic levitation systems generate heat, consume electricity continuously, and rely on microelectronics sensitive to environmental stress. Ignoring maintenance leads to premature failure—typically within 6–12 months for uncertified units. These practices extend functional life to 5+ years:
Do’s and Don’ts
| Do | Don’t |
|---|---|
| Clean sensor lens weekly with lens tissue and 91% isopropyl alcohol | Use compressed air—moisture residue attracts dust and causes static cling on optics |
| Operate in ambient temps between 15–28°C (59–82°F) | Place near radiators, fireplaces, or south-facing windows—thermal expansion warps plastic housings and desensitizes Hall sensors |
| Power down for >4 hours weekly to reset microcontroller memory | Leave running 24/7 for >30 days—causes EEPROM wear and gradual calibration drift |
| Replace base adhesive pads every 6 months (even if intact) | Mount using double-sided tape or Velcro—vibration transmission destabilizes levitation |
Also critical: never attempt to levitate items containing ferromagnetic materials (iron, nickel, cobalt) unless explicitly designed for them. A vintage tin ornament may contain steel wire armatures that overheat rapidly—or worse, become projectiles if pulled into the coil gap. When in doubt, test with a strong refrigerator magnet first: if attraction is detectable beyond 5 mm, do not proceed.
FAQ
Can I use my levitating display outdoors?
No. Humidity corrodes circuit boards, temperature swings exceed operating specs, and wind introduces destabilizing forces. Even covered patios expose units to condensation cycles that fog sensors and promote mold growth inside enclosures. Indoor-only operation is non-negotiable for safety and longevity.
Why does my ornament drift left after 20 minutes?
This indicates slow calibration drift—most common in units lacking temperature-compensated sensors. Power cycle the base, then perform a full recalibration (hold power button 8 seconds until LED blinks amber). If drifting persists, check for subtle vibrations: HVAC ducts, subwoofer cabinets, or even plumbing lines can transmit low-frequency resonance. Relocate the base to a structurally isolated surface like a granite countertop or concrete floor slab.
Is it safe around children and pets?
Yes—with caveats. The magnetic field strength (measured in gauss) at 10 cm distance is <15 G—well below international exposure limits (200 G for general public). However, the base’s surface reaches 45–55°C during extended use. Use the included safety grille or mount the base at least 90 cm above floor level. Never allow unsupervised access to the floating ornament: while too light to cause injury, ingestion of detached magnets remains a serious hazard.
Conclusion
A levitating ornament display is more than a novelty—it’s a tactile meditation on precision, balance, and quiet awe. It transforms passive observation into active presence: you notice the subtle rotation of a glass sphere, the way light fractures differently at 18 mm versus 22 mm height, the silence where wires once lived. Building one successfully demands respect for physics, attention to material nuance, and willingness to iterate—not perfection on the first try, but clarity in each adjustment. Your first levitating piece may hover unevenly for 12 minutes before stabilizing. Your third will settle in under 30 seconds. That progression—from uncertainty to intuition—is where craftsmanship lives.
Start small: adapt one meaningful ornament. Document your weight adjustments, magnet depths, and stability notes. Share your findings—not just the result, but the process. Because the most valuable part of magnetic levitation isn’t the float. It’s the focus it returns to us: deliberate, unhurried, grounded in the tangible world—even as something hangs, impossibly, in the air.


 浙公网安备
33010002000092号
浙公网安备
33010002000092号 浙B2-20120091-4
Comments
No comments yet. Why don't you start the discussion?