
Every year, children around the world eagerly await Santa’s arrival. While no one has captured definitive proof of his visit, you can come close by building your own motion-tracking Santa Cam. Using a Raspberry Pi, PIR sensor, camera module, and a few lines of Python, you can create an automated system that detects movement, captures images, and even sends real-time alerts. This project blends holiday fun with practical electronics and programming—perfect for tech-savvy families or DIY enthusiasts looking to add a touch of smart magic to their Christmas Eve.
Why Build a Santa Cam?
A Santa Cam isn’t just a festive gadget—it’s a hands-on introduction to embedded systems, computer vision, and home automation. By combining hardware sensing with software logic, you teach valuable skills in problem-solving, circuitry, and coding. More importantly, it creates a memorable family tradition: waking up to photos of “Santa” (or perhaps a cleverly disguised parent) sneaking through the living room.
The beauty of this system lies in its simplicity. With off-the-shelf components and open-source tools, you can assemble a reliable motion-detection camera for under $100. And because it runs on Linux, you can customize it further—adding email notifications, cloud uploads, or even voice announcements.
Required Components and Setup
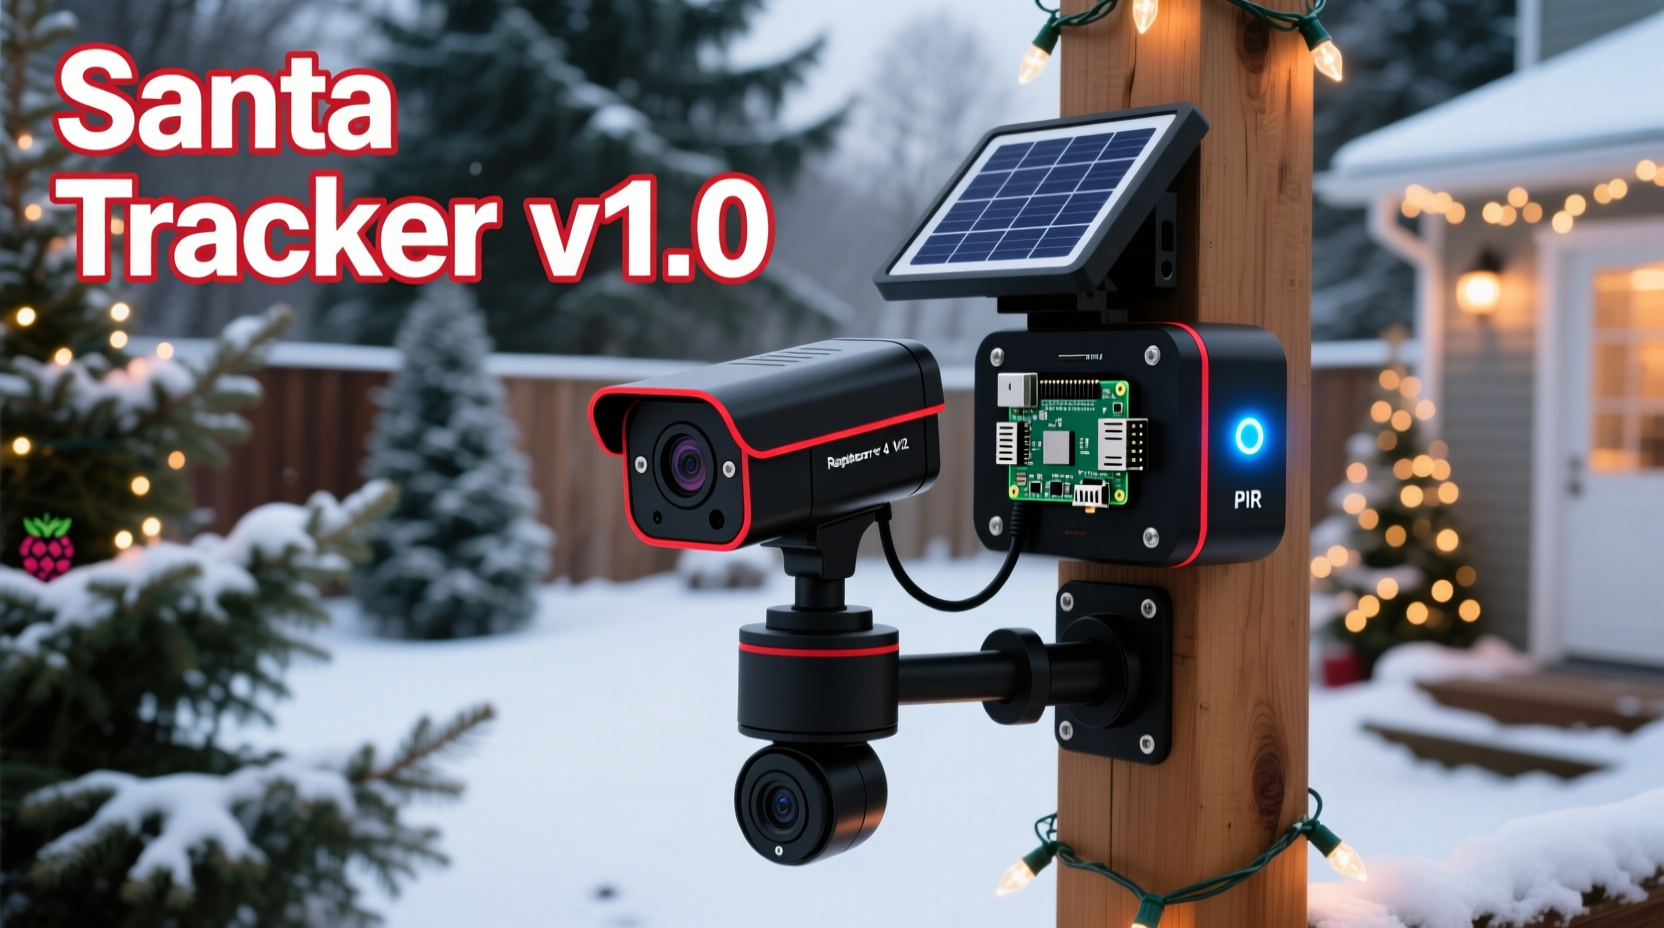
Before writing any code, gather the necessary hardware. Most items are readily available from electronics retailers or online marketplaces.
Hardware List
- Raspberry Pi (Model 3B+, 4, or Pi Zero W recommended)
- Raspberry Pi Camera Module (v2 preferred) or USB webcam
- PIR (Passive Infrared) Motion Sensor (HC-SR501)
- MicroSD card (16GB or larger, preloaded with Raspberry Pi OS)
- Power supply (5V/2.5A for Pi 4; lower for Zero)
- Breadboard and jumper wires (male-to-female and male-to-male)
- Small enclosure (optional, for discreet placement)
Software Requirements
- Raspberry Pi OS (preferably Lite if headless, Desktop if testing locally)
- Python 3.x
- OpenCV or picamera2 library (depending on camera type)
- Optional: smtplib for email alerts, ftplib for cloud backup
Begin by installing Raspberry Pi OS using Raspberry Pi Imager. Enable SSH and configure Wi-Fi during setup if you plan to run the device headlessly. Once booted, connect via SSH or directly using a monitor and keyboard.
Next, enable the camera interface. Run sudo raspi-config, navigate to \"Interface Options,\" then \"Camera,\" and enable it. Reboot when prompted.
“Projects like the Santa Cam turn abstract programming concepts into tangible experiences. Kids see cause and effect in real time.” — Dr. Alan Reyes, STEM Education Coordinator
Wiring the PIR Sensor and Camera
The HC-SR501 PIR sensor detects infrared radiation emitted by warm bodies—like humans or reindeer. It has three pins: VCC (power), GND (ground), and OUT (signal). Connect them as follows:
| PIR Pin | Raspberry Pi GPIO | Connection Type |
|---|---|---|
| VCC | 5V (Pin 2) | Red wire |
| GND | Ground (Pin 6) | Black wire |
| OUT | GPIO 17 (Pin 11) | Yellow or white signal wire |
The camera connects via the dedicated ribbon cable slot between the Ethernet and HDMI ports. Gently lift the clips, insert the cable with the silver contacts facing the USB ports (for most models), then press the clips back down.
Test the camera with the command:
libcamera-hello --timeout 5000
If you see a live preview, the camera is working.
Step-by-Step Code Implementation
With hardware connected, write a Python script to monitor motion and trigger photos. This example uses picamera2, the modern replacement for picamera.
Install Dependencies
sudo apt update
sudo apt install python3-picamera2 python3-libcamera python3-prctl
Create the Santa Cam Script
Navigate to your project folder and create a new file:
nano santa_cam.py
Paste the following code:
import time
import datetime
from picamera2 import Picamera2
import RPi.GPIO as GPIO

# Configuration
PIR_PIN = 17
IMAGE_DIR = \"/home/pi/santa_photos/\"

# Setup GPIO
GPIO.setmode(GPIO.BCM)
GPIO.setup(PIR_PIN, GPIO.IN)

# Initialize camera
picam2 = Picamera2()
config = picam2.create_still_configuration()
picam2.configure(config)
picam2.start()

print(\"Santa Cam armed... Waiting for movement.\")
time.sleep(2)  # Allow camera to stabilize

try:
    while True:
        if GPIO.input(PIR_PIN):
            print(\"Motion detected!\")

            # Generate timestamped filename
            timestamp = datetime.datetime.now().strftime(\"%Y%m%d_%H%M%S\")
            filename = f\"{IMAGE_DIR}santa_visit_{timestamp}.jpg\"

            # Capture image
            picam2.capture_file(filename)
            print(f\"Photo saved: {filename}\")

            # Wait before allowing another capture (anti-flood)
            time.sleep(5)
        else:
            time.sleep(0.1)  # Reduce CPU load

except KeyboardInterrupt:
    print(\"System deactivated.\")
finally:
    picam2.stop()
    GPIO.cleanup()
Save and exit (Ctrl+X, then Y).
Run the System
- Create the photo directory:
mkdir /home/pi/santa_photos - Make the script executable:
chmod +x santa_cam.py - Run it:
python3 santa_cam.py
When motion is detected, the camera captures a still image and saves it with a timestamp. The 5-second cooldown prevents rapid-fire shots from continuous movement.
Auto-Start on Boot (Optional)
To ensure the Santa Cam runs every time the Pi powers on, add it to cron:
crontab -e
Add this line:
@reboot sleep 20 && /usr/bin/python3 /home/pi/santa_cam.py &
This delays startup by 20 seconds to allow Wi-Fi and hardware initialization.
Enhancing the Santa Cam Experience
The basic version works well, but several upgrades can improve reliability and fun.
Email Alerts
Modify the script to send an email when motion is detected. Use Gmail’s SMTP server with an app password.
import smtplib
from email.mime.multipart import MIMEMultipart
from email.mime.text import MIMEText
from email.mime.base import MIMEBase
from email import encoders
Add inside the motion detection block:
def send_alert(filename):
    msg = MIMEMultipart()
    msg['From'] = 'your_email@gmail.com'
    msg['To'] = 'family_email@example.com'
    msg['Subject'] = '🎅 Santa Has Been Spotted!'

    body = 'Check the attached photo—Santa might be nearby!'
    msg.attach(MIMEText(body, 'plain'))

    attachment = open(filename, 'rb')
    part = MIMEBase('application', 'octet-stream')
    part.set_payload(attachment.read())
    encoders.encode_base64(part)
    part.add_header('Content-Disposition', f'attachment; filename= {filename}')
    msg.attach(part)

    server = smtplib.SMTP('smtp.gmail.com', 587)
    server.starttls()
    server.login('your_email@gmail.com', 'your_app_password')
    text = msg.as_string()
    server.sendmail('your_email@gmail.com', 'family_email@example.com', text)
    server.quit()
    attachment.close()
Call send_alert(filename) right after capturing the image.
Cloud Backup
Use FTP or rsync to push photos to a remote server or NAS. Alternatively, integrate with Google Drive using gdrive CLI tool.
Santa Mode Lighting
Add RGB LEDs triggered alongside the camera. Program them to flash red and green when motion is detected—creating a festive “alert” effect.
Audio Announcement
Connect a small speaker and play a short jingle like “Here Comes Santa Claus” using pygame.mixer or aplay. Just ensure volume is low to avoid waking light sleepers.
Real Example: The Thompson Family Santa Cam
The Thompsons in Portland, Oregon, built their first Santa Cam in 2020. Using a Raspberry Pi 4 and an old camera module, they mounted the system above their tree. On Christmas Eve, the PIR sensor triggered five times—three were pets, but two showed clear images of someone in a red suit adjusting ornaments.
\"We told the kids Santa was extra careful not to wake them,\" said Mark Thompson. \"But we got great photos—and our daughter still believes at age 9.\" They now run the system annually and share images with grandparents via email alerts.
In 2022, they upgraded to include a thermal overlay using OpenCV to highlight heat signatures. While not foolproof, it added a layer of scientific flair to their holiday tradition.
Frequently Asked Questions
Can I use a USB webcam instead of the Pi Camera?
Yes. Use OpenCV with cv2.VideoCapture(0) to access USB cameras. Install OpenCV via pip3 install opencv-python. Note that some webcams may have slower startup times or compatibility issues.
How do I prevent false triggers from pets?
Adjust the PIR sensor’s sensitivity dial to ignore smaller heat sources. Position the sensor higher or angle it to exclude pet pathways. For advanced filtering, use OpenCV to analyze object size in frames before saving.
What if the Pi loses power during the night?
Use a UPS HAT or a portable power bank capable of supplying stable 5V. Ensure total runtime exceeds 12 hours. Alternatively, plug into a surge-protected outlet used for essential devices.
Final Checklist Before Christmas Eve
- ✅ Assemble all hardware and test connections
- ✅ Confirm camera feed is clear and focused
- ✅ Verify PIR sensor detects motion reliably
- ✅ Run a full system test at night with simulated Santa
- ✅ Store photos to a known directory and verify access
- ✅ Set up auto-start via cron or systemd
- ✅ Charge backup power source (if used)
- ✅ Discreetly position the unit with lens unobstructed
Conclusion: Make This Christmas the Most Technologically Memorable Yet
Building a motion-tracking Santa Cam blends nostalgia with innovation. It’s more than a prank—it’s a gateway to learning, creativity, and shared wonder. Whether you’re introducing your kids to tech or satisfying your own maker instincts, this project delivers joy with every line of code and blink of an LED.
The Raspberry Pi doesn’t just watch for Santa—it empowers you to become part of the magic. From wiring sensors to receiving midnight alerts, each step reinforces real-world skills while preserving childhood belief. And who knows? You might just catch something unexplainable in the blur of the night.


 浙公网安备
33010002000092号
浙公网安备
33010002000092号 浙B2-20120091-4
Comments
No comments yet. Why don't you start the discussion?