
Capturing memories in tangible form adds warmth and meaning to holiday traditions. One of the most heartfelt ways to preserve special moments is by creating personalized ornaments using photo transfer techniques. These handmade keepsakes blend artistry and sentiment, turning cherished photographs—of family, pets, or milestone events—into durable decorations that can be displayed year after year. Unlike mass-produced trinkets, these ornaments carry emotional weight and reflect individual stories. With accessible materials and straightforward methods, anyone can craft elegant, custom pieces that stand out on the tree or serve as meaningful gifts.
The process involves transferring a printed image onto a rigid surface such as wood, ceramic, or glass, then sealing it into an ornament form. While the concept may sound complex, modern supplies and techniques have made photo transfers more approachable than ever. Whether you're crafting for yourself or designing gifts for loved ones, mastering this skill opens up endless creative possibilities.
Understanding Photo Transfer Methods
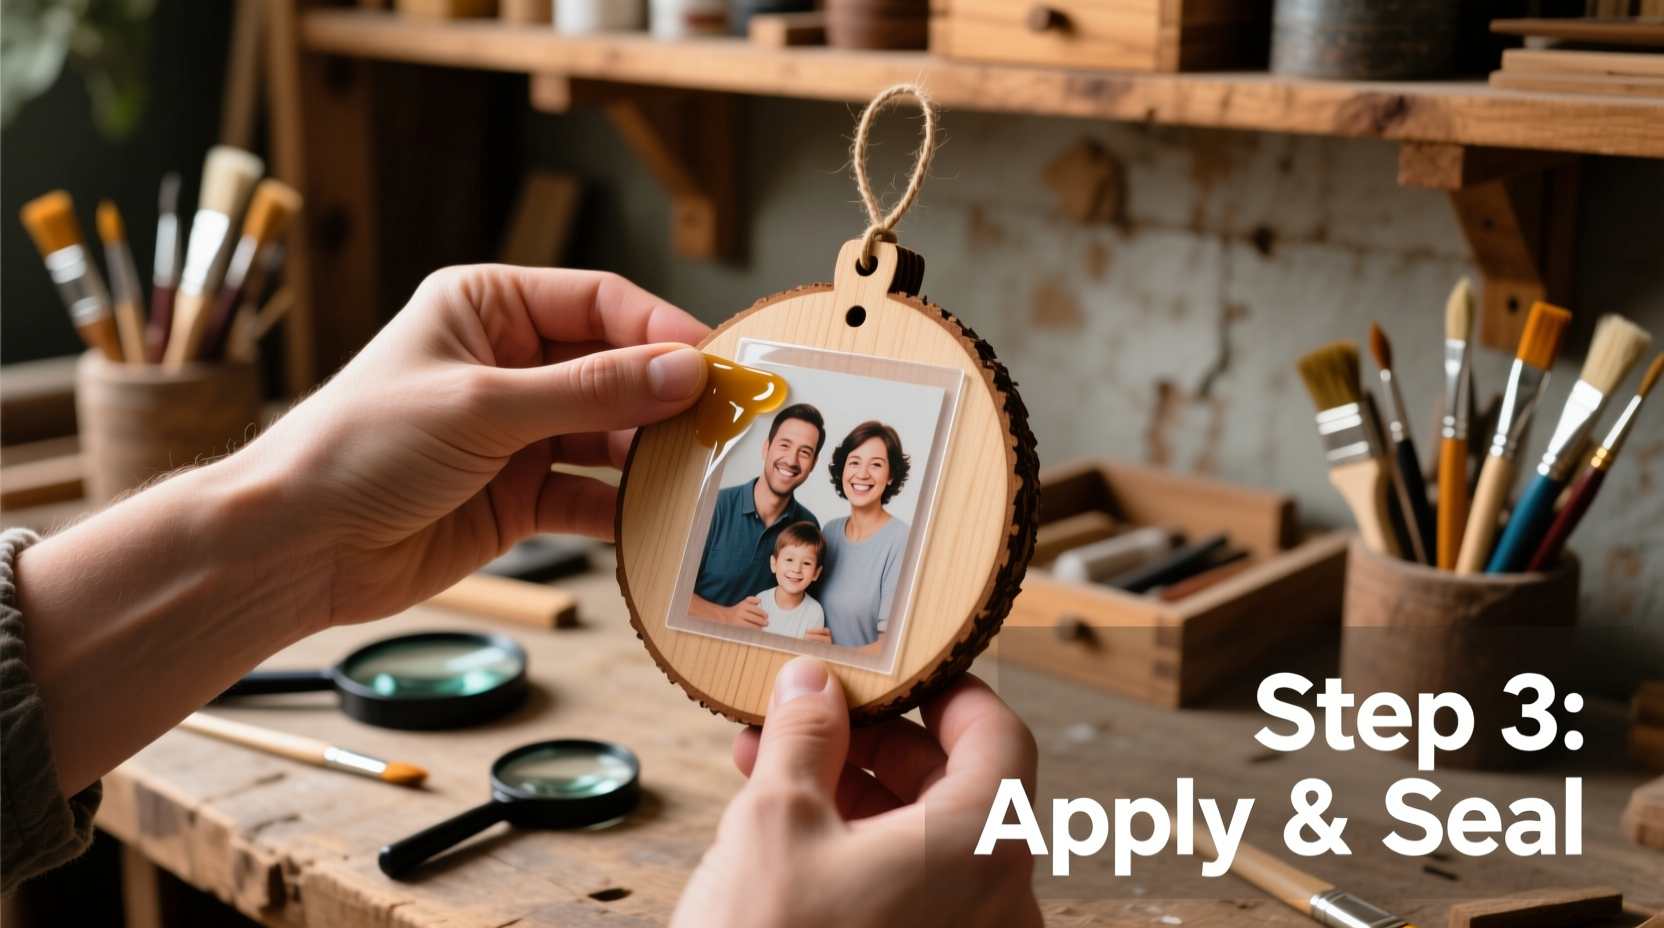
Photo transfer is not a single technique but a category of processes that move ink from paper to another surface. The method you choose depends on your desired finish, materials available, and level of precision. Three primary techniques are widely used in DIY ornament making: gel medium transfer, Mod Podge decoupage transfer, and heat transfer printing.
Gel medium transfer uses an acrylic-based gel to adhere and lift the toner from laser-printed images onto porous surfaces like wood slices or unfinished ceramics. This method produces sharp results with a slightly vintage texture. The paper must be sanded away gradually, revealing the embedded image beneath.
Mod Podge decoupage transfer relies on a specialized adhesive that bonds the photo to the surface while allowing the paper backing to be rubbed off. It works best with high-resolution prints and smooth substrates. Though simpler than gel medium, it requires patience during the rubbing stage to avoid damaging the transferred layer.
Heat transfer printing involves printing a mirror image on special transfer paper, then using heat and pressure (via iron or heat press) to fuse it onto coated surfaces like metal or polymer clay. This technique yields vibrant, full-color results and is ideal for glossy finishes.
Essential Materials and Tools Checklist
Before beginning, gather all necessary supplies to ensure a smooth workflow. Having everything ready minimizes interruptions and helps maintain consistency in application.
“Preparation is half the battle in any craft project. Organizing your workspace and tools ensures precision and reduces frustration.” — Lena Torres, Mixed Media Artist
- Laser-printed photograph (mirror image if using heat transfer)
- Ornament base (wood slice, ceramic tile, clear glass bulb, or MDF shape)
- Acrylic gel medium or decoupage glue (e.g., Mod Podge Photo Transfer Medium)
- Soft-bristled brush or foam applicator
- Sanding block (fine grit, 220+)
- Clean cloth or sponge
- Scissors or craft knife
- Clear sealant (matte or gloss varnish)
- Hanging cord, ribbon, or bail
- Optional: Stencils, paint, embellishments
Choose a clean, flat workspace protected with newspaper or a silicone mat. Good lighting is essential, especially during the delicate stages of paper removal and finishing.
Step-by-Step Guide to Creating a Wood Slice Ornament Using Gel Medium
Wood slice ornaments offer a rustic, natural aesthetic perfect for heirloom-quality keepsakes. Follow this detailed sequence to achieve professional results.
- Prepare the Image: Select a high-contrast photo with clear focal points. Print it on a laser printer—do not use inkjet. Cut the image slightly larger than your wood slice to allow for trimming later.
- Prep the Wood: Lightly sand the surface of the wood slice to remove splinters and create a smooth base. Wipe away dust with a dry cloth. If desired, apply a light coat of clear sealer and let dry to prevent excessive absorption.
- Apply Gel Medium: Using a foam brush, apply a generous, even layer of acrylic gel medium to the entire surface of the wood. Work quickly before the medium begins to dry.
- Position the Photo: Place the printed side of the photo face-down onto the gel-coated wood. Press firmly from the center outward to eliminate air bubbles. Use a brayer or credit card wrapped in plastic to smooth the surface without tearing the paper.
- Dry Completely: Allow the piece to dry undisturbed for at least 24 hours. Drying time may vary depending on humidity and thickness of application.
- Remove the Paper Backing: Dampen a sponge with water and gently rub the paper in circular motions. Start at one corner and work slowly. The paper will begin to ball up, revealing the transferred image. Be patient—aggressive rubbing can damage the toner layer.
- Final Touches: Once all paper is removed and the image is clear, let the surface dry again. Apply 2–3 thin coats of clear varnish, allowing drying time between layers. This protects the image and enhances durability.
- Add Hanging Element: Drill a small hole at the top edge or attach a metal bail with strong adhesive. Thread ribbon or twine through for hanging.
Comparing Transfer Techniques: Which Method Is Right for You?
Each transfer method has strengths and limitations. Consider your goals, timeline, and materials when choosing.
| Method | Best For | Time Required | Durability | Learning Curve |
|---|---|---|---|---|
| Gel Medium Transfer | Wood, raw ceramics, textured surfaces | 24–48 hours (including drying) | High (when sealed) | Moderate |
| Decoupage Transfer | Smooth wood, glass, metal | 12–24 hours | Medium to High | Low to Moderate |
| Heat Transfer | Polymer clay, coated metals, fabric ornaments | Under 1 hour | High (heat-set bond) | Low (with proper tools) |
Gel medium offers the most authentic, handcrafted appearance but demands patience. Decoupage is beginner-friendly and forgiving. Heat transfer delivers speed and color accuracy but requires specialty paper and equipment.
A Real Example: Crafting a Family Legacy Ornament
Sarah, a teacher from Vermont, wanted to honor her late grandmother during the holidays. She selected a black-and-white photo from the 1950s—a rare image of her grandmother as a young woman—and decided to turn it into a keepsake ornament. Using a 3-inch wood slice from a maple tree felled in her backyard, she applied the gel medium transfer technique. After careful sanding and multiple sealant layers, the image emerged with remarkable clarity, its grain blending subtly with the wood’s natural pattern.
She added a small brass tag engraved with her grandmother’s name and the year. That Christmas, the ornament became the centerpiece of the tree. Her children now ask to hang it every year, sparking conversations about family history. What began as a simple craft evolved into a tradition of storytelling and remembrance.
Avoiding Common Mistakes
Even experienced crafters encounter setbacks. Awareness of frequent errors improves success rates significantly.
- Using inkjet prints: Water-soluble ink bleeds during the wet removal phase, ruining the image.
- Rushing the drying process: Incomplete drying leads to smudging or incomplete adhesion.
- Over-rubbing the paper: Applying too much pressure removes toner along with paper fibers.
- Neglecting sealing: Unsealed transfers are vulnerable to UV fading, moisture, and abrasion.
- Ignoring image orientation: For heat transfers, failing to mirror the image results in reversed text or faces.
“Every mistake teaches something valuable. I ruined three wood slices before mastering the rubbing technique—but now I teach workshops on it.” — Diego Mendez, Craft Instructor
Frequently Asked Questions
Can I use a regular home printer for photo transfers?
No, standard inkjet printers are unsuitable for gel and decoupage transfers because the ink dissolves in water. Only laser printers produce toner-based prints that withstand moisture. If you don’t have access to a laser printer, many office supply stores offer laser printing services.
How long do photo transfer ornaments last?
With proper sealing and storage, they can last decades. Keep them out of direct sunlight and extreme humidity. Stored in a box with tissue paper between layers, they remain vibrant for generations.
Can I transfer a photo onto a glass ornament?
Yes, but the method differs. For clear glass bulbs, use Mod Podge decoupage transfer or insert a reverse-printed image inside the ornament. Exterior transfers require thorough cleaning and priming to ensure adhesion. Seal well to prevent peeling.
Enhancing Your Design with Creative Touches
Once the transfer is complete, personalize further. Paint the edges with metallic gold or festive red for a polished look. Add stenciled words like “Joy” or “2024” around the border. Embed tiny rhinestones or glitter in the sealant for subtle sparkle. For themed ornaments, pair the photo with complementary shapes—heart frames for anniversaries, stars for first Christmases, or snowflakes for winter birthdays.
Consider layering multiple small transfers on a larger base to create a collage effect. Alternatively, combine the photo with handwritten notes or pressed botanicals for a mixed-media piece.
Final Tips for Success
Work in a dust-free environment to avoid particles sticking to wet adhesive. If bubbles appear after applying the photo, prick them gently with a pin and press down with the brayer. For dark-toned photos, consider bleaching the wood slightly beforehand to enhance contrast.
Conclusion: Turn Memories Into Heirlooms
Creating a personalized ornament with photo transfer techniques is more than a craft—it’s an act of preservation. Each step, from selecting the image to sealing the final piece, connects you to the moment captured. These ornaments become touchstones of joy, resilience, and love, passed down through seasons and generations.
You don’t need advanced skills or expensive tools to begin. With patience and attention to detail, you can transform a simple print into a treasured decoration. Whether commemorating a child’s first holiday, celebrating a wedding, or honoring someone no longer with us, these handmade tokens carry meaning no store-bought item can replicate.


 浙公网安备
33010002000092号
浙公网安备
33010002000092号 浙B2-20120091-4
Comments
No comments yet. Why don't you start the discussion?