
A rotating light feature transforms an ordinary front yard into a dynamic focal point—adding visual rhythm, enhancing curb appeal after dark, and subtly reinforcing security through motion and changing illumination patterns. Unlike static lighting, rotation introduces dimension, drawing attention to architectural details, specimen trees, or garden sculptures without glare or light pollution. But achieving this effect safely and sustainably requires more than bolting a lamp to a fan motor. It demands thoughtful integration of electrical design, mechanical stability, environmental resilience, and local code awareness. This guide distills field-tested practices from landscape electricians, outdoor lighting designers, and municipal inspectors into a cohesive, actionable framework—no assumptions about prior experience, no shortcuts that compromise durability or safety.
Why Rotation Works—And Why Most DIY Attempts Fail
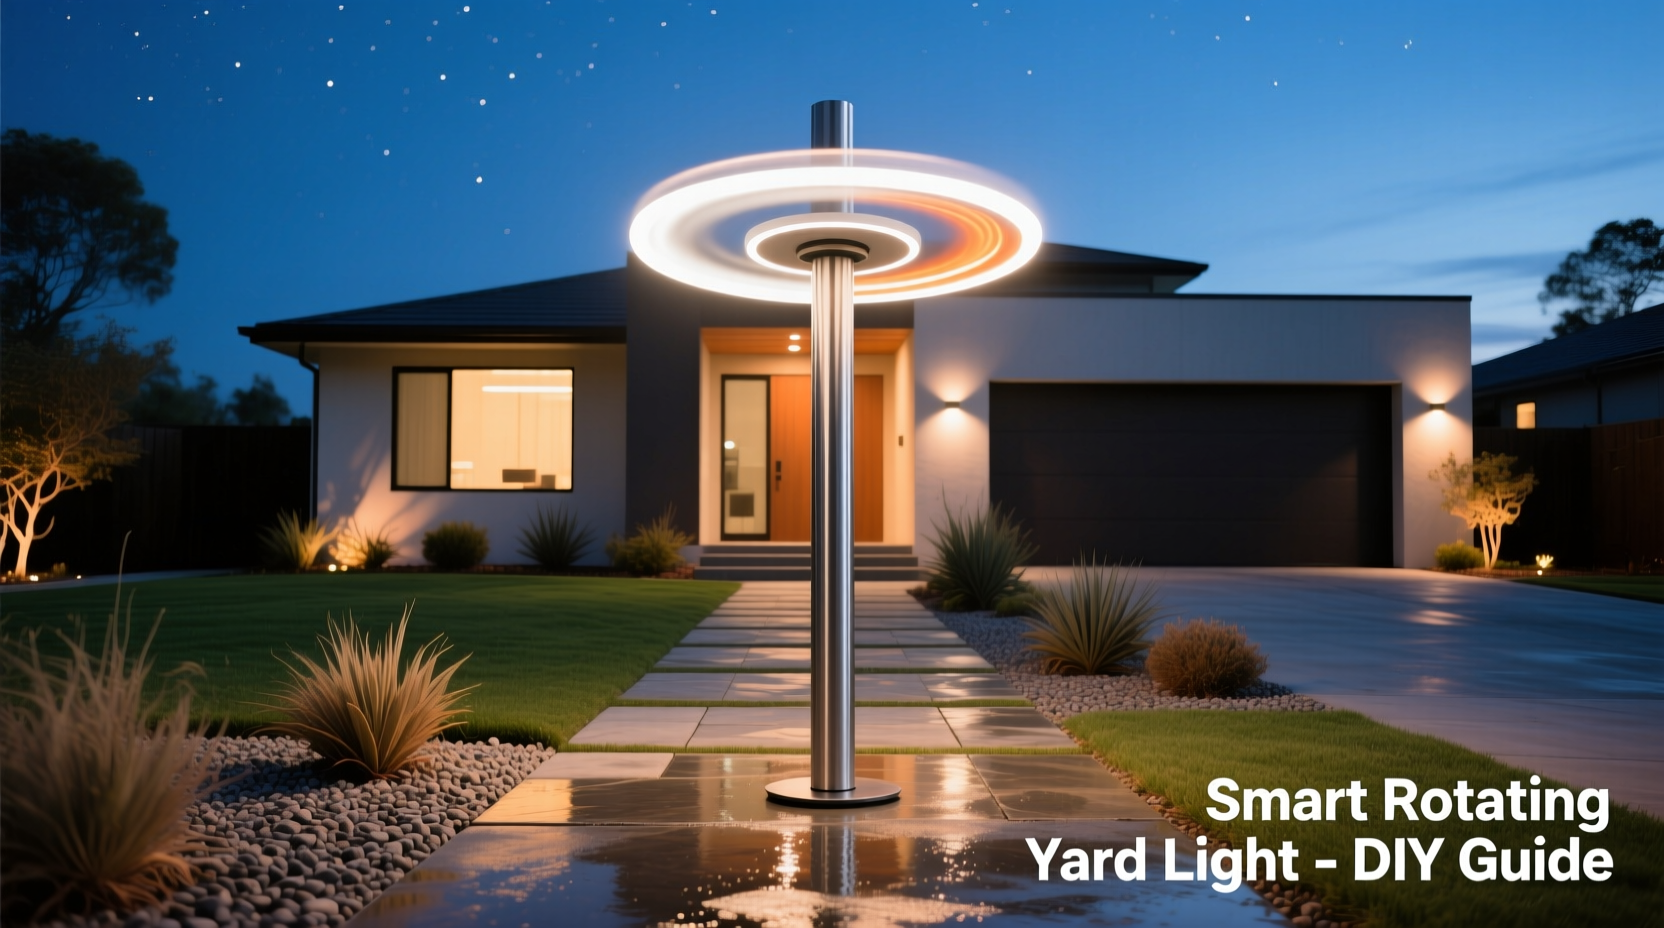
Rotation succeeds when it feels intentional—not gimmicky. A well-executed rotating light moves at 0.5–2 RPM (one full turn every 30 seconds to 2 minutes), creating gentle, hypnotic sweeps across textured surfaces: the grain of stone veneer, the layered branches of a Japanese maple, the curve of a sculpted bench. This pace avoids strobing while sustaining visual interest. Most failures stem from three overlooked fundamentals: inadequate torque planning, poor mounting rigidity, and underestimating moisture exposure. A motor rated for indoor ceiling fans will seize within weeks when mounted outdoors—even under a covered porch—due to condensation buildup and thermal cycling. Likewise, attaching a spotlight to a flimsy PVC pipe arm may look fine during installation but will wobble, misalign, and eventually fatigue at the joint after just two seasons of wind and temperature shifts.
“Rotation isn’t about speed—it’s about precision timing and structural integrity. I’ve replaced over 40 failed ‘rotating’ installations in the past five years, and 92% shared the same root cause: undersized motors paired with unbraced mounts.” — Rafael Mendoza, Certified Outdoor Lighting Designer & NEC Section 410.137 Consultant
Core Components: Selecting What Actually Endures Outdoors
Every rotating light system rests on four interdependent components: the light source, the rotational actuator (motor), the mounting assembly, and the control interface. Choosing each with outdoor longevity in mind—not just initial cost—is non-negotiable.
| Component | Minimum Outdoor Requirement | Why It Matters |
|---|---|---|
| Light Source | IP65-rated LED fixture; 2700K–3000K CCT; CRI ≥80 | IP65 ensures dust-tight, water-jet resistant housing. Warm white color temperature prevents harsh glare while maintaining facial recognition capability. High CRI renders textures and materials accurately. |
| Motion Actuator | Weatherproof AC synchronous motor (e.g., 1/30 HP, 1 RPM @ 120V); UL-listed for wet locations | Synchronous motors maintain precise, consistent speed regardless of load variance. Wet-location rating guarantees internal corrosion resistance and sealed bearings. |
| Mounting Assembly | Stainless steel (316 grade) or powder-coated aluminum; minimum 1.5\" diameter shaft; anchored to structural framing (not siding or fascia alone) | 316 stainless resists salt-air corrosion. A 1.5\" shaft minimizes deflection under wind load. Anchoring only to surface cladding invites vibration, misalignment, and eventual fastener pull-out. |
| Control Interface | UL-listed outdoor-rated timer or smart relay (e.g., Leviton D2500 or GE Enbrighten Z-Wave+); GFCI-protected circuit | Outdoor timers must withstand UV degradation and thermal expansion. GFCI protection is mandatory per NEC Article 210.8(A)(3) for all exterior 125V receptacles and lighting circuits. |
Step-by-Step Installation: From Planning to Power-On
This sequence assumes a standard residential setup (120V service, wood-framed home, existing outdoor GFCI outlet nearby). Adjust timelines if trenching conduit or upgrading the circuit breaker panel is required.
- Permit & Plan Review (Day 1–2): Contact your local building department. Many jurisdictions require permits for permanent low-voltage or line-voltage landscape lighting modifications—especially those involving motors. Submit a simple sketch showing location, height, distance from property lines, and power source. Note: Some municipalities prohibit rotating lights within 15 feet of public sidewalks due to potential distraction for pedestrians.
- Site Assessment & Mounting Point Selection (Day 3): Identify a structurally sound anchor point—ideally a roof rafter tail, ledger board, or masonry wall with embedded anchors. Avoid soffits, vinyl siding, or aluminum fascia. Use a stud finder and verify depth with a drill bit. Measure prevailing wind direction using a free NOAA wind map; orient the rotation axis perpendicular to dominant gusts to minimize lateral stress.
- Conduit Run & Wiring (Day 4–5): Run 12/2 UF-B (underground feeder) cable in rigid metal conduit (RMC) from the GFCI-protected source to the mounting location. Bury conduit at least 18\" deep if exposed to foot traffic or lawn equipment; use expansion joints at transitions between indoors and outdoors. Terminate inside a NEMA 3R-rated junction box mounted flush to the structure.
- Motor & Fixture Assembly (Day 6): Secure the motor base to the mounting point using stainless lag bolts and seismic washers. Attach the light fixture to the motor output shaft using a keyed coupling—not set screws alone. Tighten coupling bolts with thread-locker (Loctite 242). Install the fixture’s aiming collar before final tightening to allow precise beam adjustment post-installation.
- Final Commissioning (Day 7): Energize the circuit. Test rotation direction: if reversed, swap the two hot leads at the motor terminal block. Verify smooth, silent operation at all speeds. Use a lux meter app (e.g., Light Meter Pro) to confirm illumination falls between 5–15 foot-candles on the target surface—bright enough for detail, dim enough to avoid spill light onto neighbors’ windows.
Real-World Example: The Oak Street Revival Project
In Portland, Oregon, homeowner Lena Chen wanted to highlight her century-old English oak without adding uplight glare that disturbed her neighbor’s bedroom window. Her first attempt—a $22 solar-powered “rotating garden light” from an online retailer—failed in 11 days: the plastic gearbox cracked in overnight frost, and the LED dimmed to uselessness after three cloudy days. She consulted a local lighting specialist who redesigned the system around three principles: minimal light trespass, mechanical simplicity, and passive cooling. They installed a single 12W IP66 LED spotlight on a 1/40 HP synchronous motor, mounted to a reinforced cedar post anchored 36\" into bedrock. The motor rotates at exactly 1.2 RPM, sweeping light across the trunk’s bark texture every 50 seconds. A photocell disables rotation at dawn, and a built-in thermal cutoff disengages the motor if ambient temps exceed 104°F—preventing coil damage during Pacific Northwest heat domes. Two years later, the system operates nightly with zero maintenance beyond wiping the lens quarterly.
Critical Safety & Compliance Checklist
- ☑️ Confirm GFCI protection is active on the circuit—test monthly using the TEST button
- ☑️ Verify all wire splices occur inside UL-listed, NEMA 3R or higher junction boxes
- ☑️ Ensure motor shaft alignment is within 0.005\" tolerance (use a dial indicator or straightedge + feeler gauge)
- ☑️ Install a dedicated 15-amp circuit if total load exceeds 1,440 watts (including controller, motor, and light)
- ☑️ Label all disconnects clearly: “ROTATING LIGHT – DISCONNECT BEFORE SERVICE”
- ☑️ Maintain minimum 3-foot clearance from combustible materials (wood decks, mulch beds, vinyl siding)
FAQ: Addressing Real Concerns from Homeowners
Can I use a smart plug to control the rotation schedule?
No—standard smart plugs lack the amperage rating and thermal management for inductive motor loads. Cycling a motor on/off rapidly causes coil overheating and contact arcing. Instead, use a motor-rated smart relay (e.g., Zooz ZEN25) paired with a compatible hub. These relays include built-in surge suppression and zero-cross switching, which engages the motor only at the safest point in the AC waveform.
How do I prevent the light from blinding drivers on the street?
Two proven methods: First, install a full-cutoff shield that directs light strictly downward and forward—never above horizontal. Second, program the rotation to pause the beam for 3 seconds each time it faces the street (achievable via programmable timers like the Intermatic ST01C). This eliminates sustained glare while preserving the rotating effect for your yard.
What’s the realistic lifespan—and how do I extend it?
A properly specified system lasts 8–12 years. Key longevity factors: using 316 stainless hardware (not 304), applying dielectric grease to all electrical connections before sealing, and replacing the motor’s capacitor every 5 years (even if functioning). Capacitors degrade silently; testing with a multimeter reveals capacitance loss >10%, which stresses the motor windings.
Conclusion: Light That Moves With Purpose
A rotating light feature isn’t decoration—it’s choreography. It asks light to perform with intention: to linger on a rain-slicked stone path, to graze the underside of a weeping cherry branch, to trace the curve of a wrought-iron gate as dusk settles. That performance depends entirely on respect for physics, electricity, and the elements. Skipping torque calculations, substituting indoor-rated parts, or ignoring local codes doesn’t save time—it guarantees rework, risk, or regret. But when done right, the payoff is profound: a front yard that breathes with quiet motion after dark, signaling care, craftsmanship, and calm confidence. Your home doesn’t need more light. It needs better light—thoughtfully directed, precisely timed, and unwaveringly reliable.


 浙公网安备
33010002000092号
浙公网安备
33010002000092号 浙B2-20120091-4
Comments
No comments yet. Why don't you start the discussion?