
There’s a quiet magic in transforming weathered, sun-bleached wood—collected from shorelines, riverbanks, or even local parks—into a centerpiece that carries the soul of the sea and the warmth of the season. A driftwood Christmas tree is more than decor: it’s a tactile story of time, tide, and tenacity. Unlike mass-produced alternatives, this tree requires no plastic, minimal tools, and zero assembly instructions from a box. It’s sturdy yet graceful, minimalist yet deeply evocative—and when wrapped in soft white or amber LED string lights, it glows with a gentle, hearth-like radiance. This guide walks you through every intentional step: how to ethically source driftwood, prepare it safely, design a stable silhouette, wire lights with precision, and anchor the piece so it lasts beyond December. No carpentry degree needed—just patience, respect for natural materials, and an eye for organic form.
Why Driftwood Works—And Why It’s Worth the Effort
Driftwood isn’t just aesthetically compelling—it’s functionally ideal for a low-profile, non-traditional Christmas tree. Its dense, interlocked grain resists warping, its natural curves lend structural integrity without nails or glue, and its porous surface diffuses light beautifully. Unlike pine or fir, which shed needles and dry out quickly indoors, properly cured driftwood remains dimensionally stable for years. Conservation ecologists emphasize that responsibly gathered driftwood supports ecosystem health: removing only wind-tossed, fully detached pieces avoids disturbing dune vegetation or nesting habitats. As marine biologist Dr. Lena Torres notes, “The most sustainable driftwood is what’s already been released by nature—not pulled from living roots or stabilized shorelines.” That ethical foundation makes this project quietly meaningful: each branch represents release, resilience, and renewal.
Gathering & Preparing Your Driftwood: Safety First, Beauty Second
Successful driftwood sourcing hinges on timing, terrain, and tactile inspection. The best pieces appear after strong winds or seasonal storms—when tides deposit newly freed branches along high-water lines. Focus on hardwoods like oak, maple, or sycamore; avoid softwoods such as pine or cedar, which degrade faster indoors and may harbor unseen resin pockets. Look for pieces with smooth, rounded edges (indicating prolonged tumbling), subtle silver-gray patina (not chalky white, which signals excessive salt exposure), and no visible cracks running deep into the core.
Once collected, preparation is non-negotiable—not for aesthetics alone, but for safety and longevity. Salt residue attracts moisture and accelerates metal corrosion in wiring; embedded sand abrades insulation; and dormant insects or mold spores pose indoor air quality risks. Follow this sequence precisely:
- Rinse thoroughly with fresh water using a stiff-bristled brush (never pressure wash—this forces water into microfractures).
- Air-dry for 4–6 weeks in a shaded, well-ventilated area—off the ground on wire racks, rotated weekly.
- Lightly sand only high-contact surfaces (e.g., trunk base, topmost branch tips) with 120-grit paper to remove loose fibers—never strip the patina.
- Sanitize with diluted vinegar (1 part white vinegar to 3 parts water), applied with a lint-free cloth. Let air-dry 48 hours before proceeding.
This curing process eliminates nearly all biological contaminants while preserving the wood’s character. Skipping it invites dust mites, musty odors, or brittle breakage under light-string tension.
Designing Your Tree Structure: Proportions, Balance, and Visual Flow
A convincing driftwood tree relies less on symmetry and more on intentional asymmetry—mimicking how real trees grow toward light. Begin by sorting your pieces into three functional categories:
- Trunk elements: 1–3 straight or gently tapered pieces, 36–48 inches tall, with consistent girth (1.5–3 inches diameter).
- Primary branches: 5–9 medium-length pieces (18–30 inches), slightly curved, with at least one pronounced “elbow” or fork.
- Accent twigs: 8–12 slender, delicate pieces (8–16 inches), often with fine lateral spurs or natural taper.
Arrange them on a large, clean floor space before mounting. Lay the tallest trunk piece vertically. Fan primary branches outward at 30°–45° angles—lower branches wider, upper ones tighter—to create visual weight and upward lift. Nest accent twigs into natural crotches or wrap them loosely around thicker limbs using thin copper wire (22-gauge, annealed). Avoid overcrowding: negative space between branches is essential for light diffusion and breathability.
| Design Principle | What to Do | What to Avoid |
|---|---|---|
| Height-to-Width Ratio | Maintain 2:1 or 2.5:1 (e.g., 48\" tall = 20–24\" widest point) | Top-heavy silhouettes or unnaturally narrow profiles |
| Branch Spacing | Allow 4–6 inches between major branch tips horizontally | Clumping branches or rigid horizontal alignment |
| Visual Anchoring | Widen the base with 2–3 shorter, stouter pieces angled slightly outward | Single-point base contact or floating upper sections |
| Material Harmony | Mix textures (smooth bark, pitted grain, fibrous ends) intentionally | Over-sanding to uniform smoothness or painting |
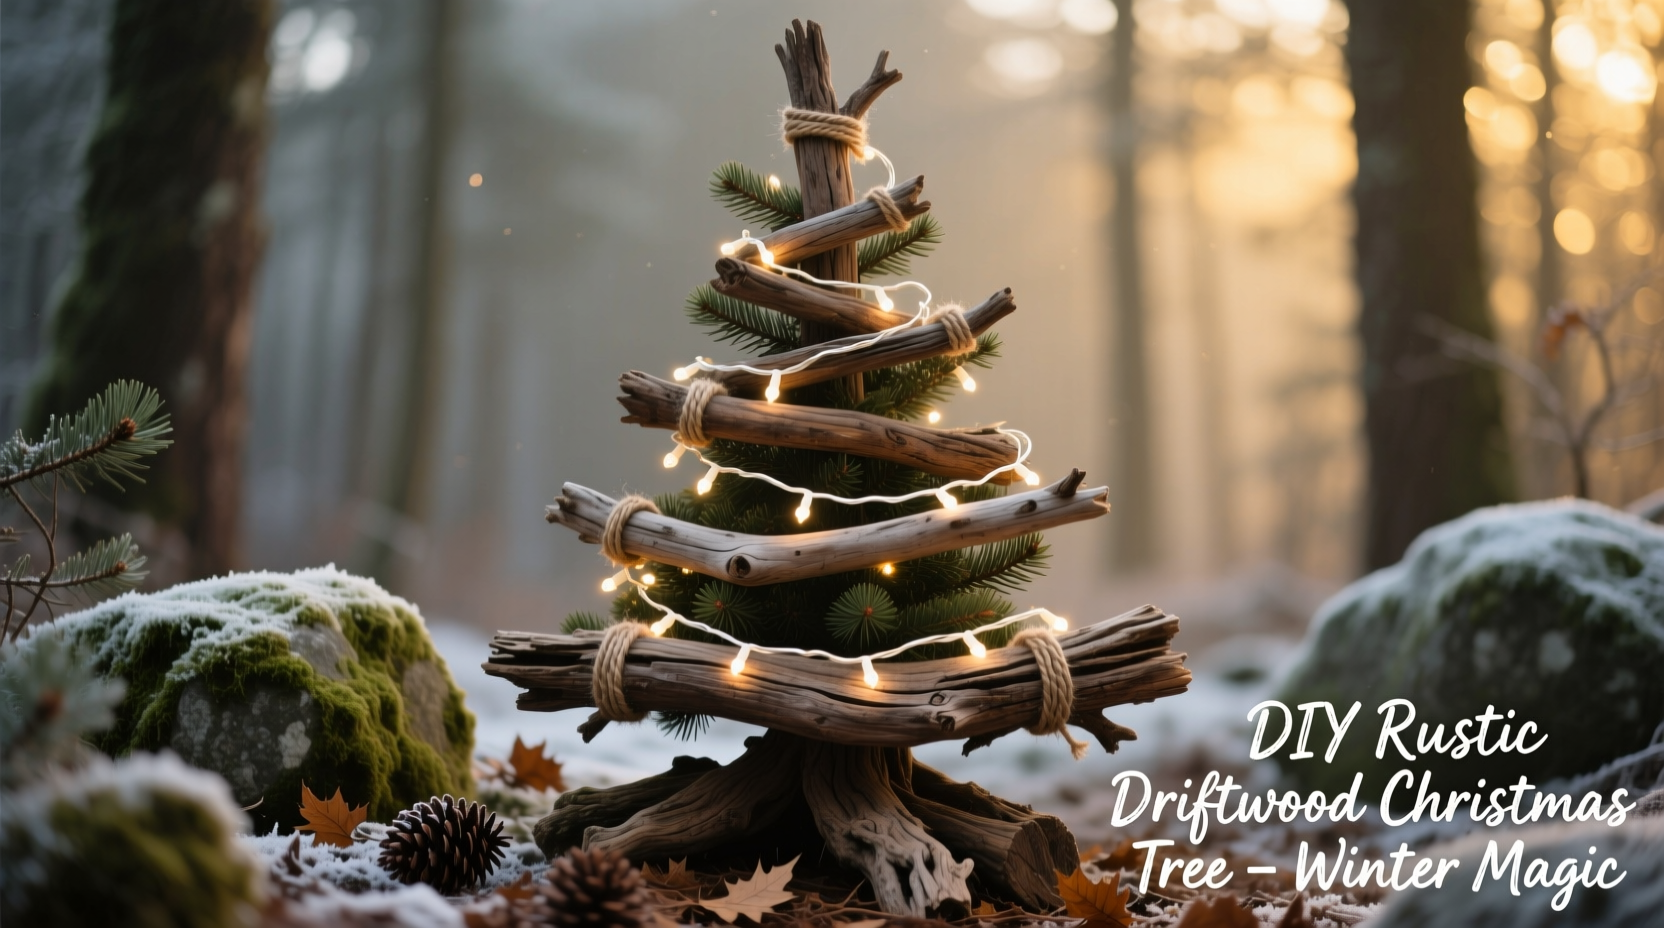
Wiring String Lights: Technique, Safety, and Light Quality
String lights transform structure into atmosphere—but improper installation risks short circuits, heat buildup, or uneven glow. Use only UL-listed, low-voltage (12V or 24V) LED mini lights with insulated copper wire and shatterproof bulbs. Warm white (2200K–2700K) offers the most authentic candlelight effect; avoid cool white, which clashes with driftwood’s earthy tones.
Start wiring at the base and work upward—never drape haphazardly. Anchor the first bulb securely to the thickest trunk section using twist ties (not tape or glue), then gently spiral the cord *up* the trunk at 3–4 inch intervals, tucking each loop behind a natural ridge or knot. At branch junctions, use a figure-eight wrap: pass the cord over the branch, under the trunk, and back over—creating friction-based hold without puncturing wood. For delicate accent twigs, hand-wrap individually, spacing bulbs 2–3 inches apart. Always leave 6–8 inches of unwrapped cord at the top for plug access and 12 inches at the base for routing to power.
Test lights before finalizing: plug in, dim the room, and walk around the piece. Adjust any dark patches by repositioning cords behind thicker wood or adding a single accent bulb at shadowed nodes. Remember: light should emanate *from within* the form—not sit on top of it.
“Driftwood lighting succeeds when the wood feels illuminated—not lit up. The goal is luminosity, not brightness.” — Elias Chen, Lighting Designer & Natural Materials Specialist
Mounting, Stabilizing, and Seasonal Care
A freestanding driftwood tree demands intelligent anchoring. The safest, most elegant solution is a custom weighted base: a 12-inch round slab of reclaimed oak or black walnut (1.5 inches thick), drilled with a central 1.25-inch hole. Insert a threaded steel rod (¼-inch diameter, 18 inches long) into the hole, securing it with epoxy rated for wood-to-metal bonding. Then, drill a matching pilot hole into the bottom of your main trunk piece and screw it firmly onto the rod. Fill the void between rod and trunk with tinted wood putty that matches your driftwood’s undertone.
For extra stability—especially if placing near foot traffic or pets—add three discreet rubber feet (3/4-inch diameter) to the underside of the base slab, spaced evenly at 120° intervals. This prevents sliding and protects floors.
During the season, keep your tree away from heating vents, radiators, and direct sunlight. Driftwood is hygroscopic: rapid humidity shifts cause subtle expansion or contraction, which may loosen light wraps over time. Check connections weekly—gently tug each bulb stem to ensure secure seating. After Christmas, unplug, carefully unwind lights (coil loosely—not tightly), and store in a breathable cotton bag with silica gel packets to prevent moisture retention. Reassemble annually: the wood deepens in tone, the lights gain patina, and the whole piece feels more like a family heirloom than seasonal decor.
Real-World Example: The Harborview Cottage Installation
In late October 2023, interior stylist Maya Rostova faced a challenge: her client’s seaside cottage featured vaulted ceilings, whitewashed shiplap walls, and zero traditional mantel space—yet demanded a holiday focal point that honored the home’s nautical lineage. She sourced 27 pieces of Atlantic white oak driftwood from Maine’s Schoodic Peninsula over two autumn weekends, selecting for tonal variation (silver-gray trunks, honey-toned accents) and structural compatibility. Working with a local metalsmith, she fabricated a brushed-brass rod-and-base system that echoed the cottage’s vintage hardware. Using 150 warm-white micro-LEDs, she prioritized “light layering”: dense wrapping at the lower third, sparse at the crown, with five directional bulbs aimed downward to cast soft pool lighting on the surrounding rug. Installed on December 1st, the tree remained in place through January 15th—with no fading, warping, or electrical issues. Neighbors began calling it “the lighthouse tree”—a testament to how purposeful material choice elevates intentionality into art.
Frequently Asked Questions
Can I use battery-operated lights instead of plug-in?
Yes—but with caveats. Opt for lithium-ion rechargeables (not disposable alkaline) with minimum 10-hour runtime and built-in timers. Avoid batteries housed in plastic casings taped to wood; instead, conceal them inside hollowed-out base slabs or behind trunk layers. Always replace batteries before they fully deplete to prevent leakage corrosion.
How do I prevent the wood from cracking indoors?
Driftwood cracks when exposed to rapid, extreme dryness—not typical home humidity. Maintain indoor relative humidity between 35%–55% using a hygrometer and humidifier if needed. Never place near forced-air registers. If minor surface checking appears, seal only affected zones with food-grade mineral oil (not varnish), applied sparingly with a lint-free cloth and buffed dry.
Is it safe to leave lights on overnight?
UL-listed LED string lights generate negligible heat and are safe for extended operation—provided wiring is secure, cords aren’t pinched, and outlets aren’t overloaded. For peace of mind, use a smart plug with auto-shutoff (e.g., 6 hours on, then off) or a mechanical timer. Never leave lights unattended for more than 12 consecutive hours.
Conclusion: Your Tree Is Already Growing
You don’t need a forest to grow a tree. You need attention. You need patience. You need the willingness to let nature’s timeline inform your own. A driftwood Christmas tree isn’t built—it’s coaxed into being, guided by the wood’s memory of water, wind, and light. Every knot tells of resistance. Every curve holds evidence of surrender. And when you wrap those first strings of light around a branch worn smooth by centuries of tide, you’re not decorating—you’re honoring continuity. This year, skip the plastic, the assembly frustration, the post-holiday landfill guilt. Gather thoughtfully. Prepare deliberately. Wire with reverence. Anchor with care. Let your tree stand not as a symbol of consumption, but of conversation—between land and sea, past and present, stillness and glow.


 浙公网安备
33010002000092号
浙公网安备
33010002000092号 浙B2-20120091-4
Comments
No comments yet. Why don't you start the discussion?