
Small bathrooms don’t have to feel cramped or claustrophobic. With thoughtful design choices, especially in lighting and layout, even the most compact spaces can appear airy, open, and surprisingly spacious. The key lies in manipulating perception—using light to expand visual boundaries and arranging fixtures to maximize flow and functionality. These strategies don’t require structural changes or costly renovations; instead, they rely on intelligent design principles that anyone can implement.
Whether you're dealing with a powder room tucked beside the stairs or a tiny ensuite in an older home, these techniques will help transform your bathroom from tight to tranquil. By combining strategic lighting placement, reflective surfaces, and space-saving layouts, you can create the illusion of volume while maintaining comfort and usability.
Use Lighting to Create Depth and Dimension
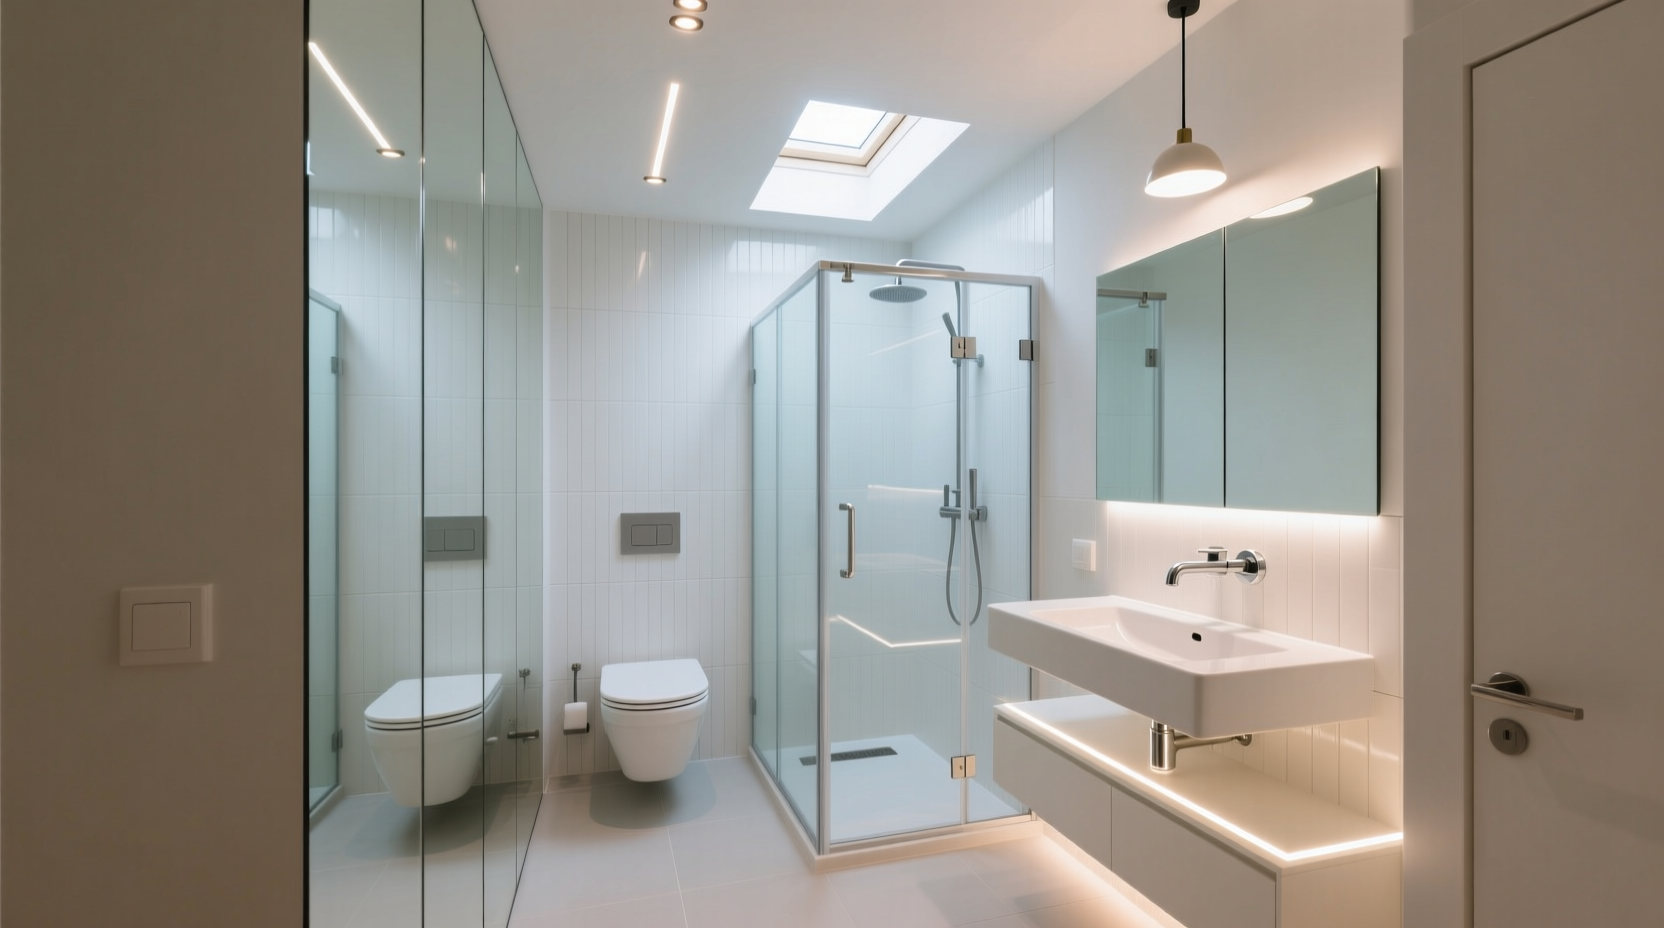
Lighting is one of the most powerful tools for altering spatial perception. In small bathrooms, poor lighting can make walls feel closer and ceilings lower. Conversely, well-planned illumination can lift the ceiling, push back the corners, and give the impression of a much larger area.
Avoid relying solely on a single overhead fixture. This creates harsh shadows and flat lighting, emphasizing the room’s limitations. Instead, layer your lighting:
- Ambient lighting: Provides overall illumination. Recessed ceiling lights or flush-mounted fixtures work well, especially when spaced evenly across the ceiling.
- Task lighting: Focused light where it's needed most—around the mirror and shower. Sconces on either side of the vanity are ideal for reducing facial shadows.
- Accent lighting: Highlights architectural features or adds warmth. LED strips under floating vanities or along shelves add a subtle glow that lifts the floor visually.
Vertical lighting—such as tall sconces or vertical LED strips—draws the eye upward, making ceilings appear higher. Horizontal lighting along the base or top edge of mirrors can stretch the sense of width. The goal is to eliminate dark zones and ensure light reaches every corner.
Optimize Layout for Flow and Functionality
The arrangement of fixtures has a direct impact on how spacious a bathroom feels. Even minor adjustments in positioning can dramatically improve movement and visual openness.
Start by evaluating traffic patterns. Is there a clear path from the door to the toilet or shower? Can two people move comfortably if needed? If not, consider repositioning elements—even a few inches can matter.
- Place the vanity against the longest wall to free up floor space.
- Choose a corner sink or pedestal model to reduce visual bulk.
- Install a shower curtain on an external track to extend beyond the tub, preventing it from bulging into the room.
- Use a pocket door or sliding barn-style door if space allows, eliminating the swing radius of a traditional door.
Floating fixtures are game-changers. A wall-mounted vanity or toilet creates the illusion of space beneath, allowing light and sightlines to travel uninterrupted. This simple shift makes floors appear larger and less cluttered.
| Hack | Effect | Difficulty Level |
|---|---|---|
| Floating vanity | Opens floor space, enhances light flow | Moderate (requires wall support) |
| Recessed medicine cabinet | Reduces protrusion, saves depth | High (involves wall modification) |
| Corner sink installation | Maximizes underutilized space | Low to Moderate |
| LED strip under vanity | Adds ambient glow, lifts floor visually | Low |
Reflective Surfaces and Strategic Mirrors
Reflections trick the eye into perceiving more space than physically exists. Incorporating mirrors and glossy finishes amplifies light and doubles the visual footprint of your bathroom.
A large mirror behind the vanity is standard—but go further. Consider extending the mirror across an entire wall or using mirrored cabinet doors. Frameless designs minimize visual breaks, creating a seamless reflective surface.
Pair mirrors with high-gloss tiles or polished countertops. Glass shower enclosures (instead of opaque curtains) maintain line-of-sight continuity. Even shiny faucets and fixtures contribute by catching and scattering light.
“Mirror placement isn’t just about function—it’s optical architecture. One well-positioned mirror can effectively double the perceived size of a room.” — Lena Torres, Interior Designer & Spatial Perception Specialist
For maximum effect, align mirrors opposite windows or light sources. If natural light is limited, position them facing artificial lighting zones. Avoid placing mirrors directly opposite cluttered areas, as this will reflect disarray rather than openness.
Step-by-Step Guide: Transform Your Small Bathroom in 5 Days
You don’t need weeks to see dramatic improvements. Follow this realistic five-day plan to upgrade your bathroom’s spatial feel using lighting and layout adjustments.
- Day 1: Assess and Plan
Measure the room, note fixture locations, and identify problem areas (e.g., dark corners, obstructed pathways). Sketch a rough layout with potential changes. - Day 2: Upgrade Lighting Fixtures
Replace outdated overhead lights with recessed LEDs. Install sconces at eye level on both sides of the mirror. Add adhesive LED strips under the vanity. - Day 3: Rearrange or Replace Fixtures
Swap a bulky vanity for a floating model. Reposition the towel rack or toilet paper holder to improve clearance. Test new configurations before mounting. - Day 4: Enhance Reflectivity
Install a full-wall mirror or replace a framed mirror with a frameless version. Switch matte tiles to glossy ones in key areas (if renovating). Polish all metal surfaces. - Day 5: Fine-Tune and Style
Adjust bulb color temperatures (stick to 3000K–3500K for warm, inviting light). Declutter countertops. Add a small indoor plant for life without sacrificing space.
This timeline assumes basic DIY skills and access to tools. For electrical work, consult a licensed electrician to ensure safety and code compliance.
Common Mistakes That Shrink Small Bathrooms
Even with good intentions, certain choices can undermine efforts to enlarge a small bathroom visually. Being aware of these pitfalls helps avoid counterproductive decisions.
- Over-lighting with cool white bulbs: While bright, 5000K+ LED lights can feel clinical and harsh, making spaces feel smaller due to contrast. Stick to warm-white or neutral-white tones.
- Crowding the center of the room: Placing rugs, baskets, or stools in the middle breaks up floor continuity. Keep the central zone clear.
- Using dark grout with light tiles: High-contrast grout lines create a grid effect that fragments the wall, diminishing expansiveness.
- Mounting mirrors too high: If the mirror doesn’t reflect activity at eye level, its spatial benefit is reduced. Center it around 5 feet from the floor.
- Ignoring vertical space: Walls above the toilet or beside the shower often go unused. Floating shelves or tall cabinets draw the eye up and utilize height.
“People focus so much on square footage that they forget volume. A bathroom with high ceilings and smart vertical storage can feel twice as big—even if it’s not.” — Marcus Lin, Architectural Designer
Real Example: From Cramped to Airy – A NYC Apartment Bathroom
In a 1920s walk-up in Brooklyn, Sarah Chen faced a 4x6-foot bathroom that felt like a closet. The only window was above the shower, and the single ceiling light cast long shadows. She avoided using the space unless necessary.
After researching spatial design, she implemented several low-cost changes:
- Removed the old medicine cabinet and installed a recessed version.
- Replaced the vanity with a floating model in white lacquer.
- Added LED strip lighting underneath and inside the new cabinet.
- Installed a floor-to-ceiling mirror on the wall opposite the door.
- Painted walls with high-gloss white paint and used large-format tiles with minimal grout lines.
The transformation was immediate. “It still measures the same,” she said, “but now I can actually move around without bumping into things. When I turn on the lights, it feels like the room opens up.” Friends regularly comment that the bathroom looks “at least twice the size.”
Checklist: Quick Wins to Make Your Small Bathroom Look Bigger
Implement these actionable steps to start seeing results immediately:
- ✅ Replace dull bulbs with warm-white LEDs (3000K–3500K)
- ✅ Install wall-mounted sconces on both sides of the mirror
- ✅ Swap out a bulky vanity for a floating or pedestal sink
- ✅ Add a large, frameless mirror—or extend an existing one
- ✅ Use glossy tiles, countertops, or backsplashes to reflect light
- ✅ Install LED strips under the vanity or along shelving
- ✅ Declutter countertops and store items in hidden compartments
- ✅ Paint walls and ceiling the same light color for continuity
- ✅ Use glass shower doors instead of fabric curtains
- ✅ Maximize vertical storage with slim shelves or tall cabinets
FAQ
Can I use multiple light sources without overloading the circuit?
Yes, LED lighting consumes significantly less power than incandescent bulbs. As long as total wattage stays within your circuit’s capacity (usually 1,440 watts on a 15-amp circuit), adding layered lighting is safe. Consult an electrician if expanding wiring.
What’s the best mirror size for a small bathroom?
The mirror should be slightly wider than the vanity (about 2–4 inches on each side) for balanced proportions. If using a wall-spanning mirror, ensure it leaves at least 1 inch of wall border to avoid a mirrored-room effect.
Is it okay to use patterned tiles in a small bathroom?
Use them sparingly. Large-scale patterns can overwhelm small spaces. If desired, apply patterned tiles as an accent (e.g., shower floor or backsplash) and keep walls and main flooring neutral and reflective.
Final Thoughts: Design Beyond Dimensions
A small bathroom’s true size isn’t measured in square feet—it’s defined by how it feels. With deliberate lighting strategies and intelligent layout choices, you can transcend physical limits and craft a space that breathes, glows, and welcomes. The techniques outlined here don’t demand demolition or deep pockets; they require observation, planning, and a willingness to rethink what’s possible.
Start tonight: turn off the overhead light and assess how shadows fall. Notice where the space feels tight or dark. Then, pick one change—add a mirror, install a light strip, float your vanity—and build from there. Each adjustment compounds, transforming not just appearance but daily experience.


 浙公网安备
33010002000092号
浙公网安备
33010002000092号 浙B2-20120091-4
Comments
No comments yet. Why don't you start the discussion?