
For many families, the holiday season is defined by shared sensory experiences: the scent of pine, the shimmer of lights, the warmth of gathered voices. But for visually impaired individuals—especially children or elders who rely primarily on touch, sound, and spatial memory—the traditional Christmas tree can feel distant, decorative but inaccessible. A tactile Christmas tree bridges that gap—not as a substitute, but as a parallel celebration rooted in intentionality, dignity, and multisensory joy. This isn’t about simplification; it’s about expansion. It’s about designing an object that invites exploration, supports independent recognition, and affirms belonging through thoughtful material choices, consistent spatial logic, and accurate, readable braille labeling. Done well, such a tree becomes more than décor—it becomes a tool for orientation, memory, language development, and intergenerational connection.
Why Tactile Design Matters Beyond Accessibility
Tactile trees serve cognitive, emotional, and developmental functions that extend far beyond functional access. For children with visual impairments, consistent texture-based categorization strengthens neural pathways associated with object permanence, symbolic representation, and vocabulary acquisition. Adults benefit from spatial anchoring—knowing where ornaments hang, how branches angle, and what each zone represents fosters autonomy during festive routines. Research from the American Foundation for the Blind confirms that multi-sensory holiday environments significantly reduce seasonal anxiety and increase participation in family rituals. Importantly, tactile trees are not “adapted” versions of sighted traditions—they’re thoughtfully designed experiences grounded in haptic literacy. As Dr. Lena Torres, Director of Sensory Inclusion at the Perkins School for the Blind, explains:
“Tactile objects aren’t just about substitution—they’re about equivalence. When a child traces a raised-pinecone ornament and feels its bumpy, spiraling surface while hearing ‘this is the trunk,’ they’re building a mental map that’s as rich and precise as a sighted peer’s visual one. That requires intention in every stitch, every tag, every placement.” — Dr. Lena Torres, Perkins School for the Blind
This principle underpins every decision: texture must be distinct *and* meaningful, braille must be accurate *and* contextually placed, and structure must support safe, repeatable interaction.
Core Design Principles for an Effective Tactile Tree
A successful tactile tree balances safety, legibility, durability, and emotional resonance. Four non-negotiable principles guide the process:
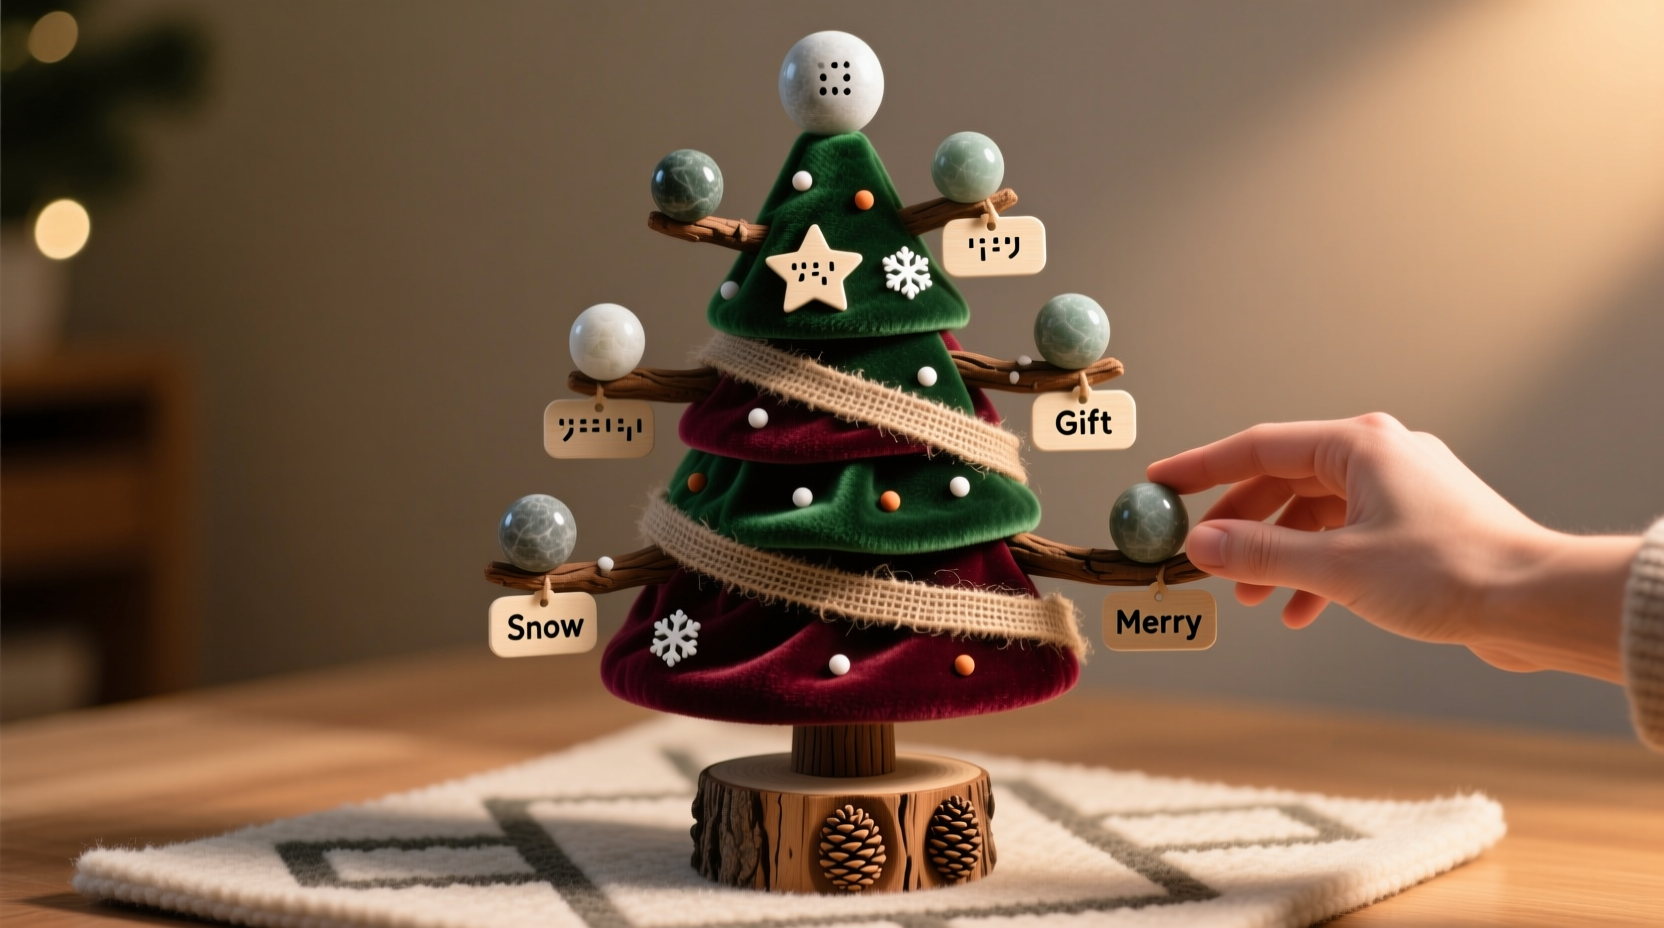
- Consistent Spatial Logic: The tree follows a predictable vertical hierarchy—base (trunk), lower branches (ground-level elements), mid-branches (familiar symbols like stars or bells), upper branches (lighter, smoother textures). This mirrors real-world spatial understanding and supports memory retention.
- Texture Contrast Hierarchy: No two adjacent zones use similar textures. Differences must be immediately distinguishable by fingertip—even for users with reduced tactile sensitivity. Prioritize high-contrast pairings: nubby vs. smooth, ridged vs. pebbled, fuzzy vs. rigid.
- Braille Integration as Language, Not Labeling: Braille isn’t tacked on—it’s embedded into the experience. Tags appear at consistent locations (always bottom-right corner of a felt ornament, always below a branch joint), use uncontracted Grade 1 braille for universal readability, and include both word and phonetic cue where helpful (e.g., “BELL / b-e-l-l”).
- Safety-First Construction: All materials must be non-toxic, flame-retardant (especially important near candles or string lights), securely anchored, and free of sharp edges or small detachable parts. Adhesives must be permanent yet non-irritating to skin.
Step-by-Step Construction Guide
Building the tree takes approximately 6–8 hours across two sessions (construction + braille verification). Allow extra time for drying and sensory testing.
- Select & Prepare the Base Structure: Use a sturdy, lightweight wooden cone (18–24 inches tall) or a dense foam core wrapped tightly in natural burlap. Avoid plastic trees—they lack structural integrity for heavy textures and generate static that interferes with touch. Sand all edges smooth and seal with water-based, non-toxic matte varnish.
- Map the Texture Zones: Divide the cone vertically into three bands: Trunk Zone (bottom 25%), Branch Zone (middle 50%), and Crown Zone (top 25%). Assign textures: Trunk = rough jute twine (wound tightly); Branch Zone = alternating felt strips (velvety green, nubby brown, ridged silver); Crown = smooth satin ribbon with tiny sewn-in glass beads (for subtle auditory feedback when touched).
- Create & Attach Tactile Ornaments: Hand-sew ornaments from contrasting fabrics: wool pom-poms (bouncy), cork slices (ridged), silicone star shapes (cool, slightly yielding), and knitted pinecones (deeply textured). Each ornament includes a 1-inch square fabric tag with embroidered braille—stitched firmly to the ornament’s base, not dangling.
- Install Braille Identification System: Use thermoformed braille labels (not ink-printed) for durability. Place one master label at eye/hand level on the tree stand: “MY CHRISTMAS TREE / TACTILE EDITION”. Then add miniature labels at key landmarks: “TRUNK”, “LOWER BRANCH”, “MID BRANCH”, “CROWN”, and “STAR TOP”. Ensure all braille faces outward and is mounted flush.
- Final Sensory Calibration: With the tree assembled, invite your visually impaired family member to explore it *without guidance*. Note where fingers pause, hesitate, or trace repeatedly. Adjust texture density, reposition labels, or add subtle auditory cues (e.g., a tiny bell inside the star) only where needed—not as decoration, but as navigational reinforcement.
Material Selection & Safety Comparison Table
| Component | Recommended Material | Why It Works | Avoid |
|---|---|---|---|
| Base Cone | Dense, kiln-dried basswood or recycled PET foam core | Stable, lightweight, accepts glue/sewing, no off-gassing | Styrofoam (crumbles, toxic dust), PVC pipe (slippery, unstable) |
| Trunk Texture | Natural jute twine (3mm thickness) | Rough, biodegradable, high friction, distinct grain pattern | Sandpaper (abrasive, shedding), coarse burlap (loose fibers) |
| Branch Wrapping | Wool-blend felt (100% wool preferred) | Naturally flame-retardant, rich texture variation, holds shape | Polyester felt (melts near heat, static-prone), velvet (too slippery) |
| Ornament Bodies | Food-grade silicone, cork, wool roving, untreated wood | Non-toxic, temperature-neutral, durable, varied tactile signatures | Plastic beads, acrylic paint, glitter, hot-glued plastic |
| Braille Labels | Thermoformed polypropylene or embossed Tyvek | Washable, tear-resistant, crisp dot definition, no ink fade | Inkjet-printed braille (smudges), laminated paper (peels, edges curl) |
Real-World Implementation: The Chen Family Experience
The Chen family in Portland, Oregon, built their first tactile tree two years ago for their daughter Maya, who is congenitally blind and uses braille daily. Initially, they’d placed ornaments randomly—“like a regular tree,” said her mother, Priya. Maya touched the tree once and walked away. “She didn’t know where anything was,” Priya recalled. “It felt chaotic, not festive.” Guided by a local orientation specialist, they redesigned using strict spatial zoning: trunk = thick rope (for grounding), lower branches = soft yarn-wrapped balls (‘snowballs’), mid-branches = cork discs engraved with braille letters spelling “FAMILY”, crown = smooth wooden star with a single chime inside. Crucially, they added a removable fabric “tree skirt” with pockets holding miniature replicas of each ornament—so Maya could match textures before placing them. Last December, Maya independently hung six ornaments in correct zones, then traced the braille on the star and announced, “This is the top. It rings. It’s done.” Her father filmed her hands moving confidently over the trunk, pausing at each texture transition—not searching, but recognizing. That shift—from passive observation to active participation—was their measure of success.
Braille Best Practices & Common Pitfalls
Braille is not decorative typography—it’s a living language requiring precision. Misplaced or inaccurate braille undermines trust and excludes users. Follow these field-tested guidelines:
- Always use uncontracted (Grade 1) braille for object names and spatial terms. Contractions assume literacy fluency and vary regionally—“TREE” in contracted braille differs between U.S. and U.K. standards. Uncontracted is universally legible.
- Position matters more than size. Place labels at consistent, predictable locations: always on the right side of a vertical element, always below a horizontal branch joint, always oriented with dots facing outward—not angled or upside-down.
- Verify with a certified braille transcriber. Free online converters often misrender punctuation, numbers, or capitalization. A single misplaced dot in “STAR” (dots 3-4-5-6) versus “STAY” (dots 3-4-5-6-2) changes meaning entirely. Budget $25–$40 for professional verification.
- Pair braille with tactile icons where possible. Next to “STAR”, add a small, raised five-pointed shape in the same material. Next to “BELL”, embed a tiny metal disc that vibrates faintly when tapped. This reinforces meaning across modalities.
FAQ
Can I adapt an existing artificial tree instead of building from scratch?
Yes—with caveats. Choose a simple, conical tree with wide, stable branch tips. Remove all original ornaments and lights (electrical components pose shock/fire risk). Wrap branches in your chosen textures using fabric glue *and* discreet stitching for security. Never glue directly to plastic branches—use cotton twine as a base layer first. Test stability thoroughly: a tactile tree must withstand repeated touching without wobbling or shedding.
How do I teach family members—including sighted children—to interact respectfully with the tactile tree?
Model intentional language: say “Let’s feel the trunk together” instead of “Look at the tree.” Teach children to explore with flat palms first, then fingertips—never poking or grabbing. Keep a laminated “Touch Guide” near the tree: green arrow = gentle stroke upward, blue circle = tap lightly, red X = do not remove. Most importantly, let the visually impaired family member lead the interaction—ask “What would you like me to help you find?” rather than assuming assistance is needed.
Is it appropriate to add scents or sounds to enhance the experience?
Only if pre-approved and consistently applied. Some individuals with visual impairments have heightened olfactory sensitivity or sensory processing differences. Introduce scent *separately*: offer a pine-scented cloth to hold *before* approaching the tree. For sound, embed subtle elements (a chime in the star, rustling silk in the crown) but avoid battery-powered music boxes—they distract from tactile focus and create unpredictable auditory noise. When in doubt, prioritize predictability over novelty.
Conclusion: Building More Than a Tree
A tactile Christmas tree is never finished—it evolves with your family’s needs, deepens with each season’s memories, and grows more meaningful with every hand that learns its language. It asks us to slow down, to choose materials with care, to verify braille with humility, and to listen closely—not just to instructions, but to the quiet moments when a child’s fingers trace a familiar ridge and they smile, knowing exactly where they are. This isn’t about checking an accessibility box. It’s about affirming that joy, tradition, and belonging are not visual privileges—they are human rights, expressed through texture, rhythm, language, and love. Start small: wind jute around a candleholder this week. Sew one braille-tagged ornament. Invite your family to close their eyes and describe what they feel—not what they imagine. The tree will grow from there.


 浙公网安备
33010002000092号
浙公网安备
33010002000092号 浙B2-20120091-4
Comments
No comments yet. Why don't you start the discussion?