
Bath bombs have become a staple in modern self-care routines, transforming ordinary baths into luxurious, aromatic experiences. But commercial versions often contain synthetic fragrances, dyes, and preservatives that can irritate sensitive skin or disrupt hormonal balance. The good news? You don’t need specialty stores or expensive kits to enjoy the fizz, fragrance, and moisturizing benefits of bath bombs. With just a few common household items—most likely already in your kitchen—you can create all-natural, customizable bath bombs that are gentle on your skin and kind to your budget.
The science behind the fizz is simple: when baking soda (a base) meets citric acid (an acid) in water, they react to produce carbon dioxide bubbles—the signature effervescence of a bath bomb. Combine this with pantry oils and binders, and you’ve got a spa-quality treat made entirely at home. This guide walks through every step, from sourcing ingredients to storage tips, ensuring success even for first-time crafters.
What You’ll Need: Pantry Staples That Work
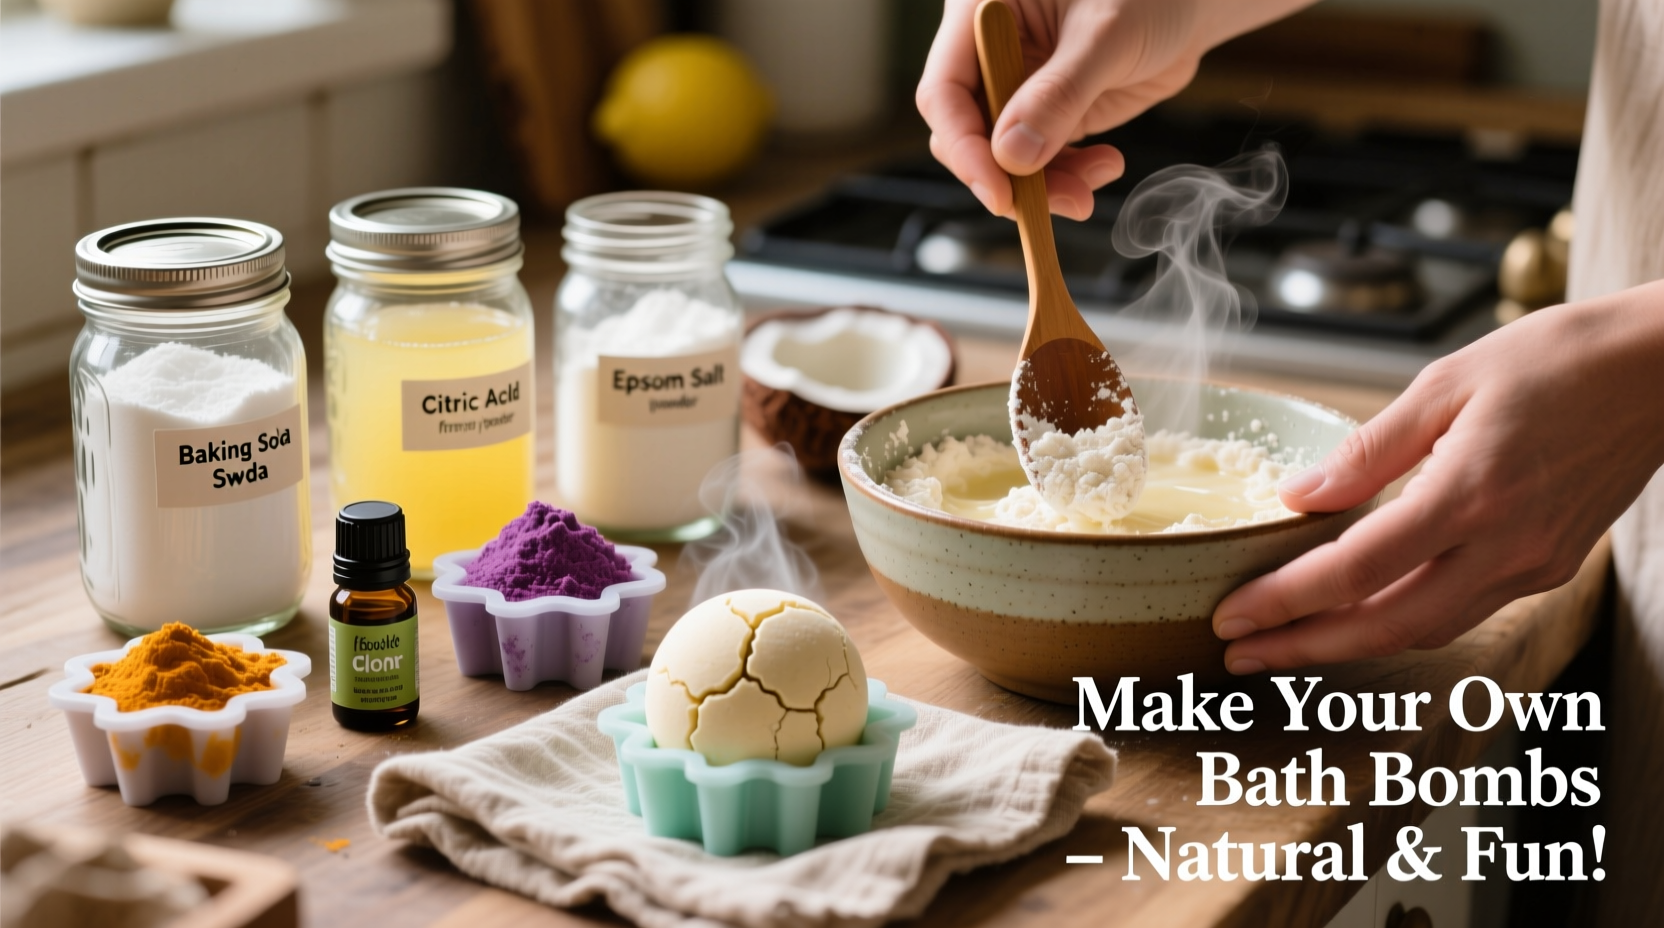
The beauty of homemade bath bombs lies in their simplicity. Most required ingredients are found in average kitchens, making this an accessible project for anyone. Below is a list of essential components and their roles in the formulation:
- Baking Soda – The primary alkaline agent responsible for the fizzy reaction. It also softens water and soothes irritated skin.
- Citric Acid – Triggers the fizz when combined with baking soda and water. Often sold as a food preservative or canning supply, it’s safe and widely available.
- Coconut Oil or Olive Oil – Acts as a binder and adds deep moisture. These oils leave skin silky without greasing the tub excessively if used in moderation.
- Cornstarch – Helps stabilize the mixture, slows down the fizz reaction, and adds a creamy texture to the bathwater.
- Water or Witch Hazel (in a spray bottle) – Used sparingly to moisten the dry mix just enough to hold shape without triggering premature fizzing.
- Essential Oils (optional) – For fragrance and aromatherapy benefits. Lavender calms, eucalyptus clears sinuses, and citrus uplifts mood.
Step-by-Step Guide to Mixing and Molding Bath Bombs
Creating bath bombs requires precision and speed. Too much liquid causes early activation; too little prevents cohesion. Follow these steps carefully for consistent results.
- Measure Ingredients Precisely: Use a digital scale or measuring cups for accuracy. A standard batch uses:
- 1 cup baking soda
- ½ cup citric acid
- ½ cup cornstarch
- ½ cup Epsom salt (optional, for muscle relief)
- Mix Dry Ingredients: In a large bowl, whisk together all dry components until uniform. Sifting helps eliminate clumps and ensures even distribution.
- Prepare Wet Ingredients: In a separate small container, combine 3–4 tablespoons melted coconut oil (or olive oil), 10–15 drops of essential oil (if using), and 1 teaspoon of water or witch hazel.
- Combine Gradually: Slowly drizzle the wet mixture into the dry ingredients while whisking continuously. Stop before the blend becomes damp. Test by squeezing a handful—if it holds shape briefly, it’s ready.
- Add Moisture Sparingly: If the mixture remains crumbly, lightly mist with witch hazel using a spray bottle. One spritz at a time, mixing thoroughly after each. Over-wetting leads to expansion and cracking.
- Pack Into Molds: Use silicone molds, muffin tins, or even repurposed seashells. Press mixture firmly into both halves if using two-part molds. Overfill slightly and compress tightly.
- Dry Completely: Let sit undisturbed for 4–6 hours, preferably overnight. Gently remove once hardened. Store in an airtight container away from humidity.
Avoiding Common Pitfalls
Even experienced makers encounter issues like crumbling, premature fizzing, or separation. Understanding why these happen improves future batches.
| Issue | Causes | Solutions |
|---|---|---|
| Bath bomb cracks during drying | Too much liquid, rapid drying in direct air | Reduce moisture; dry in a cool, dark place |
| Doesn’t hold shape | Insufficient binder or under-compaction | Add more oil (¼ tsp at a time); press harder into mold |
| Fizzes immediately upon mixing | Contact with water too early | Use witch hazel instead of water; work quickly in dry conditions |
| Weaker fizz in bath | Old or damp citric acid, over-handling | Check freshness; store dry ingredients separately until use |
Customization Ideas Using Household Additives
Once you master the basic formula, experiment with natural enhancements drawn straight from your pantry or spice rack. Each addition brings unique sensory or therapeutic value.
- Ground Oats – Soothe eczema-prone or itchy skin. Blend rolled oats into a fine powder before adding (¼ cup per batch).
- Turmeric Powder – Adds golden hue and anti-inflammatory properties. Use sparingly (½ tsp max) to avoid staining.
- Matcha Green Tea – Rich in antioxidants; imparts a soft green tint and earthy aroma.
- Dried Herbs or Flowers – Crushed rose petals, lavender buds, or chamomile add visual appeal and subtle scent. Ensure they’re cosmetic-grade and free of pesticides.
- Honey (as liquid binder) – Replace part of the oil with warmed honey for added humectant qualities. Note: increases stickiness and risk of early activation.
“Natural bath products allow users to control what touches their skin. When people switch to DIY, many report fewer rashes and better sleep.” — Dr. Lena Patel, Integrative Dermatologist
Mini Case Study: Reviving Self-Care on a Budget
Sarah, a mother of two in Ohio, struggled with postpartum fatigue and limited personal time. She loved bath bombs but found store-bought ones too costly and full of unpronounceable ingredients. After finding a recipe online, she tried making her own using baking soda, citric acid ordered online, and coconut oil from her pantry. Her first batch failed—too wet, cracked open—but she adjusted by switching to witch hazel and letting them dry longer. Now, she makes themed bombs for holidays: peppermint in winter, lemon-thyme in summer. Not only does she save over $200 a year, but her teenage daughter joined in, turning it into a weekly bonding ritual. “It’s not just about the bath,” Sarah says. “It’s about reclaiming moments for myself.”
Storage, Shelf Life, and Usage Tips
Homemade bath bombs lack commercial preservatives, so proper handling extends usability. Here's how to maximize longevity:
- Store in an airtight glass jar or resealable plastic container.
- Keep in a cool, dark cupboard—avoid bathrooms with high steam exposure.
- Place silica gel packets inside the container to absorb ambient moisture.
- Use within 2–3 months for optimal fizz and scent retention.
- If surface powder forms, gently buff with a dry cloth—it’s separated baking soda and still effective.
When using, drop one whole bomb into warm (not scalding) running water. Avoid direct contact with jets, which can break it apart prematurely. Allow full dissolution before entering—this ensures even dispersion of oils and minerals.
Checklist: Preparing Your First Batch
- Clean and dry all tools (bowls, spoons, molds)
- Measure ingredients accurately
- Melt coconut oil gently (microwave in 15-sec bursts)
- Have spray bottle with witch hazel ready
- Choose mold type and prepare workspace
- Wear gloves if sensitive to citric acid
Frequently Asked Questions
Can I make bath bombs without citric acid?
No true fizz occurs without an acidic component. While vinegar or lemon juice contain acid, they activate instantly when mixed with baking soda. Citric acid remains stable in dry form, making it essential for shelf-stable bombs. Lemon juice powder (dehydrated) is the closest alternative.
Are these safe for kids or sensitive skin?
Yes, if formulated carefully. Omit essential oils for children under six or those with sensitivities. Increase cornstarch and oat flour to buffer pH. Always do a patch test on a small area of skin before full immersion.
Why did my bath bomb expand or crack in the mold?
This usually means excess moisture triggered a slow reaction before drying. Next time, reduce liquid and increase drying time. Also, avoid pressing mixture too tightly—it needs room to settle.
Conclusion: Turn Your Kitchen Into a Spa Lab
Making bath bombs from pantry ingredients isn’t just economical—it reconnects you with the art of mindful creation. Every batch lets you tailor textures, scents, and benefits to your body’s needs, free from hidden chemicals or inflated prices. Whether you're crafting for relaxation, gifting, or simply enjoying the tactile joy of mixing and molding, this skill empowers you to elevate everyday rituals with intention and care.
Start small, learn from imperfections, and soon you’ll develop a signature blend that feels uniquely yours. The ingredients are already waiting in your cabinets. All that’s left is to begin.


 浙公网安备
33010002000092号
浙公网安备
33010002000092号 浙B2-20120091-4
Comments
No comments yet. Why don't you start the discussion?