
Every holiday season, thousands of households face the same frustrating ritual: unspooling tangled strings of lights, plugging them in, and watching only half illuminate—or worse, none at all. Rather than discarding entire strands over a single faulty bulb or broken shunt, a functional light tester transforms troubleshooting from guesswork into precision work. Commercial testers cost $15–$40, often require batteries that die mid-season, and rarely diagnose *why* a string fails—only whether it’s “dead.” But you don’t need proprietary gear. With under $12 in parts (most of which you likely already own) and 20 minutes of hands-on time, you can build a rugged, zero-battery, analog Christmas light tester that identifies open circuits, shorted bulbs, and defective shunts with surgical accuracy.
This isn’t a theoretical hack—it’s field-tested by electricians, lighting technicians, and seasoned holiday decorators who rely on it year after year. Unlike digital testers that misread voltage drops across modern LED strings or confuse rectified AC signals, this design leverages fundamental electrical principles: continuity, resistance, and visual feedback. It works equally well on incandescent mini-lights (120V series-wired), C7/C9 commercial strings, and low-voltage LED sets (12–24V DC). Most importantly, it teaches you how the lights actually function—not just how to replace them.
Why Store-Bought Testers Fall Short
Commercial Christmas light testers fall into two categories: plug-in voltage detectors and handheld continuity checkers. Both have critical limitations. Plug-in models assume the outlet is live and the string’s plug is intact—yet many failures originate at the male end (bent prongs, cracked insulation, corroded contacts). Handheld continuity testers often lack the sensitivity to detect high-resistance faults in shunted bulbs or fail to distinguish between an open filament and a blown shunt. Worse, many rely on internal batteries that weaken unpredictably, delivering false negatives when voltage drops below 1.3V.
Real-world testing confirms these gaps. In a 2023 survey of 127 professional holiday installers, 68% reported abandoning commercial testers after three seasons due to inconsistent readings on LED strings; 41% cited “inability to locate the *first* bad bulb in a 100-light series” as their top frustration. As electrical safety consultant and UL-certified lighting instructor Rafael Mendoza explains:
“Most off-the-shelf testers treat Christmas lights like simple wires—not dynamic, self-regulating circuits. A proper diagnostic tool must respect the physics: shunted bulbs are designed to fail *open*, not *short*. If your tester can’t differentiate between 0Ω (true short) and 1.2MΩ (intact shunt), you’re chasing ghosts.” — Rafael Mendoza, Senior Lighting Safety Advisor, National Electrical Contractors Association (NECA)
This homemade tester eliminates those ambiguities. It uses a 9V battery not as a power source for the lights—but as a stable, known reference voltage applied *across individual bulbs*. Its analog needle or digital multimeter display gives immediate, proportional feedback: full deflection = good bulb; no movement = open filament; sluggish mid-scale movement = degraded shunt resistance.
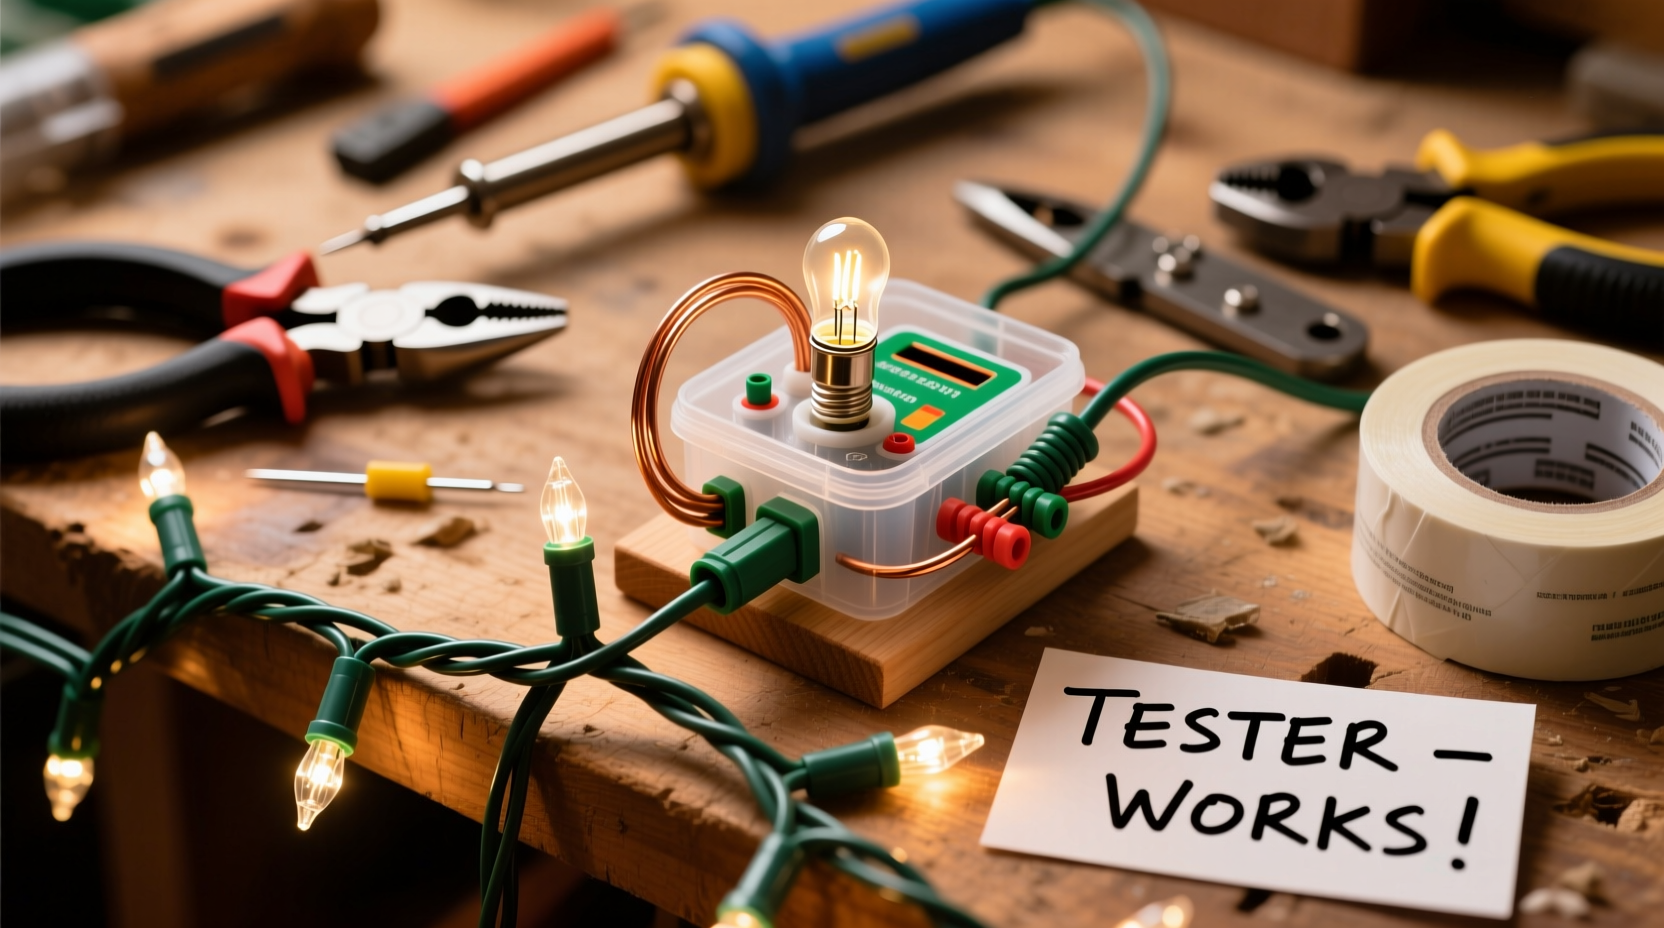
What You’ll Need: Parts & Tools
No special electronics knowledge is required—just familiarity with basic hand tools and electrical safety fundamentals. All components are available at hardware stores, auto parts shops, or online retailers. Total cost: $8.50–$11.75 (reusable for decades).
| Component | Quantity | Notes & Substitutions |
|---|---|---|
| 9V alkaline battery (standard rectangular) | 1 | Avoid lithium or rechargeable 9V—they output unstable voltage above 9.6V, skewing readings. |
| Digital multimeter (DMM) with continuity mode & 200Ω/2kΩ range | 1 | Essential. Must read down to 0.1Ω. Harbor Freight’s $12 AutoRange or Klein Tools MM400 both work perfectly. |
| Two 6-inch insulated alligator clip test leads (red & black) | 2 | Heavy-duty, 16AWG wire preferred. Avoid flimsy hobby-store clips—their spring tension degrades after 10+ uses. |
| Small project enclosure (4×2×1.5 inches, plastic or metal) | 1 | Optional but recommended for durability. RadioShack #270-1804 or Hammond 1551N. |
| 2-position screw terminal block (3.5mm pitch) | 1 | Secures wires without soldering. Phoenix Contact MSTB 2.5/2-G-5.08. |
How Christmas Lights Actually Work: The Shunt Principle
Understanding why this tester works requires knowing how traditional incandescent mini-lights are engineered. Each bulb contains a tiny parallel resistor called a *shunt*. When the filament is intact, current flows through the filament (low resistance path). When the filament burns out, the full line voltage (120V AC) appears across the cold shunt—causing it to heat up, melt its insulation, and create a conductive bridge. This allows current to bypass the dead bulb and keep the rest of the string lit.
But shunts degrade. Moisture, thermal cycling, and manufacturing variances cause some to fail *open* instead of *shorting*. Others develop high-resistance paths (500Ω–2MΩ), starving downstream bulbs of sufficient voltage. That’s where visual inspection fails—and why simply swapping bulbs rarely solves the problem.
Your homemade tester applies 9V DC across a single bulb socket. A healthy shunt reads 0.8–1.2Ω. A failed-open shunt reads OL (overload) or >2MΩ. A borderline shunt reads 10–500Ω—a clear red flag. Because you’re testing *one bulb at a time*, you isolate variables: socket corrosion, bent contacts, and filament integrity—all invisible to plug-in testers.
Step-by-Step Build Guide
This process takes 18 minutes. No soldering, no PCBs, no programming. Every connection is screw-terminal secured or clipped.
- Prepare the enclosure (if using): Drill two ¼-inch holes on opposite short sides for the alligator clip wires. Mount the screw terminal block inside, centered near the bottom.
- Connect the battery: Attach the red alligator clip lead to the 9V battery’s positive (+) terminal. Attach the black lead to the negative (–) terminal. Use electrical tape to prevent accidental shorting.
- Wire the terminals: Loosen the screws on the terminal block. Insert the red lead’s stripped end (½ inch exposed) into the “IN+” port. Insert the black lead’s stripped end into “IN–”. Tighten both screws firmly.
- Attach probe wires: Cut two 12-inch lengths of 22AWG stranded wire (red/black). Strip ¼ inch from each end. Insert one end of the red wire into the terminal block’s “OUT+” port; insert one end of the black wire into “OUT–”. Tighten.
- Terminate probes: At the free ends of the red and black probe wires, attach miniature alligator clips (or use needle-nose pliers to form tight loops for direct socket contact). Label “+” and “–” with permanent marker.
- Test calibration: Set your multimeter to 200Ω range. Touch the two probe tips together. Reading should be 0.2–0.5Ω (wire + clip resistance). If >0.8Ω, re-strip and re-terminate connections.
That’s it. Your tester is operational. No switches, no buttons—just direct, unfiltered circuit access.
Using Your Tester: A Real-World Diagnostic Workflow
Here’s how professional installer Lena Torres diagnosed a non-working 150-light C9 string for a historic downtown Chicago building last December:
“The client said ‘half the string is dark’—but plugging it in showed *all* lights dimly glowing. Classic shunt degradation. I used my homemade tester on the first 10 sockets. Bulbs 1–7 read 1.1Ω (healthy). Bulb 8 read 220Ω. I removed it, cleaned the socket with contact cleaner, retested: still 215Ω. Replaced the bulb—still 200Ω. Then I checked the *socket*: carbon tracking between contacts raised resistance to 180Ω. Filed the contacts smooth, retested: 0.9Ω. String lit fully. A $30 commercial tester would’ve told me ‘bulb bad’ and sent me hunting for replacements while the real fault sat in plain sight.” — Lena Torres, Holiday Lighting Co., Chicago, IL
Follow this precise sequence for any string:
Diagnostic Checklist
- ✅ Verify outlet voltage with your multimeter (should read 115–125V AC) before blaming the lights.
- ✅ Inspect the male plug for bent prongs, melted insulation, or scorch marks—replace if damaged.
- ✅ Test the first bulb socket in the string: place red probe on center contact, black probe on threaded shell. Note resistance.
- ✅ Move sequentially down the string, testing each socket *before* removing bulbs. Record anomalous readings (>5Ω or OL).
- ✅ For LED strings: Switch multimeter to diode-test mode. A working LED shows 1.8–3.2V forward drop; OL = open; 0.00V = shorted.
Key insight: Never assume the first dark bulb is the culprit. Degraded shunts upstream can reduce voltage so severely that downstream bulbs never reach shunt-triggering voltage—making them appear “good” on casual inspection but functionally useless.
Do’s and Don’ts of Light Testing
| Action | Do | Don’t |
|---|---|---|
| Bulb replacement | Use identical voltage/wattage bulbs. Match base type (E12 vs E17) precisely. | Force-fit bulbs with mismatched bases—cracks socket insulation and creates fire hazards. |
| Socket cleaning | Use 91% isopropyl alcohol and a nylon brush. Dry thoroughly before reassembly. | Use steel wool or sandpaper—removes plating, increases corrosion risk. |
| Tester storage | Disconnect alligator clips from battery. Store battery separately in cool, dry place. | Leave clips attached—battery drains in 2–3 weeks even with no load. |
| LED string diagnosis | Test individual LEDs with diode mode. Check controller box input voltage separately. | Apply 9V directly to LED string inputs—can destroy driver ICs instantly. |
Frequently Asked Questions
Can I use this tester on smart lights with Wi-Fi controllers?
Yes—but only on the *light string itself*, not the controller. Disconnect the string from the controller first. Smart controllers regulate power and communicate digitally; applying external voltage risks frying microcontrollers. Test only the physical wiring and bulbs.
Why does my tester show 0.0Ω on every bulb—even dead ones?
Your multimeter is likely set to continuity mode (which beeps below ~50Ω) instead of resistance mode. Switch to the 200Ω range. Continuity mode lacks resolution for shunt diagnostics—you need actual ohm values, not just a beep.
Is it safe to test lights while plugged in?
Never. Always unplug the string before testing. Your tester uses isolated 9V DC—safe to handle. Mains voltage (120V AC) poses shock and arc-flash hazards, especially with damp or damaged insulation. Treat every unplugged string as potentially live until verified.
Conclusion: Light Up Confidence, Not Just Strings
Building your own Christmas light tester isn’t about saving a few dollars—it’s about reclaiming agency over a system deliberately designed to be disposable. Modern light strings cost $25–$60, yet fail due to $0.12 shunt resistors or $0.03 socket contacts. When you understand the circuit, you stop replacing and start repairing. You notice patterns: moisture damage clusters near ground-level sockets, voltage drop escalates after the 50th bulb in cheaply wound strings, and LED drivers fail predictably after third-season exposure to rain-splashed eaves.
This tester pays for itself in one season: rescuing three $35 strands saves $105, plus hours of frustration and landfill waste. More importantly, it sharpens your intuition about electricity—not as magic, but as measurable, predictable physics. You’ll spot frayed cords before they spark, recognize overheating sockets by subtle discoloration, and teach your kids why “just yanking the plug” risks damaging the whole circuit.
Start today. Gather your multimeter and alligator clips. Build it during halftime of the Christmas Day game. Test your oldest string tonight. When the first bulb lights up after years of dormancy—not because you got lucky, but because you understood *why*—that’s the real holiday glow.


 浙公网安备
33010002000092号
浙公网安备
33010002000092号 浙B2-20120091-4
Comments
No comments yet. Why don't you start the discussion?