
Amid the glow of holiday lights and the scent of pine, handmade touches bring warmth and authenticity to seasonal decor. One simple yet powerful way to elevate your Christmas styling is by crafting rustic ribbons dyed with natural pigments from your kitchen. These dyes—derived from spices, vegetables, and fruits—produce soft, earthy hues that complement vintage wreaths, gift wrapping, and tree ornaments. Unlike synthetic dyes, natural alternatives are biodegradable, non-toxic, and create unique variations that celebrate imperfection. This guide walks you through sourcing materials, preparing fibers, selecting plant-based color sources, and applying them safely to fabric ribbons for a truly personal holiday touch.
Selecting the Right Fabric and Fiber
Natural dyes bond best with natural fibers. Synthetic materials like polyester resist absorption, resulting in faint or uneven color. For rustic Christmas ribbons, choose untreated cotton, linen, silk, or wool. These fibers accept tannins and mordants effectively, allowing deeper, longer-lasting color penetration.
Cotton and linen produce matte, muted tones ideal for farmhouse-style decor. Silk accepts dyes more vividly and develops a subtle sheen when dried—perfect for elegant gift accents. Wool, though less common for ribbons, can be used for garlands or decorative knots if handled gently during the dye process.
Width and length depend on use. Narrow 1/2-inch strips work well for ornament hangers, while 2- to 3-inch wide ribbons enhance wreath centers or present bows. Cut all pieces slightly longer than needed—you’ll lose an inch or two to fraying during simmering.
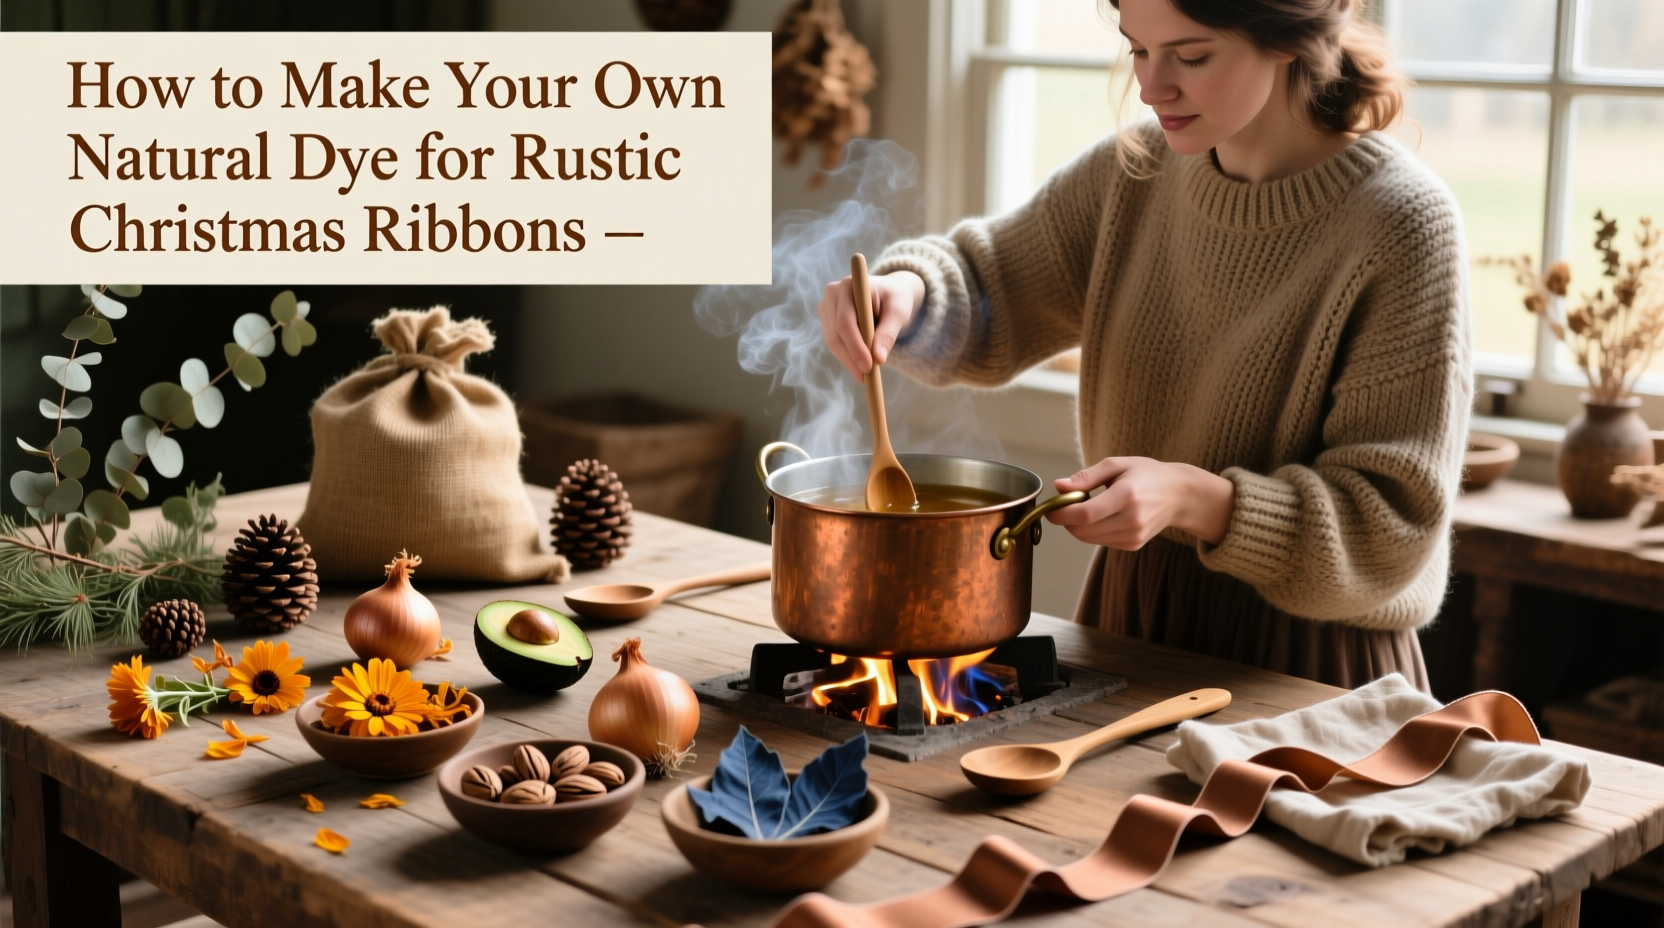
Essential Dye Ingredients and Tools
You don’t need a chemistry lab to create beautiful colors. Most ingredients are pantry staples or compost-bin castoffs. The key components are the dye source, a mordant (a substance that fixes color to fiber), and water.
Mordants improve colorfastness and alter shades. Alum (potassium aluminum sulfate) is the safest and most accessible for home use. It’s odorless, dissolves easily, and works with nearly all plant dyes. Iron (ferrous sulfate) can be used as a modifier to darken or “sadden” colors—ideal for achieving deep forest greens or charcoal reds.
Common household items double as dye sources:
- Onion skins – golden yellows and amber browns
- Beetroot – soft pinks and magentas (fades quickly)
- Pomegranate peels – warm ochres and antique golds
- Black tea or coffee – rich tans and chocolate browns
- Walnut hulls – deep espresso tones
- Spices (turmeric, cloves, cinnamon sticks) – vibrant yellows and rusty oranges
“Natural dyes carry the spirit of place and season. A ribbon dyed with last autumn’s walnut hulls holds memory as much as color.” — Lila Grant, Textile Artist & Sustainable Dyer
Step-by-Step Guide to Dyeing Rustic Christmas Ribbons
The process takes 2–4 hours, mostly unattended simmering. Work in a well-ventilated area and use stainless steel or enamel pots—never aluminum or copper, which react with mordants and alter colors.
- Prepare the fiber: Soak cut ribbons in lukewarm water for 30 minutes. This ensures even saturation and prevents blotchy dyeing.
- Mordant the fabric: Dissolve 1 tablespoon of alum per 100 grams of dry fabric in hot water. Add to a large pot with enough water to submerge the ribbons freely. Simmer fabric for 45 minutes. Remove, rinse lightly, and set aside. (Skip this step only if using turmeric, which acts as its own fixative.)
- Extract the dye: Chop or crush your dye material (e.g., break cinnamon sticks, shred onion skins). Use a ratio of 2:1 plant matter to fabric by weight. Place in a pot, cover with water, and simmer for 1 hour. Strain out solids using cheesecloth or a fine sieve.
- Dye the ribbons: Return the liquid dye to the pot. Submerge pre-mordanted ribbons. Simmer gently for 45–60 minutes, stirring occasionally. For deeper color, leave ribbons in the dye bath overnight as it cools.
- Rinse and dry: Remove ribbons and rinse under cool running water until runoff is clear. Hang to dry away from direct sunlight, which can fade colors. Once dry, press lightly with a cool iron if desired.
Color Profiles and Seasonal Pairings
Natural dyes yield unpredictable but poetic results. The final shade depends on water pH, fabric type, and cooking time. The following table outlines expected outcomes and recommended uses for Christmas styling:
| Dye Source | Expected Color Range | Best For | Lightfastness |
|---|---|---|---|
| Yellow onion skins | Golden yellow to russet brown | Wreaths, gift tags, napkin ties | High |
| Turmeric | Bright lemon yellow | Table runners, tree accents | Low (fades in sunlight) |
| Walnut hulls | Deep brown to black | Vintage-style bows, woodland themes | Very high |
| Pomegranate rind | Antique gold, olive undertones | Elegant wrapping, heirloom gifts | High |
| Beetroot | Pale pink to dusty rose | Feminine packages, children’s ornaments | Very low |
| Black tea (strong brew) | Warm tan to light mocha | Neutral base for stamping or calligraphy | Moderate |
To deepen colors, overdye fabrics. For example, dip a turmeric-yellow ribbon into cooled black tea for a mossy green. Or simmer a beet-dyed strip briefly in pomegranate for a dusky berry tone. Always test on a scrap first.
Avoiding Common Pitfalls
Natural dyeing is forgiving, but some missteps lead to frustration. Avoid these mistakes:
- Using tap water with high chlorine content – Chlorine interferes with dye uptake. If your water is heavily treated, use filtered or rainwater.
- Overcrowding the pot – Ribbons must move freely in the dye bath. Overlapping causes uneven coloring.
- Skipping the mordant – Without it, colors wash out quickly. Even “self-fixing” dyes like turmeric benefit from alum for longevity.
- Using metal utensils – Stir with wood or silicone to prevent unwanted chemical reactions.
- Rushing the cooling phase – Letting fabric absorb dye as the bath cools often produces richer results than short, hot dips.
Mini Case Study: A Farmhouse Holiday Revamp
In rural Vermont, craft enthusiast Mara Thompson decided to refresh her family’s Christmas decor using only foraged and kitchen-sourced materials. With burlap wreaths already made, she wanted ribbons that matched the organic aesthetic.
Mara collected red onion skins from months of meal prep, stored in a jar in her pantry. She added crushed walnut hulls gathered from a backyard tree in early fall. Using separate pots, she dyed linen ribbons—one batch with onions alone (yielding a warm amber), another with walnuts (deep chocolate brown). After rinsing and drying, she twisted the two together into a braided bow for her front door wreath.
Guests consistently complimented the “vintage apothecary” look. More importantly, Mara reduced waste, avoided plastic ribbons, and created a signature element she now reuses each year. Stored flat in a cotton drawer liner, the ribbons show no fading after three seasons.
Checklist: Natural Dye Preparation at a Glance
Before starting, gather and confirm the following:
- ☐ Natural fiber ribbons (cotton, linen, silk) cut to size
- ☐ Stainless steel or enamel pot (dedicated to dyeing)
- ☐ Alum mordant (available online or in craft stores)
- ☐ Dye material (onion skins, spices, fruit peels, etc.)
- ☐ Cheesecloth or fine strainer
- ☐ Wooden spoon
- ☐ Gloves (to prevent staining hands)
- ☐ Clothesline or drying rack away from sunlight
- ☐ Labels for jars (if storing leftover dye)
Frequently Asked Questions
Can I reuse the dye bath?
Yes, but expect progressively lighter shades. After the first use, strain and refrigerate the liquid for up to one week. Reheat and reuse for smaller projects or lighter tints. Discard if mold appears or odor changes.
Are naturally dyed ribbons safe for children or pets?
Yes, when made with food-grade ingredients and proper mordants. Alum is non-toxic in the quantities used. Avoid letting young children chew on ribbons, as loose fibers pose a choking hazard regardless of dye type.
How do I care for dyed ribbons over time?
Store flat in a dark drawer or box lined with acid-free tissue paper. Avoid damp areas to prevent mildew. If cleaning is necessary, spot-clean with distilled water and air dry immediately. Never machine-wash.
Final Thoughts and Creative Encouragement
Creating your own natural dye for rustic Christmas ribbons isn’t just a craft—it’s a mindful ritual that connects celebration with sustainability. Each hue carries the essence of the earth: the tang of citrus peel, the warmth of cinnamon, the depth of fallen walnuts. These ribbons won’t look mass-produced or perfectly uniform, and that’s their strength. They tell a story of intention, seasonality, and care.
Start small. Try one batch with onion skins this weekend. Wrap a simple kraft paper box, tie a sprig of rosemary to it, and feel the difference that handmade beauty makes. As you gain confidence, experiment with layered dyes, botanical printing, or adding salt or vinegar to shift colors subtly.


 浙公网安备
33010002000092号
浙公网安备
33010002000092号 浙B2-20120091-4
Comments
No comments yet. Why don't you start the discussion?