
Finding ways to decorate sustainably during the holiday season doesn’t have to mean sacrificing charm or creativity. One of the most beloved seasonal accents—pinecone garlands—often come with a frustrating downside: dried glue stains, uneven spacing, and time-consuming prep. But there’s a better way. With a few clever techniques and natural materials, you can craft a stunning pinecone garland that’s entirely glue-free, easy to assemble, and gentle on both your surfaces and the environment.
This method uses tension, threading, and strategic knotting to hold pinecones securely in place while preserving their natural texture and shape. Whether you're draping it over a mantel, wrapping it around a staircase, or using it as a centerpiece accent, this garland brings warmth and woodland elegance without any sticky cleanup afterward.
Why Skip the Glue?
Traditional pinecone garlands rely heavily on hot glue to attach each cone to a base string or wreath form. While effective, this approach has several drawbacks:
- Permanent attachment: Once glued, pinecones can't be reused or rearranged.
- Mess potential: Hot glue drips, burns, and sticks to fingers, tables, and tools.
- Environmental impact: Synthetic adhesives aren’t biodegradable and complicate composting.
- Rigidity: Glued garlands lose flexibility, making storage difficult and prone to breakage.
By eliminating glue, you gain versatility. The same materials can be reconfigured year after year. Plus, if you're crafting with children or in shared spaces, avoiding hot glue means safer hands and cleaner workspaces.
“Natural materials deserve natural methods. When we respect the integrity of pinecones, moss, and twine, we create decor that feels more connected to the seasons.” — Lena Whitmore, Sustainable Craft Designer
Materials You’ll Need
The beauty of a glue-free pinecone garland lies in its simplicity. Most supplies are reusable, biodegradable, or already in your home. Here’s what to gather:
| Material | Purpose | Recommended Type |
|---|---|---|
| Pinecones (30–50) | Main decorative element | Dry, closed cones; mix sizes for visual interest |
| Natural jute or hemp cord (10–15 ft) | Base string for threading | Medium thickness (3–4mm), uncoated |
| Leather lacing or waxed linen thread | Securing individual cones | Waxed for durability, approx. 18 inches per cone |
| Scissors | Cutting cord and thread | Sharp fabric scissors |
| Needle (blunt-tipped upholstery or tapestry) | Threading through pinecone bases | Large eye, sturdy shaft |
| Baking sheet & oven (optional) | Drying and sanitizing pinecones | 300°F for 30 minutes |
Step-by-Step Guide to Building Your Garland
Creating a secure, visually balanced pinecone garland without glue requires thoughtful spacing and reliable fastening. Follow this timeline for best results:
- Prepare the pinecones (1 hour, including drying): If gathered from outside, spread pinecones on a baking sheet and bake at 300°F for 30 minutes to kill pests and remove moisture. Let cool completely.
- Cut the main cord: Measure and cut your jute or hemp cord to desired length (typically 6–8 feet for mantels). Add 12 inches extra on each end for hanging or tying.
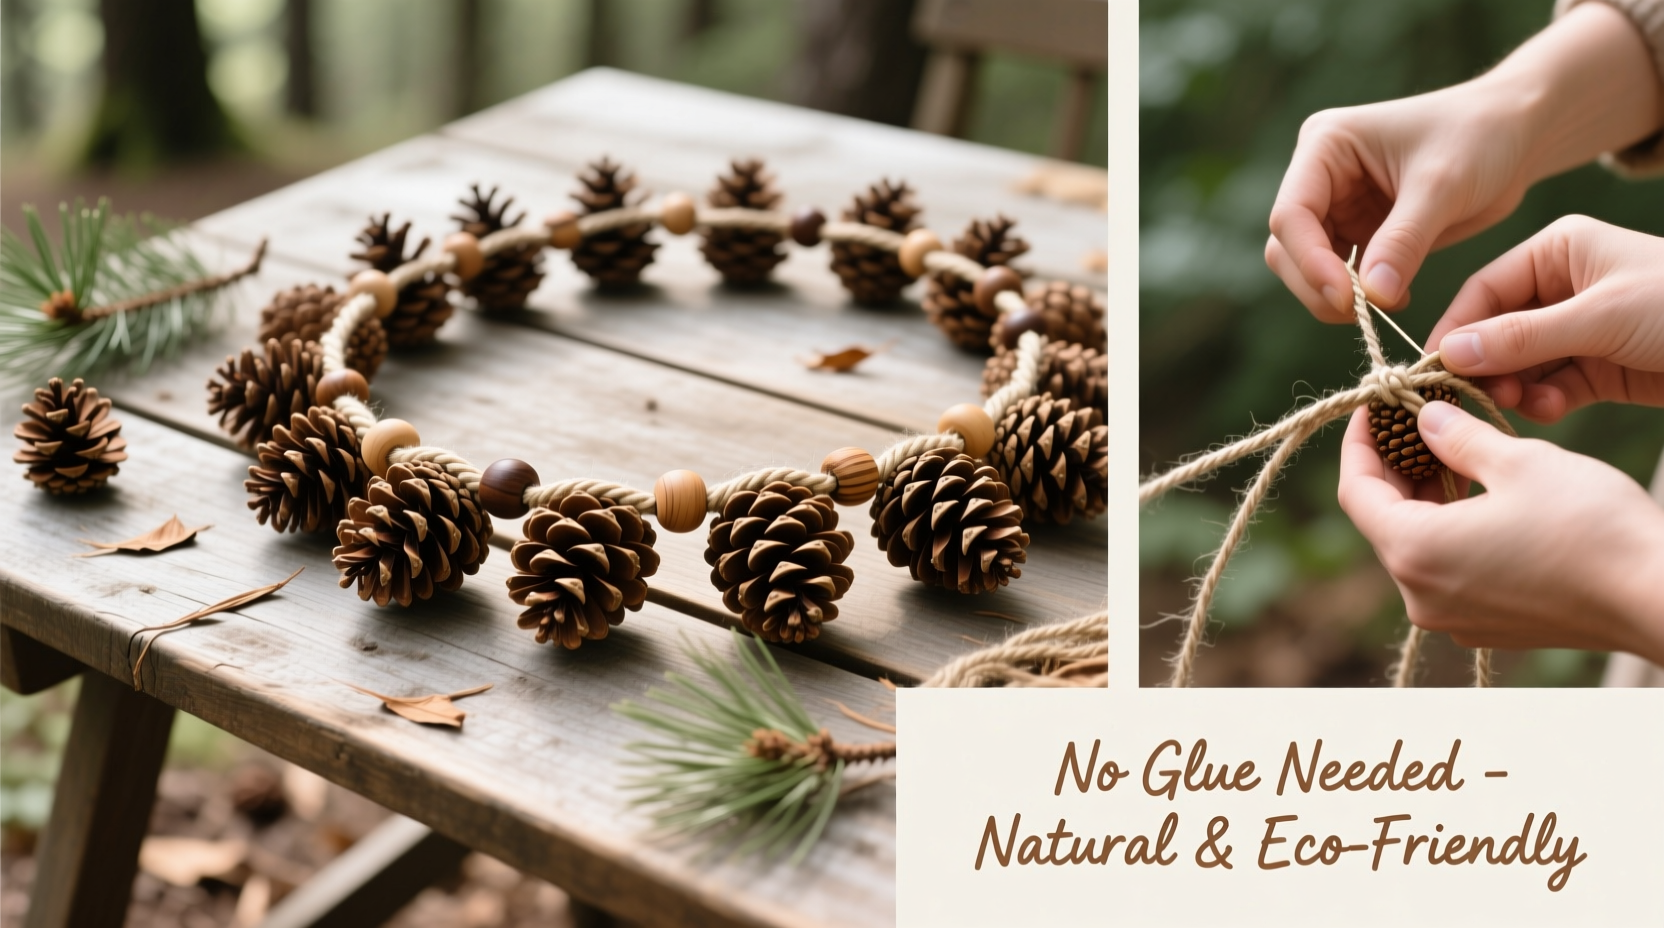
- Thread the first pinecone: Cut an 18-inch piece of leather lacing. Thread it through the eye of the needle. Insert the needle between the lower scales of a pinecone near its base. Push through until about 6 inches of lacing protrudes from the back.
- Tie to the main cord: Lay the protruding ends across the main cord where you want the pinecone positioned. Tie a double square knot around the main cord, pulling tight so the pinecone sits snugly against the knot. Trim excess lacing, leaving a small tail.
- Repeat with spacing: Move 4–6 inches along the main cord and attach the next pinecone using the same method. Vary cone sizes and orientations (some tip-up, some tip-down) for organic flow.
- Add rhythm and texture: After every 3–4 pinecones, consider adding dried elements like cinnamon sticks, acorns, or small dried oranges tied with matching thread. These enhance scent and visual depth without glue.
- Finish the ends: Once all pinecones are attached, reinforce the last knot with a drop of water-based sealant (optional but not required). Leave 6–8 inch tails on both ends for hanging.
The entire process takes about 1.5 to 2 hours, depending on garland length and detail level. Work on a clean, flat surface with good lighting to avoid mis-threading.
Alternative Fastening Methods Without Glue
If needle-and-thread isn’t your preferred technique, here are two other reliable, glue-free options:
Twist-Tie Method Using Floral Wire
Use thin, green floral wire (22-gauge) to wrap tightly around the base of each pinecone and twist-anchor it to the main cord. Bend the wire ends neatly to avoid snags. This method is faster than threading but less invisible than lacing.
Loop-and-Latch with Elastic Cord
For a stretchable, flexible garland (ideal for railing wraps), use braided elastic cord. Slide pinecones onto the cord by gently prying open lower scales and slipping the cord underneath. The elasticity creates tension that holds cones in place. Best for lightweight, compact pinecones only.
Mini Case Study: A Family-Friendly Holiday Project
In Portland, Oregon, the Reyes family decided to skip store-bought decorations and host a “Nature Craft Night” before Thanksgiving. With two young children, they wanted something safe, engaging, and low-mess. They collected pinecones during a weekend hike in Forest Park, then used the needle-and-lacing method described above to build a 7-foot garland together.
The parents pre-cut all cords and tied starter knots. The kids chose which pinecones to use and helped position them along the line. No hot glue meant no supervision stress. The finished garland was draped across the living room window, layered with fairy lights. They stored the disassembled materials in a labeled cotton bag, planning to reuse the cord and reconfigure the design next year.
“It felt meaningful,” said Marta Reyes. “We didn’t just hang a decoration—we made a memory out of things the forest shared with us.”
Do’s and Don’ts of Natural Garland Crafting
| Do | Don’t |
|---|---|
| Use dry, closed pinecones to prevent shedding | Use wet or open cones that may drop scales |
| Space pinecones evenly (4–6 inches apart) | Cluster too many together, creating visual heaviness |
| Store garland loosely coiled in a breathable container | Compress into plastic bins where moisture can build |
| Refresh scent with a light spritz of pine essential oil | Soak in oils or perfumes that may stain or attract dust |
| Inspect knots annually for wear | Assume natural fibers last forever—replace lacing every 2–3 years |
FAQ
Can I wash or clean the garland later?
No washing. Instead, gently shake outdoors or use a soft brush to remove dust. Avoid water, which can weaken natural fibers and cause mildew. For spot cleaning, dab with a slightly damp cloth and dry immediately.
How long will a glue-free garland last?
With proper storage—cool, dry, and away from direct sunlight—a well-made glue-free garland can last 5+ years. Replace frayed cords or loose ties as needed. Pinecones themselves can remain intact indefinitely if kept dry.
Are there pet-safe alternatives to pinecones?
Yes. If pets chew decorations, avoid small pieces. Opt for larger, firmly secured cones or substitute with knotted wool balls, dried corn husks, or felted ornaments tied securely. Always supervise animals around seasonal decor.
Checklist: Build Your Glue-Free Pinecone Garland
- ☐ Gather 30–50 dry pinecones
- ☐ Bake pinecones at 300°F for 30 minutes (optional)
- ☐ Cut main cord to desired length + extra for hanging
- ☐ Prepare 18-inch leather lacing pieces (one per pinecone)
- ☐ Thread needle and begin attaching pinecones with square knots
- ☐ Space each cone 4–6 inches apart
- ☐ Add natural accents (cinnamon, dried fruit) if desired
- ☐ Reinforce end knots and trim excess
- ☐ Hang and enjoy!
- ☐ Store coiled in breathable cotton bag after season
Conclusion
Creating a natural pinecone garland without glue isn’t just a workaround—it’s an upgrade. It embraces sustainability, reduces waste, and invites craftsmanship over convenience. Each knot tied by hand adds intention, transforming simple forest finds into heirloom-quality decor.
You don’t need special tools or expensive supplies. What matters is patience, attention to detail, and a willingness to work with nature rather than against it. This holiday season, step away from synthetic shortcuts and discover the quiet satisfaction of making something beautiful—cleanly, thoughtfully, and without the mess.


 浙公网安备
33010002000092号
浙公网安备
33010002000092号 浙B2-20120091-4
Comments
No comments yet. Why don't you start the discussion?