
Reusable water bottles are a smart, eco-friendly choice for staying hydrated on the go. But over time, even the most durable models can develop an unpleasant odor—often described as musty, sour, or vaguely like gym socks. This funk isn’t just annoying; it can be a sign of lingering bacteria or mold buildup. The good news: with the right approach, you can eliminate odors completely and keep your bottle fresh for months. This guide breaks down the science behind the smell, effective cleaning techniques, preventive habits, and real-world strategies that actually work.
Why Reusable Bottles Develop Odors
The root cause of a smelly water bottle lies in microbial growth. When moisture, warmth, and organic residue (like saliva, juice, or protein shakes) combine inside a sealed container, they create the perfect breeding ground for bacteria and mildew. These microbes produce volatile organic compounds (VOCs), which are responsible for the off-putting smells.
Bottles made from certain materials—especially those with narrow necks, rubber gaskets, or textured interiors—are more prone to trapping debris. Even if you rinse your bottle daily, microscopic biofilm can cling to crevices around the lid, spout, or threads. Over time, this film becomes a persistent source of odor, resistant to basic washing.
“Biofilms in water bottles are surprisingly resilient. They require mechanical scrubbing and proper disinfectants—not just rinsing—to fully remove.” — Dr. Lena Patel, Microbiologist at the Institute for Environmental Health
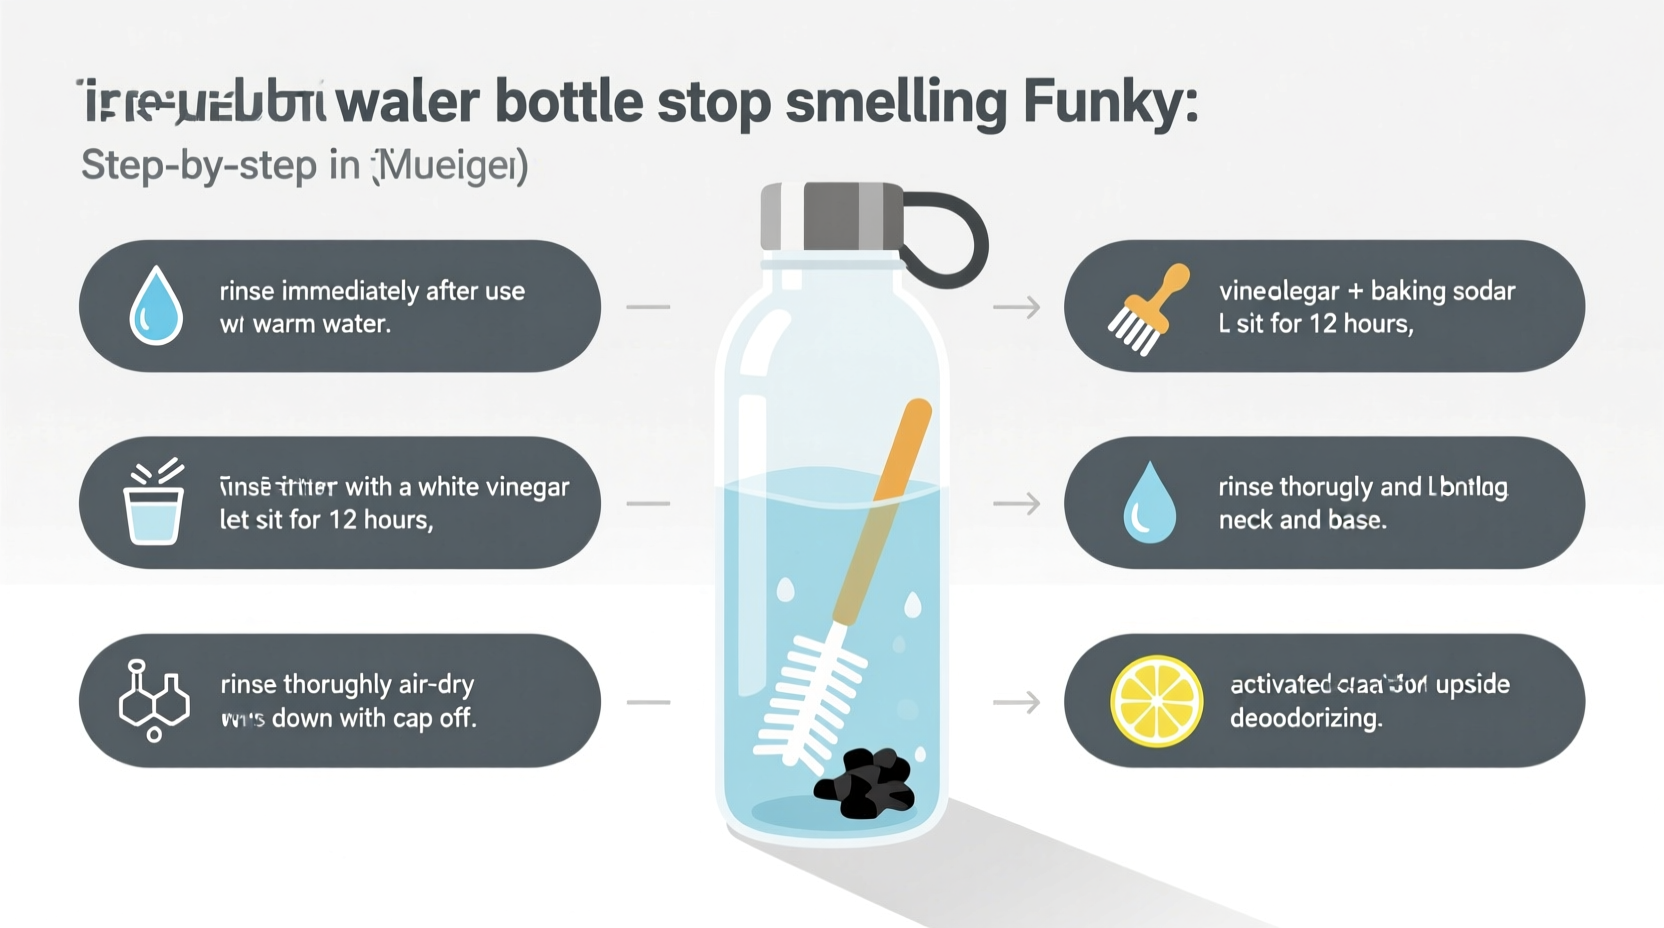
Step-by-Step Guide to Deep Clean Your Bottle
A surface-level wash won’t solve a deep-seated odor. Follow this detailed process to sanitize every part of your bottle effectively.
- Disassemble completely: Remove the cap, lid, straw, silicone seal, and any other detachable parts. Most odors originate in these hidden areas.
- Rinse all components: Flush with warm water to remove loose particles.
- Prepare a cleaning solution: Choose one of the following options based on material compatibility:
- Vinegar and baking soda (safe for stainless steel, glass, most plastics)
- Diluted hydrogen peroxide (3% solution, effective against mold)
- Oxygen-based cleaner (e.g., OxiClean, ideal for tough stains and odors)
- Soak for 30–60 minutes: Fill the bottle with your chosen solution and submerge small parts. For vinegar, mix equal parts white vinegar and water. Add a teaspoon of baking soda for extra fizz and deodorizing power.
- Scrub thoroughly: Use a long-handled bottle brush to reach the bottom and sides. A smaller interdental brush works well for straws and grooves in lids.
- Pay special attention to seals: Silicone gaskets trap moisture and bacteria. Soak them separately and gently scrub with an old toothbrush.
- Rinse multiple times: Residue from cleaners—especially vinegar—can linger and affect taste. Rinse under hot water until no scent remains.
- Air dry completely: Place all parts upside down on a clean towel in a well-ventilated area. Avoid sealing or storing while damp.
Best Cleaning Solutions Compared
| Solution | Best For | Effectiveness | Caution |
|---|---|---|---|
| Vinegar + Baking Soda | Everyday use, mild odors | ★★★★☆ | May leave slight vinegar smell initially |
| Hydrogen Peroxide (3%) | Mold, stubborn biofilm | ★★★★★ | Can discolor some plastics over time |
| Oxygen-Based Cleaner | Protein or smoothie residue | ★★★★☆ | Not suitable for aluminum bottles |
| Dishwasher (top rack) | Dishwasher-safe models only | ★★★☆☆ | Heat can warp plastic and degrade seals |
| Lemon Juice + Salt | Natural option, light cleaning | ★★★☆☆ | Citric acid may corrode metal over time |
Preventing Future Smells: Daily Habits That Work
Cleaning once won’t prevent future issues. Long-term freshness depends on consistent care. Integrate these practices into your routine:
- Wash daily: Even if you only used water, rinse and dry your bottle every night. Don’t let moisture sit overnight.
- Avoid sugary drinks: Sports drinks, juice, and flavored waters feed bacteria. If you do use them, wash immediately after.
- Don’t seal a wet bottle: Always air-dry completely before closing and storing.
- Replace worn parts: Cracked lids, cloudy straws, or brittle seals should be replaced. Most brands sell replacement kits.
- Use a bottle sleeve: Insulated sleeves reduce condensation, minimizing external moisture that promotes mold on surfaces.
Mini Case Study: Fixing a Month-Old Scent Problem
Sarah, a nurse working 12-hour shifts, relied on her insulated stainless steel bottle throughout her busy days. After three weeks of back-to-back shifts, she noticed a persistent sour smell—even after rinsing. She tried dish soap and hot water, but the odor returned within hours.
Following the deep-cleaning protocol, Sarah disassembled the entire lid mechanism, soaked all parts in a vinegar-baking soda mix for 45 minutes, then scrubbed each component with a soft brush. She discovered black specks in the silicone gasket—early mold growth. After replacing the seal and repeating the soak with hydrogen peroxide, the bottle was odor-free. By switching to nightly rinses and monthly deep cleans, she kept it fresh for over eight months.
Her experience highlights a common oversight: people often clean the bottle body but neglect the lid system, where 70% of odor-causing microbes reside.
Checklist: Monthly Bottle Maintenance Routine
To keep your bottle consistently fresh, follow this simple checklist every 30 days:
- ☑ Disassemble all parts (lid, straw, seal, bite valve)
- ☑ Soak in vinegar-water solution (1:1 ratio) for 30+ minutes
- ☑ Scrub interior with a bottle brush
- ☑ Clean lid components with a toothbrush
- ☑ Rinse thoroughly until no odor remains
- ☑ Air-dry completely before reassembly
- ☑ Inspect for cracks, cloudiness, or warping
- ☑ Replace damaged or degraded parts
Material-Specific Care Tips
Not all bottles respond to cleaning the same way. The material affects both odor susceptibility and safe cleaning methods.
Stainless Steel
Highly resistant to corrosion and odor retention. Safe for vinegar, hydrogen peroxide, and oxygen cleaners. Avoid chlorine-based products. Double-walled models should never be filled with carbonated drinks unless designed for it—pressure can damage insulation.
Glass
Naturally non-porous and odor-resistant. Can handle most natural cleaners. Wrap in a silicone sleeve to prevent breakage. Avoid extreme temperature shocks (e.g., boiling water in a cold bottle).
Plastic (Tritan, Polypropylene)
Lightweight and durable, but more prone to absorbing odors over time. Use only non-abrasive cleaners. Avoid high heat (dishwashers, boiling water) which can warp plastic and degrade seals. Replace every 6–12 months with heavy use.
Aluminum
Often lined with epoxy to prevent metal leaching. Harsh chemicals like bleach or strong acids can damage the liner. Stick to mild detergents and vinegar solutions. Not compatible with oxygen-based cleaners.
“The key is matching your cleaning method to the bottle’s material. Using the wrong solution can shorten its life or create health risks.” — Carlos Mendez, Product Safety Analyst at EcoGear Labs
Frequently Asked Questions
Can I put my water bottle in the dishwasher?
Only if the manufacturer labels it as dishwasher-safe. Even then, place it on the top rack to avoid high heat near the heating element. Hand-washing is gentler and more thorough, especially for lids and seals.
How often should I deep clean my bottle?
At minimum, once a month. If you use it daily or carry anything other than water, consider deep cleaning every 2–3 weeks. Visible cloudiness, residue, or odor are clear signals it’s time.
What if the smell comes back after cleaning?
If odors persist despite proper cleaning, the issue may be a degraded seal or micro-cracks in plastic. Try replacing the lid or gasket. If the bottle is over a year old with heavy use, replacement might be the safest option.
Final Thoughts: Freshness Starts With Awareness
A smelly water bottle doesn’t mean you’ve failed at hygiene—it means you’re using your bottle regularly, which is a win. But consistent care turns a good habit into a sustainable one. By understanding where odors come from and adopting a few disciplined routines, you can enjoy clean-tasting water without worrying about what’s lurking in the lid.
Start tonight: take apart your bottle, inspect each piece, and give it a proper soak. Make cleaning as automatic as filling it with water. Your taste buds—and your health—will thank you.


 浙公网安备
33010002000092号
浙公网安备
33010002000092号 浙B2-20120091-4
Comments
No comments yet. Why don't you start the discussion?