
Finding the right ring size is crucial for comfort, style, and safety. Whether you're shopping online, planning a surprise proposal, or simply replacing a lost ring, knowing your exact size makes all the difference. While professional sizing with a ring gauge is ideal, it's not always possible—especially if you're trying to keep a gift secret or don't have access to a jeweler. The good news? You can measure your ring size at home with surprising accuracy using only common household items and careful technique.
This guide walks through proven, no-tool methods that deliver reliable results. From paper strips to string techniques and comparative measurements, you’ll learn how to avoid common pitfalls and ensure your ring fits perfectly the first time.
Why Accurate Ring Sizing Matters
A poorly fitting ring can cause discomfort, restrict circulation, or slip off during daily activities. A ring that’s too tight may lead to swelling or pain, while one that’s too loose risks getting lost—especially on active hands. According to the Jewelers of America, nearly 40% of online ring returns are due to incorrect sizing. Getting it right from the start saves time, money, and emotional stress, especially for sentimental pieces like engagement or wedding bands.
Ring size isn’t just about circumference—it also depends on finger shape, knuckle size, and even time of day. Fingers naturally swell in heat and contract in cold, so timing matters. Understanding these variables helps you measure more accurately, even without specialized tools.
Best Time of Day to Measure Your Finger
Your fingers aren’t the same size all day. They tend to be largest in the evening after fluid retention from daily activity and smallest in the morning. For the most accurate measurement, measure your finger at the end of the day when it’s closest to its typical wearing size.
If you're measuring for a ring that will be worn daily, do so when your hands are at normal temperature and not swollen. Consistency across multiple measurements increases reliability.
Step-by-Step Guide: Measuring Ring Size Without Tools
You don’t need a ring sizer or calipers to get an accurate fit. With patience and attention to detail, these five methods use everyday items to determine your ring size reliably.
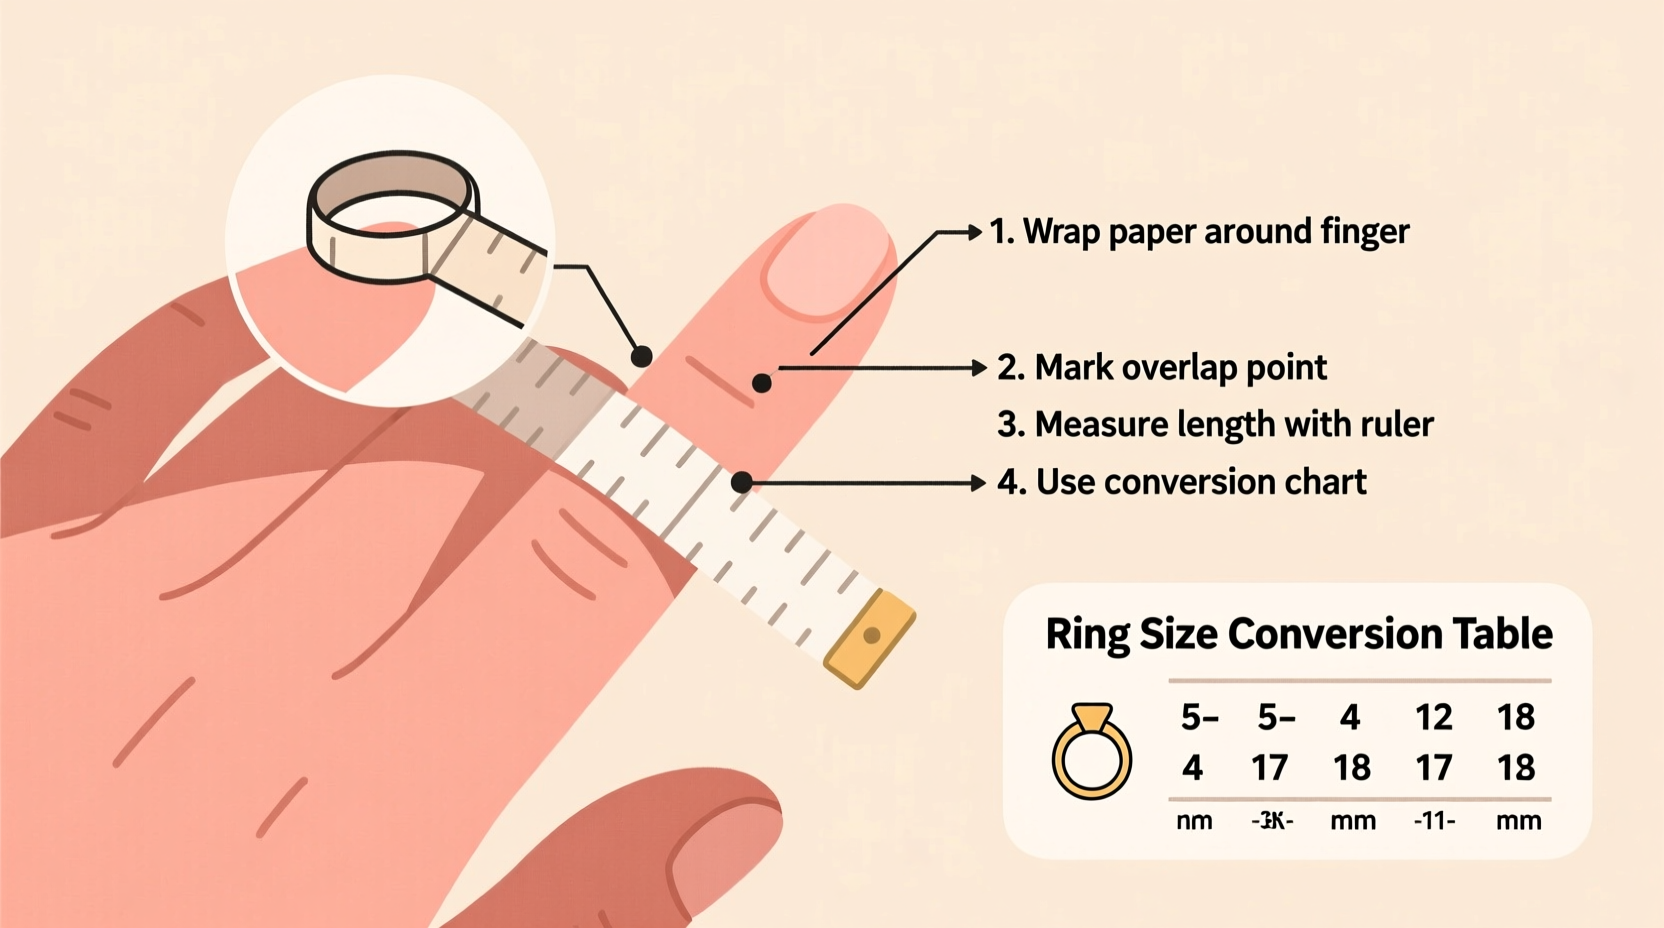
Method 1: String or Paper Strip Method
This is the most widely used at-home technique and delivers surprisingly precise results when done carefully.
- Cut a thin strip of paper (about 1/4 inch wide) or use a piece of non-stretchy string.
- Wrap it snugly around the base of your finger—the same spot where you plan to wear the ring.
- Ensure the strip is flat and doesn’t overlap. Mark where the two ends meet.
- Unwrap the strip and measure the length in millimeters using a ruler.
- Use a ring size conversion chart (see table below) to find your corresponding size.
Method 2: Use a Known Ring You Already Own
If you have a ring that fits well on the intended finger, you can use it to determine your size.
- Place the ring on a piece of paper and trace the inside diameter (the hole, not the outer edge).
- Measure the diameter of the traced circle in millimeters using a ruler.
- Double-check by measuring both vertically and horizontally to account for any distortion.
- Compare the average diameter to a standard ring size chart.
This method works best for solitaire or band rings with a consistent inner diameter. Ornate designs with large settings may skew results.
Method 3: Comparison with Standard Objects
While less precise, comparing your ring to common circular objects of known diameter can provide a rough estimate.
- A U.S. dime has a diameter of about 17.9 mm (~size 5)
- A penny measures approximately 19.05 mm (~size 7)
- A nickel is roughly 21.2 mm (~size 10)
Hold your ring next to these coins to see which one matches most closely. This method is best used as a sanity check rather than a primary sizing tool.
Method 4: Print a DIY Ring Sizer Template
Many reputable jewelry websites offer printable ring sizer templates. These are scaled to real-world dimensions and can be printed at home.
- Download a ring sizer PDF from a trusted source (e.g., Blue Nile, James Allen).
- Print it at 100% scale—do not allow your printer to \"fit to page.\"
- Cut out the sizer and wrap it around your finger, aligning the zero mark.
- Note which line matches up with the end of the strip.
Method 5: Knuckle Consideration Technique
Some rings must slide over a larger knuckle before settling onto the finger. Ignoring this can result in a ring that’s too loose once it passes the joint.
- Measure the circumference at the base of the finger (where the ring sits).
- Measure the circumference at the widest part of the knuckle.
- If there’s a significant difference, choose a size that allows comfortable passage but includes a ring guard or spring insert for stability.
This is especially important for people with prominent knuckles or arthritis-related swelling.
Ring Size Conversion Table
| US Size | Inside Diameter (mm) | Circumference (mm) | UK/Australia | Europe |
|---|---|---|---|---|
| 4 | 14.86 | 46.7 | H | 47 |
| 5 | 15.70 | 49.3 | J | 50 |
| 6 | 16.51 | 51.9 | L | 52 |
| 7 | 17.35 | 54.5 | N | 54 |
| 8 | 18.19 | 57.2 | P | 57 |
| 9 | 18.99 | 59.7 | R | 60 |
| 10 | 19.84 | 62.3 | T | 62 |
Use this table to convert your measured circumference or diameter into standard ring sizes across regions. Always round to the nearest whole or half size based on your measurement.
Common Mistakes to Avoid
Even small errors can throw off your ring size. Here are frequent missteps and how to prevent them:
| Do’s | Don’ts |
|---|---|
| Measure at room temperature in the evening | Measure after swimming or exercising |
| Take multiple measurements over several days | Rely on a single reading |
| Account for knuckle size if larger than the finger base | Ignore swelling or joint differences |
| Use non-stretch materials like paper or thread | Use rubber bands or elastic strings |
| Verify results with a known-fitting ring if possible | Assume your size is the same on all fingers |
Expert Insight: What Jewelers Recommend
“Even experienced jewelers recommend taking three separate measurements before ordering a custom ring. Temperature, hydration, and hand position all affect fit. When in doubt, go slightly larger—you can always resize down, but widening a ring damages the metal.” — Daniel Reyes, Master Bench Jeweler with 22 years of experience
Professional jewelers emphasize consistency and caution. Many advise erring on the side of a slightly larger size, especially for bands that won’t be resized frequently. Solid gold and platinum rings can be resized, but intricate designs or eternity bands often cannot.
Mini Case Study: Sarah’s Surprise Engagement Ring
Sarah wanted to propose with a custom-designed engagement ring but didn’t know her partner’s ring size. She couldn’t borrow a ring without raising suspicion. Over three evenings, she used the paper strip method on her partner’s left ring finger while they watched TV, ensuring the hand was relaxed and at normal temperature.
She took three measurements: 54.1 mm, 54.6 mm, and 54.3 mm. Averaging them gave 54.3 mm—just under US size 7. She cross-checked by tracing a ring her partner wore on another finger and estimating proportionally. Confident in her data, she ordered a size 7. The ring fit perfectly on the first try, and the proposal went off without a hitch.
Sarah’s success came from repetition, timing, and avoiding emotional pressure to rush the process.
Checklist: How to Measure Ring Size at Home Correctly
- ✅ Measure your finger at the end of the day when it’s warm and slightly swollen
- ✅ Use a non-stretch material like paper or cotton string
- ✅ Wrap snugly but not tightly—allow space for slight movement
- ✅ Take at least three measurements over different days
- ✅ Account for knuckle size if it’s significantly larger than the finger base
- ✅ Compare your measurement to a reliable ring size chart
- ✅ When in doubt, size up—resizing smaller is easier than enlarging
- ✅ Verify with a known-fitting ring if possible
Frequently Asked Questions
Can I use a ruler alone to measure ring size?
Yes, but only indirectly. A ruler helps measure the length of a string or paper strip wrapped around your finger. You then use that linear measurement to calculate circumference and match it to a ring size chart. Never try to estimate size by holding a ruler next to your finger—it won’t be accurate.
Are ring sizes the same for men and women?
The sizing system is the same globally, but average sizes differ. In the U.S., the average woman wears size 6, while the average man wears size 8–10. However, individual variation is significant, so never assume based on gender.
What if my ring size falls between two sizes?
If your measurement lands between sizes (e.g., 54.8 mm), choose the larger size for comfort, especially for wider bands. A 6mm-wide ring feels tighter than a 2mm band at the same diameter. For widths over 6mm, consider going up half a size.
Final Tips for Long-Term Accuracy
Once you’ve determined your size, record it along with the date and conditions (e.g., “measured June 12, evening, left ring finger”). Finger size can change over time due to weight fluctuations, aging, or medical conditions like arthritis.
If buying online, look for retailers that offer free resizing within a certain period. Reputable jewelers often include one complimentary resize within 30–90 days. Keep your original packaging and receipt until you’re certain of the fit.
Conclusion: Get It Right from the Start
Measuring your ring size at home without tools is entirely possible—with care, consistency, and the right approach. Whether you're treating yourself or planning a meaningful surprise, accurate sizing ensures comfort, security, and lasting enjoyment of your jewelry.
Now that you know how to measure precisely, take action today. Grab a strip of paper, a ruler, and spend five minutes getting it right. Your future self—and your fingers—will thank you.


 浙公网安备
33010002000092号
浙公网安备
33010002000092号 浙B2-20120091-4
Comments
No comments yet. Why don't you start the discussion?