
Candle making is as much an art as it is a craft, and at the heart of every memorable candle lies its fragrance. A well-blended scent can transform a simple wax vessel into an experience—evoking memories, calming the mind, or energizing a space. While pre-made fragrance oils offer convenience, learning how to mix them yourself unlocks creative freedom and allows you to create signature scents tailored to your style or brand.
For beginners, fragrance blending can seem intimidating. Will the notes clash? Will the scent throw poorly? Is there a risk of weakening the fragrance load? The good news is that with a structured approach, basic knowledge of scent profiles, and a bit of experimentation, anyone can blend like a pro. This guide walks you through everything you need to know—from understanding fragrance families to mastering blending ratios and testing your creations.
Understanding Fragrance Oil Basics
Fragrance oils used in candle making are synthetic or nature-identical compounds designed to mimic natural aromas or create entirely new olfactory experiences. Unlike essential oils, which are extracted from plants, fragrance oils are formulated for stability, scent throw, and compatibility with wax.
Before blending, it’s crucial to understand three key properties:
- Scent Throw: How well the fragrance disperses when the candle is lit (hot throw) or unlit (cold throw).
- Flash Point: The temperature at which the oil can ignite. Important for safety during pouring.
- Fragrance Load: The maximum percentage of oil that can be safely added to wax (typically 6–10%, depending on wax type).
Most candle waxes—including soy, paraffin, and coconut blends—accept fragrance loads between 6% and 10%. Exceeding this can lead to poor burn performance, oil seepage, or sooting.
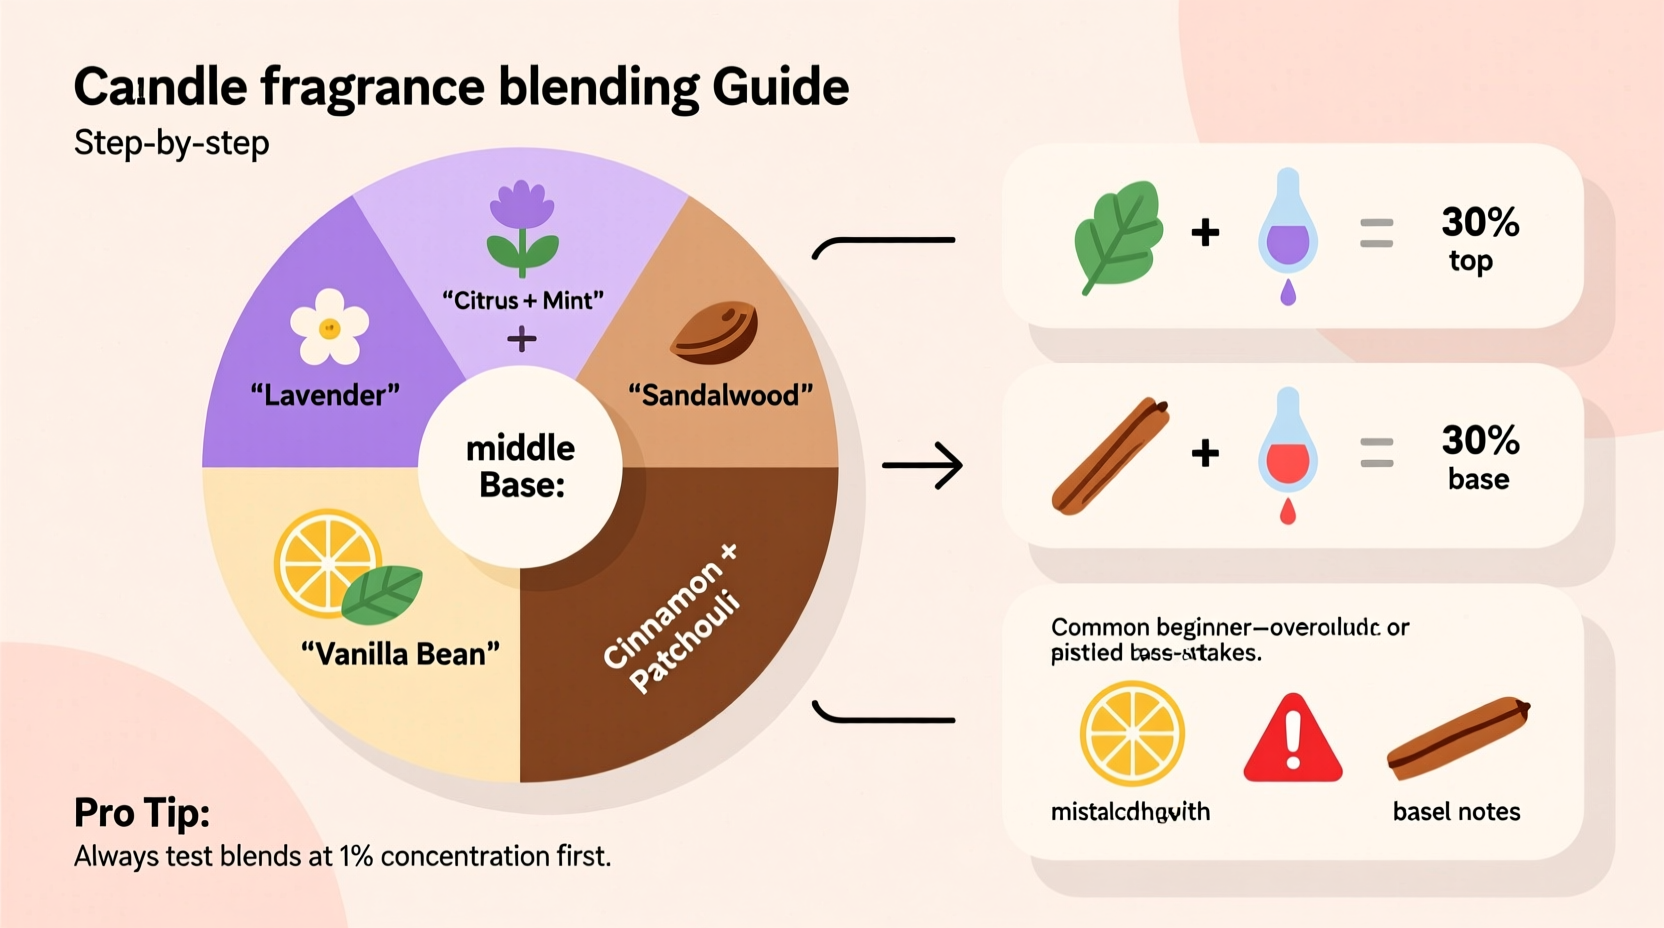
The Art of Scent Families and Notes
Fragrances are composed of top, middle (heart), and base notes—each playing a role in how the scent unfolds over time.
- Top Notes: The first impression—light, fresh, and volatile. Examples: citrus, bergamot, mint.
- Middle (Heart) Notes: The core character—floral, spicy, or herbal. Examples: lavender, rose, cinnamon.
- Base Notes: The foundation—deep, rich, and long-lasting. Examples: vanilla, sandalwood, musk.
Think of fragrance blending like composing music: top notes are the opening chords, middle notes form the melody, and base notes provide the bassline. A balanced blend includes all three layers.
Fragrance families group scents by dominant characteristics. Common families include:
| Fragrance Family | Characteristics | Common Notes |
|---|---|---|
| Floral | Petal-like, romantic, soft | Rose, jasmine, lilac |
| Fruity | Bright, juicy, playful | Strawberry, peach, mango |
| Woody/Earthy | Warm, grounding, rustic | Sandalwood, cedar, patchouli |
| Spicy | Warm, bold, inviting | Cinnamon, clove, nutmeg |
| Fresh/Clean | Crisp, airy, invigorating | Ozone, linen, rain |
| Gourmand | Sweet, edible, comforting | Vanilla, caramel, baked goods |
Successful blends often combine complementary families. For example, a gourmand base (vanilla) paired with a floral heart (jasmine) and a citrus top (orange) creates a warm yet uplifting scent. Avoid combining too many strong families—like spicy and woody—without a balancing note, as they can become overwhelming.
“Balance is everything. A great candle fragrance should unfold like a story—one that evolves from first light to final flicker.” — Lila Monroe, Master Perfumer & Candle Formulator
Step-by-Step Guide to Blending Fragrance Oils
Blending isn’t guesswork—it’s a repeatable process rooted in proportion, testing, and documentation. Follow this timeline to create consistent, professional-grade blends.
- Define Your Scent Goal: Decide what mood or memory you want to evoke. Cozy autumn evenings? Tropical beach days? Morning coffee rituals?
- Select 2–4 Complementary Oils: Choose one base, one heart, and optionally a top note. Stick to 3 max for beginners.
- Use a Blending Ratio: Start with a proven structure:
- Base Note: 50%
- Middle Note: 30%
- Top Note: 20%
- Measure Precisely: Use a digital scale or graduated pipette. Mix in small batches (e.g., 10g total) for testing.
- Blend in a Neutral Container: Use a glass vial or small mason jar. Stir gently with a clean stir stick.
- Let It Rest (Aging): Allow the blend to sit for 24–48 hours. This lets the molecules bind and the scent mature.
- Test in Wax: Make a test candle using your chosen wax and wick. Evaluate cold throw after 48 hours and hot throw after burning for 2–3 hours.
- Adjust and Refine: If too sharp, reduce top notes. If weak, increase base or overall load (within safe limits). Record all changes.
Beginner-Friendly Blending Formulas to Try
Start with these tried-and-tested combinations to build confidence and train your nose.
1. \"Cozy Cabin\" (Woody-Spicy)
- 50% Sandalwood (base)
- 30% Cinnamon (middle)
- 20% Orange Peel (top)
A warm, inviting blend perfect for fall and winter. The citrus lifts the heaviness of wood and spice.
2. \"Morning Bloom\" (Floral-Fruity)
- 50% Fresh Linen (base – clean anchor)
- 30% Lavender (middle)
- 20% Lemon Zest (top)
Light and refreshing—ideal for bathrooms or home offices. The linen provides a neutral base so the floral doesn’t dominate.
3. \"Desert Sunset\" (Gourmand-Woody)
- 50% Vanilla Bean (base)
- 30% Amber (middle)
- 20% Sage (top)
Rich and slightly earthy. The sage adds a herbal contrast to the sweetness, preventing cloyingness.
“I started with copycat versions of popular store-bought scents. Once I understood how they were built, I began tweaking ratios to make them my own. That’s how I launched my best-selling ‘Ocean Mist & Vanilla’ blend.” — Derek Chen, Small-Batch Candle Maker
Common Mistakes and How to Avoid Them
Even experienced crafters make errors. Here are the most frequent pitfalls—and how to fix them.
| Mistake | Why It Happens | How to Fix |
|---|---|---|
| Weak scent throw | Underloading, poor wax compatibility, or unstable fragrance | Ensure correct fragrance load; test oil in your specific wax; use high-quality oils |
| Wax sweating (oil pooling) | Overloading or improper curing | Stay within 10% load; cure candles 5–7 days before burning |
| Notes clashing or smelling “off” | Incompatible scent families or unbalanced ratios | Stick to harmonious families; use the 50-30-20 rule; age the blend |
| Discoloration of wax | Vanilla-heavy oils or certain dyes in fragrance | Add liquid candle dye stabilizer or accept natural browning as part of aesthetic |
Essential Checklist for Successful Blending
Follow this checklist every time you create a new fragrance blend:
- ☑ Confirm fragrance load limit for your wax type
- ☑ Choose 2–3 complementary oils from different note levels
- ☑ Use precise measurements (scale or pipette)
- ☑ Blend in a clean, labeled container
- ☑ Age the blend for 24–48 hours before testing
- ☑ Test in a real candle (not just sniffing the bottle)
- ☑ Burn test for at least two cycles to evaluate hot throw consistency
- ☑ Document the formula and results for future reference
Real Example: From Kitchen Experiment to Best Seller
Jenna, a hobbyist from Portland, wanted to recreate the smell of her grandmother’s apple pie. She started with a single apple fragrance oil but found it too candy-like. After researching, she layered in 50% baked apple crisp (gourmand), 30% cinnamon stick (spice), and 20% buttered crust (creamy base). She aged the blend for two days, then poured a test candle in soy wax with a cotton wick.
After curing for a week, the cold throw was subtle but promising. On first burn, the kitchen filled with a realistic, warm pie aroma—not sweet, not artificial. She named it “Grandma’s Sunday Pie” and sold out her first batch at a local market. Today, it’s her flagship scent.
Her secret? Patience and iteration. “I made five versions before getting it right,” she says. “But each one taught me something about balance.”
FAQ: Your Blending Questions Answered
Can I mix fragrance oils from different brands?
Yes, but with caution. Different brands use varying carrier oils and concentrations. Always test compatibility and performance in wax. Some combinations may separate or weaken throw.
How long should I cure my candles after adding blended fragrance?
Minimum 5 days, ideally 7. Curing allows the fragrance to fully bind with the wax, significantly improving both cold and hot throw. Gourmand and complex blends benefit most from extended curing.
Why does my blend smell different in the bottle than in the candle?
Fragrance oils are concentrated and volatile. In wax, the scent is diffused slowly and affected by heat, wax type, and wick size. Always judge a blend by its performance in a burned candle, not just the bottle sniff test.
Master Your Craft, One Scent at a Time
Blending fragrance oils for candles is equal parts science and intuition. There’s no single “right” way—but there are proven methods that dramatically increase your chances of success. By understanding scent structure, respecting fragrance loads, and testing systematically, you’ll move beyond imitation to innovation.
Your nose will sharpen with practice. You’ll begin to predict how notes interact, recognize imbalances, and refine formulas with confidence. Whether you’re crafting candles for joy, gifts, or business, custom blending adds a personal touch that store-bought scents can’t match.


 浙公网安备
33010002000092号
浙公网安备
33010002000092号 浙B2-20120091-4
Comments
No comments yet. Why don't you start the discussion?