
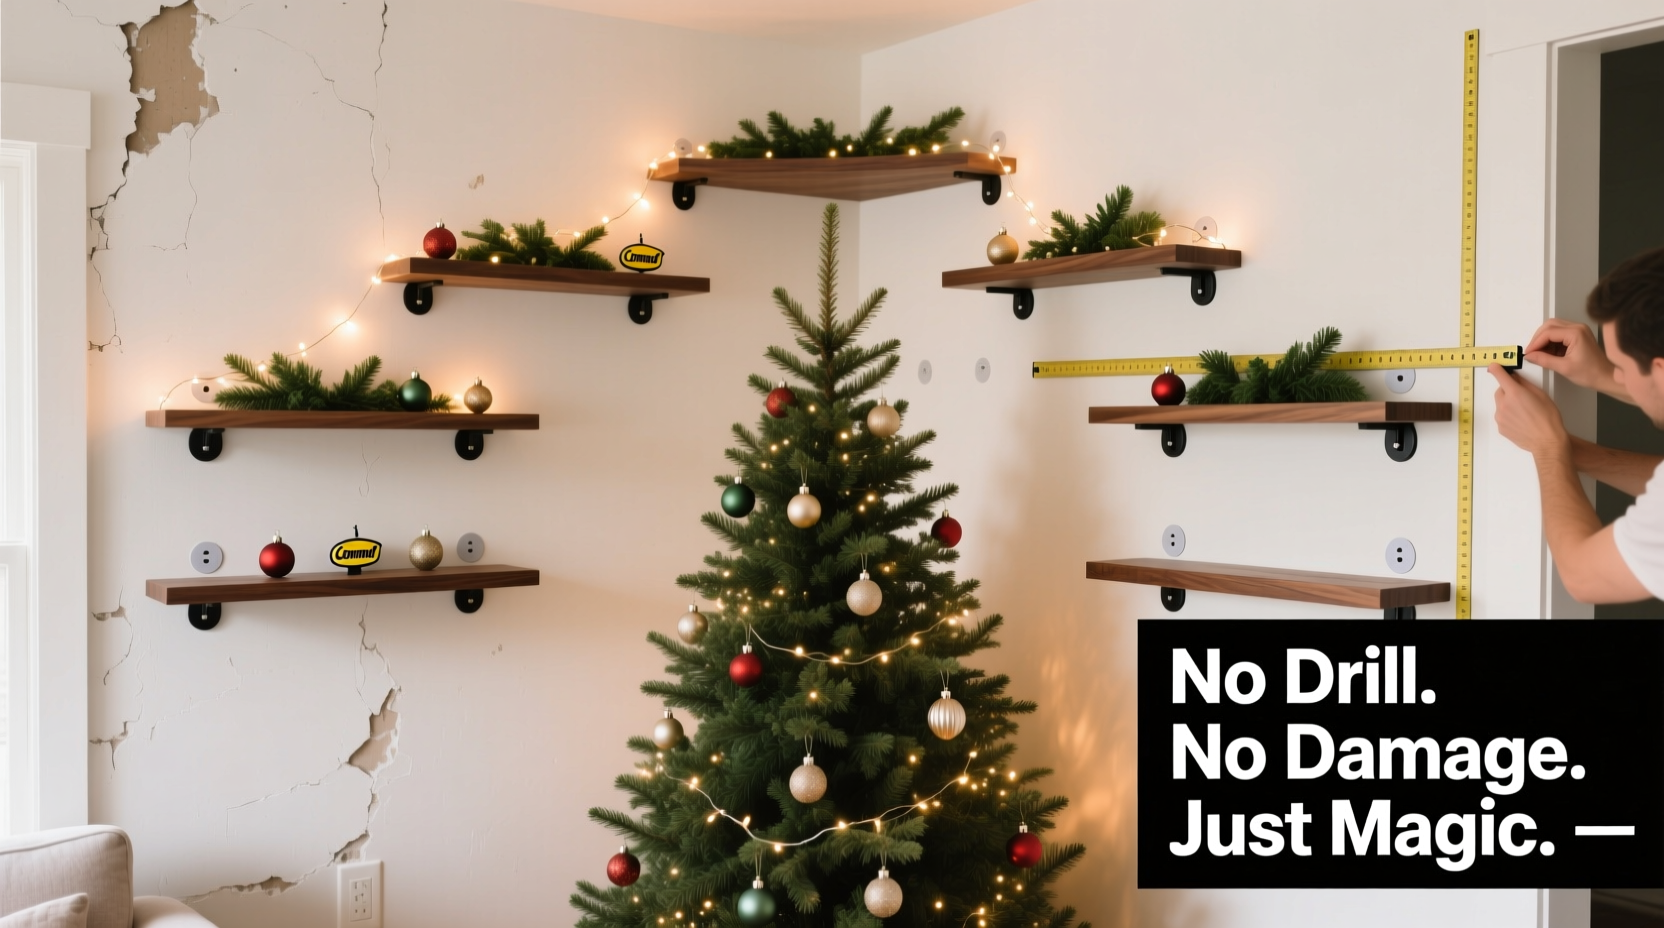
Decorating for the holidays often means finding creative ways to display ornaments, lights, and festive decor—especially when working around a centerpiece like a Christmas tree. Floating shelves offer an elegant solution to elevate your holiday presentation, providing space for candles, mini trees, photo frames, or seasonal greenery. However, traditional mounting methods require drilling into studs, which can compromise wall integrity and leave permanent damage. For renters, homeowners with textured walls, or anyone avoiding invasive installations, this presents a challenge.
The good news is that modern adhesive technology and clever mounting strategies now make it possible to install sturdy, stylish floating shelves safely—without screws in studs or harm to delicate wall finishes. With the right tools, materials, and techniques, you can create a seamless, festive display that enhances your space and comes down just as cleanly as it went up.
Why Avoid Drilling? Understanding the Risks
Drilling into walls during holiday decorating may seem harmless, but it carries several drawbacks:
- Renting restrictions: Most leases prohibit permanent alterations, including holes in walls.
- Wall texture damage: Textured surfaces like orange peel, knockdown, or popcorn are difficult to repair without visible patches.
- Mistakes are costly: A misplaced hole near a Christmas tree can disrupt symmetry or ruin carefully planned decor layouts.
- Time-consuming repairs: Patching, sanding, and repainting take time and skill—especially post-holiday when energy is low.
Given these concerns, non-invasive mounting methods aren’t just convenient—they’re essential for flexible, reversible design. The goal isn’t to sacrifice stability for convenience, but to find balance: secure enough to hold decor, gentle enough to preserve your walls.
Selecting the Right Damage-Free Mounting System
Not all adhesives or hanging systems are created equal. To support floating shelves—particularly those holding ceramic, glass, or multiple decorations—you need high-performance solutions designed for lateral weight distribution and shear resistance (resistance to sliding downward).
Below are the most effective stud-free options:
- Heavy-duty adhesive strips: Brands like 3M Command™ offer large specialty strips rated for up to 16 pounds per pair. These use a unique adhesive foam that bonds strongly yet releases cleanly with a pull tab.
- Adjustable tension rods with shelf brackets: Ideal for corners or between two walls, tension rods use spring-loaded pressure to hold lightweight shelves without wall contact.
- Over-the-door style brackets: Modified versions can extend over baseboards or moldings to support narrow shelves without direct wall attachment.
- Furniture-style risers or ledges: Place decorative consoles or bookshelf risers behind the tree skirt to mimic built-in shelving.
- Magnetic mounting (for metal studs or surfaces): Limited application, but viable in some commercial or industrial-style homes.
For most residential settings, heavy-duty adhesive strips combined with properly sized floating shelves yield the best results.
Choosing the Best Shelf Material and Design
The shelf itself plays a crucial role in success. Lightweight doesn’t have to mean flimsy. Opt for materials that maximize strength-to-weight ratio:
| Material | Weight Capacity (with Adhesive) | Pros | Cons |
|---|---|---|---|
| Engineered wood (e.g., MDF) | Up to 12 lbs per strip set | Affordable, paintable, smooth finish | Bulkier; heavier than alternatives |
| Plywood (1/2\") | Up to 10 lbs | Durable, natural look | May require edge banding |
| Acrylic/Plexiglass | Up to 8 lbs | Modern, invisible look; very light | Scratches easily; limited load |
| Aluminum composite | Up to 15 lbs | Extremely strong, weather-resistant | More expensive; harder to cut at home |
Shelf depth should be kept modest—between 6 and 10 inches—to reduce leverage and minimize strain on adhesive points. Wider shelves increase torque, making them more likely to peel away even under moderate weight.
Step-by-Step Installation Guide
Follow this detailed process to mount floating shelves safely and securely around your Christmas tree using only adhesive methods.
- Measure and plan layout: Use painter’s tape to mark shelf positions on the wall. Consider height relative to the tree—ideal placements are between eye level and treetop, avoiding obstruction of lights or ornaments.
- Clean the wall surface: Wipe the area with rubbing alcohol and a lint-free cloth. Remove dust, grease, or wax residues that could weaken adhesion.
- Prepare the shelf mounting side: If using adhesive strips, attach the larger backing to the shelf first. Press firmly for 30 seconds per strip.
- Allow curing time: Let the adhesive bond to the shelf for at least one hour before applying to the wall (per manufacturer instructions).
- Align and press onto wall: Remove the wall-side liner and position the shelf precisely. Apply firm, even pressure across the entire back edge for 30 seconds.
- Wait before loading: Wait 24 hours before placing any items on the shelf. This allows full adhesive bonding.
- Test gradually: Begin with lightweight items (e.g., pinecones, LED candles), then add heavier pieces over time.
Real Example: Holiday Display in a Rented Apartment
Sophie, a graphic designer living in a 1970s-era apartment with textured walls, wanted to flank her 7-foot Christmas tree with matching birch-finish floating shelves. Her lease forbade drilling, and previous tenants had left patchy repairs she didn’t want to repeat.
She selected 8-inch deep MDF shelves painted white, each weighing 3.2 lbs empty. Using two sets of 3M Command™ Jumbo Hooks (rated for 7.5 lbs each), she mounted the shelves at 48\" and 68\" heights beside the tree. After 24 hours of curing, she added battery-powered fairy lights, a small potted rosemary “tree,” and vintage ornaments—all totaling under 9 lbs per shelf.
The shelves remained secure throughout the six-week holiday season. When it was time to remove them, she used the pull-tab method, releasing the adhesive cleanly. No residue or texture damage remained.
“Adhesive mounting has evolved beyond temporary fixes. With proper prep and realistic load expectations, it’s now viable for semi-permanent displays.” — Daniel Reeves, Interior Product Engineer at HomeFix Labs
Do’s and Don’ts of Stud-Free Shelf Mounting
To ensure long-term success and wall preservation, follow this checklist of best practices.
| Do’s | Don’ts |
|---|---|
| Use multiple adhesive points for distributed support | Mount shelves above radiators or heat sources |
| Stick to loads under 80% of rated capacity | Install on freshly painted walls (wait 30 days) |
| Check periodically for shifting or peeling | Use standard tape or glue instead of engineered adhesives |
| Remove shelves slowly using the release tab | Hang wet or damp items (e.g., live plants with saucers) |
| Match shelf color to wall for visual harmony | Ignore humidity levels—high moisture weakens adhesion |
Frequently Asked Questions
Can I reuse adhesive strips after removing the shelf?
No, adhesive strips are single-use. Once detached from the wall, the bonding material loses effectiveness. Always replace with new strips for reinstallation.
What if my wall has heavy texture—will the strips still work?
Yes, but with caution. Deep textures prevent full surface contact, reducing grip. In such cases, use additional strips and opt for shorter shelves. Alternatively, consider tension-mounted corner brackets that bypass wall adhesion entirely.
How do I remove adhesive residue without damaging paint?
Most quality strips (like Command™) leave no residue when removed correctly. If traces remain, gently rub with a cloth dampened with isopropyl alcohol. Avoid scraping or using solvents unless testing on a hidden area first.
Final Checklist Before You Begin
- ✅ Measure shelf dimensions and desired placement
- ✅ Confirm total weight of shelf + intended decor
- ✅ Purchase sufficient heavy-duty adhesive strips (double recommended count)
- ✅ Clean wall thoroughly with alcohol wipe
- ✅ Allow 24-hour cure time before loading
- ✅ Plan removal strategy before installation
- ✅ Label shelves or take photos for easy reassembly next year
Conclusion: Festive Style Without Permanent Trade-offs
Mounting floating shelves around a Christmas tree without drilling is not only possible—it’s practical, safe, and increasingly reliable thanks to advances in adhesive engineering. By choosing the right materials, following proper installation steps, and respecting weight limits, you can achieve a polished, custom look that enhances your holiday ambiance without compromising your walls.
This season, embrace creativity without fear of damage. Whether you're in a rental, protecting heirloom finishes, or simply avoiding drywall dust, damage-free shelving lets you celebrate freely and remove decor just as easily come January.


 浙公网安备
33010002000092号
浙公网安备
33010002000092号 浙B2-20120091-4
Comments
No comments yet. Why don't you start the discussion?