
A cluttered closet doesn’t require expensive organizers or custom installations to fix. In fact, with just two simple tools—hangers and bins—you can transform even the most chaotic space into a functional, visually calming system. This method is not only affordable but also highly adaptable, making it ideal for renters, small spaces, or anyone who wants a low-commitment solution. The key lies in strategy: thoughtful categorization, consistent placement, and smart use of vertical and shelf space.
Start with a Clear-Out and Categorize First
Before hanging or binning anything, remove all items from your closet. This step may seem obvious, but it’s often skipped in favor of quick fixes that don’t last. Laying everything out allows you to assess what you own, identify duplicates, and decide what truly belongs in your daily rotation.
Sort clothing and accessories into broad categories: tops, bottoms, dresses, outerwear, workout gear, sleepwear, accessories (scarves, belts), shoes, and seasonal items. Use separate piles on your bed or floor to keep things visible. As you sort, be ruthless about what stays. If you haven’t worn it in the past year—or if it doesn’t fit or make you feel confident—consider donating or storing it elsewhere.
Use Bins Strategically for Non-Hangable Items
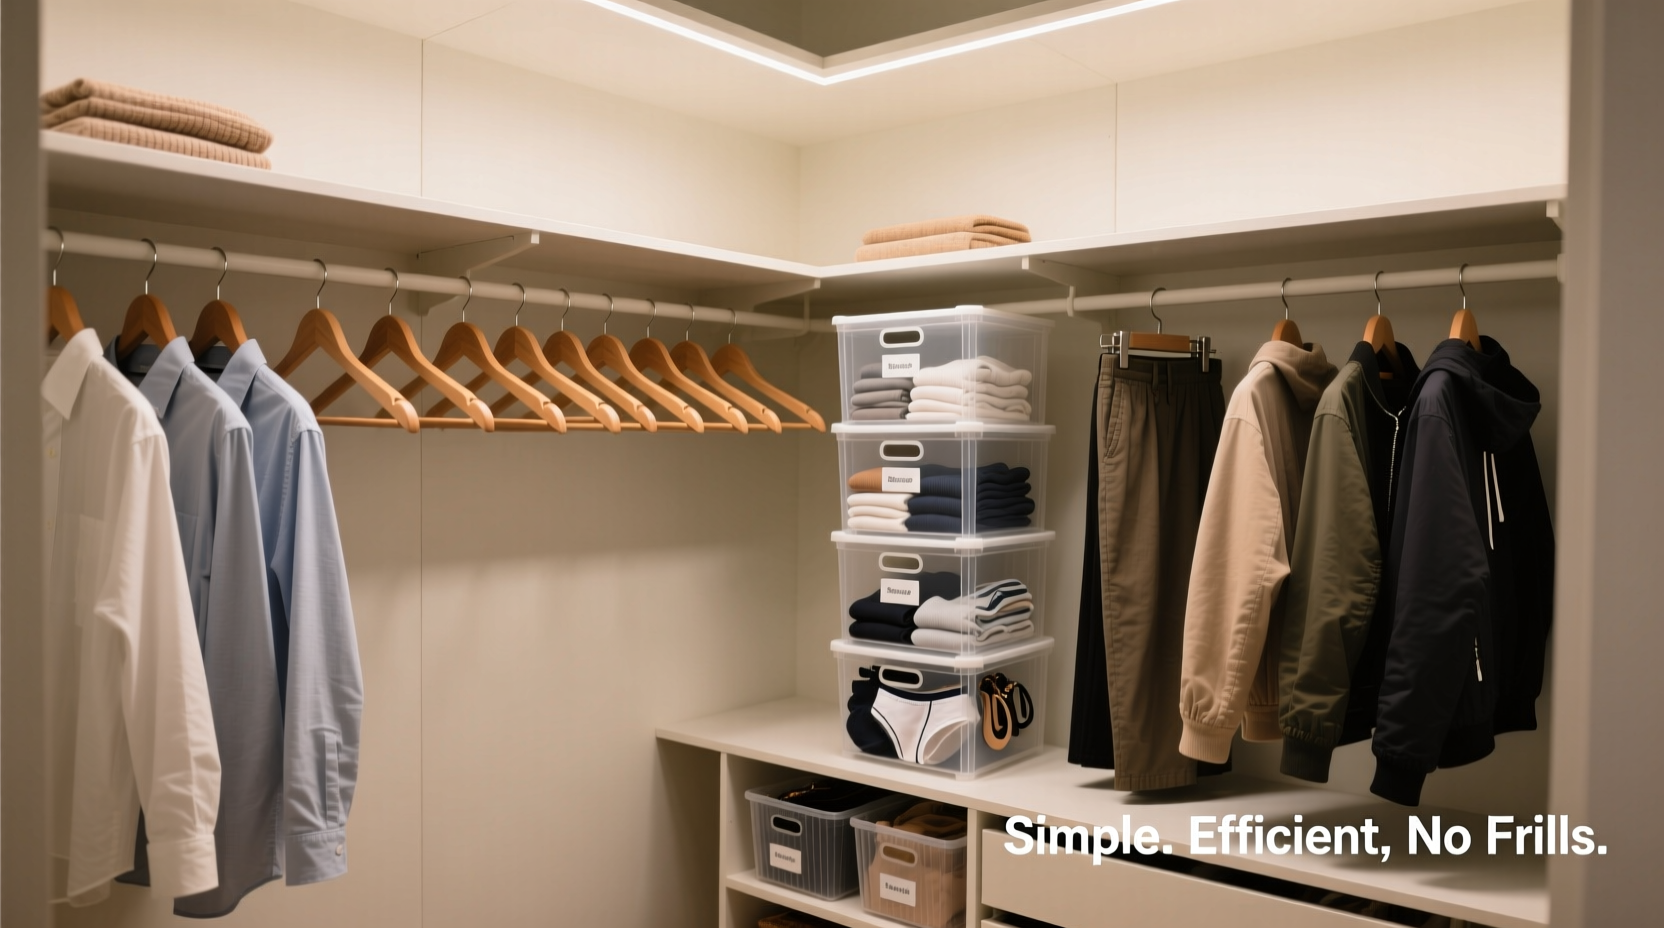
Bins are your best ally for organizing items that don’t hang well: socks, underwear, gym clothes, pajamas, scarves, hats, and even folded sweaters. Opt for uniform, clear or labeled bins to maintain visual consistency and ease of access. Stackable fabric bins work well on shelves, while plastic or wicker baskets suit open floor areas.
Place frequently used items at eye level. Reserve higher shelves for rarely used pieces like formal accessories or off-season storage. Avoid overfilling bins—keep them at 75% capacity so contents remain visible and accessible.
“Organization isn’t about owning more containers—it’s about using what you have with intention.” — Maria Thompson, Home Efficiency Consultant
Choose the Right Hangers for Maximum Efficiency
Not all hangers are created equal. A mismatched collection of wire, wooden, and plastic hangers wastes space and damages clothing. Uniform slimline velvet hangers are ideal—they prevent slippage, take up minimal space, and support delicate fabrics without stretching shoulders. For heavy coats or suits, opt for sturdy wooden hangers to maintain structure.
Hang clothes by category first (e.g., all shirts together), then subdivide by color within each group. This dual system makes outfit coordination faster and creates a visually pleasing gradient effect. Group similar items like blouses, button-downs, and t-shirts separately, even if they’re all “tops.”
Use cascading hangers sparingly. While they double hanging space, they can make it harder to see and access individual garments. Instead, maximize rod space by using front-to-back layering: place shorter items (like shirts) toward the front and longer ones (dresses, jackets) behind.
Hanger Types and Their Best Uses
| Hanger Type | Best For | Avoid With |
|---|---|---|
| Velvet/Slimline | Tops, blouses, pants | Heavy winter coats |
| Wooden | Suits, coats, structured jackets | Frequent rotation items (too bulky) |
| Plastic Contour | Shirts, polos | Delicate knits (can snag) |
| Pants Clip Hangers | Trousers, skirts | Delicate fabrics like silk |
Create Zones Using Only Hangers and Bins
Zoning turns a generic closet into a purpose-driven space. Divide your closet into functional zones based on usage frequency and item type. You don’t need labels or special hardware—just consistent placement and container use.
For example:
- Daily Wear Zone: Hang everyday tops and bottoms on the most accessible rod section. Place matching bins below for jeans, undergarments, and socks.
- Work/Professional Zone: Dedicate a separate rod segment to blazers, dress shirts, and tailored pants. Use a labeled bin for ties or belts.
- Seasonal Storage Zone: Store off-season items in clearly marked bins on high shelves. Rotate twice a year—spring and fall.
- Accessories Zone: Use small bins for hats, scarves, and gloves. Hang belts on a double-hook or roll them inside a narrow bin.
Keep shoes in flat, shallow bins or stackable trays if shelf space allows. If floor space is tight, store less-used pairs under the hanging rack in labeled boxes.
Step-by-Step: Organizing Your Closet in One Afternoon
You can complete a full closet overhaul in 3–4 hours with focus and this sequence:
- Empty the closet completely. Place items on a bed or nearby floor.
- Sort into categories. Create piles: keep, donate, repair, store seasonally.
- Wipe down shelves and rods. A clean surface prevents dust buildup and sets a fresh tone.
- Assign zones. Decide which sections will hold daily wear, work clothes, etc.
- Hang clothes by type and color. Start with long items at one end, progress to short ones.
- Fill bins with folded or small items. Use one bin per category (e.g., gym clothes, pajamas).
- Place bins on shelves or the floor beneath the rod. Stack only if stable and labeled.
- Store off-season items out of reach. Top shelves or under-bed bins work well.
- Do a final walk-through. Ask: Can I find everything easily? Is anything overcrowded?
This process works whether you have a reach-in closet, a wardrobe, or a standalone garment rack. The principles scale down or up depending on your space.
Real Example: Transforming a Shared Bedroom Closet
Sarah and James shared a small 4-foot-wide closet in their apartment. Before reorganizing, clothes were piled on the floor, hangers faced every direction, and finding a matching sock took minutes. They had no budget for built-ins and couldn’t drill into walls.
They bought eight identical fabric bins ($20 total) and 25 velvet hangers ($30). They cleared the closet, sorted everything, and donated three garbage bags of unused clothing. They designated the left rod for Sarah’s blouses and dresses, the right for James’ shirts and jackets. Pants were clipped and hung behind.
On the single shelf, they placed four bins: one for Sarah’s scarves, one for James’ ties, one for workout clothes, and one for sleepwear. Two bins went on the floor for socks and underwear. Seasonal sweaters were stored in a labeled bin on top of the closet.
The result? Both could dress faster, laundry sorting improved, and the space felt twice as large—all for under $50 and four hours of effort.
Common Mistakes to Avoid
Even with the right tools, poor habits can undo your progress. Watch out for these pitfalls:
- Overcrowding rods: If hangers don’t glide freely, you have too many items. Rotate out less-used pieces.
- Mixing categories: Don’t combine casual tees with work blouses. Separation reduces decision fatigue.
- Using mismatched bins: Random containers create visual chaos. Stick to one style and color.
- Ignoring height levels: Store frequently used items between waist and eye level. Keep backups above or below.
- Skipping labels: Even if you remember where things go now, memory fades. Labels help everyone in the household.
Do’s and Don’ts of Closet Organization
| Action | Do | Don’t |
|---|---|---|
| Hanging clothes | Group by type, then color | Mix formal and casual in same section |
| Using bins | Label and limit to one category per bin | Overfill or mix unrelated items |
| Storing seasonal items | Use sealed bins on high shelves | Leave them in the way of daily access |
| Choosing hangers | Use uniform, non-slip types | Keep bent wire hangers |
Frequently Asked Questions
Can I organize a small closet with just hangers and bins?
Absolutely. Small closets benefit most from simplicity. Use slim hangers to save space and stackable bins to maximize vertical storage. Avoid bulky furniture or multi-tiered systems that eat up floor area.
How do I keep my closet organized long-term?
Adopt a “one in, one out” rule: when you buy something new, donate an old item. Do a 10-minute weekly sweep to reset misaligned hangers or overflowing bins. Every season, reassess what you’re actually wearing.
What if I don’t have shelves or drawers?
No problem. Use floor-standing bins or under-hanging organizers. Place bins directly on the closet floor, grouped by category. Just ensure they don’t block the door or create tripping hazards.
Final Checklist: Your No-Frills Closet Reset
Before you finish, run through this checklist to ensure lasting success:
- ✅ Removed everything and sorted ruthlessly
- ✅ Kept only what fits, functions, and brings joy
- ✅ Used uniform hangers for all hanging items
- ✅ Grouped clothes by category and color
- ✅ Assigned bins for non-hangable items
- ✅ Labeled all bins for easy identification
- ✅ Stored off-season items out of prime space
- ✅ Cleaned rods and shelves before restocking
- ✅ Created zones for daily, work, and occasional wear
- ✅ Tested accessibility—can you reach everything easily?
Conclusion: Simplicity Lasts Longer Than Systems
Organizing a closet doesn’t require a renovation or a big investment. With just hangers and bins, disciplined sorting, and intentional placement, you can create a system that’s easy to maintain and genuinely improves your daily routine. The most effective closets aren’t the fanciest—they’re the ones that work consistently, adapt over time, and reduce stress every morning.


 浙公网安备
33010002000092号
浙公网安备
33010002000092号 浙B2-20120091-4
Comments
No comments yet. Why don't you start the discussion?