
A junk drawer is one of those household fixtures we all have but rarely manage well. It starts with good intentions—a place for batteries, rubber bands, and the odd screw—then spirals into a black hole of miscellany. By the time you need a flashlight or a stamp, it’s buried under expired coupons and broken earbuds. The myth persists that organizing it takes hours, but with the right system, you can transform chaos into order in under ten minutes. The key isn’t just tidying—it’s building functionality that sticks.
This guide breaks down a rapid yet sustainable method for taming your junk drawer using proven organizational principles. No complicated tools, no expensive bins—just smart decisions that create clarity and consistency.
The Problem with Traditional Junk Drawer “Organization”
Most attempts at organizing a junk drawer fail because they focus on appearance over function. People dump everything out, wipe the drawer, and shove items back in, maybe adding a tray or two. Within weeks, entropy returns. Why? Because they haven’t defined purpose, categorized by use, or designed for accessibility.
True organization means designing a system where every item has a logical home and retrieval is intuitive. As professional organizer Marie Kondo observed:
“Tidying is not just about cleaning up. It’s about creating a relationship between you and your belongings.” — Marie Kondo, Organizing Consultant
Your junk drawer doesn’t need perfection—it needs purpose. And that starts with a clear strategy.
Step-by-Step: The 9-Minute Junk Drawer Reset
Follow this timed sequence to reorganize your drawer efficiently. Set a timer for each step to stay focused and avoid overthinking.
- (1 min) Empty the drawer completely. Place contents on a clean surface. Do not sort yet—just remove everything.
- (2 min) Discard the obvious trash. Toss dried-up pens, broken clips, expired coupons, frayed cords, and anything unusable. Be ruthless.
- (2 min) Group like items together. Create small piles: batteries, tape, tools, office supplies, etc. This reveals what you actually own.
- (2 min) Decide what stays and what goes. Ask: Have I used this in the past 6 months? Does it serve a real purpose? If not, discard or relocate.
- (1 min) Wipe down the drawer. Use a damp cloth to clean residue, dust, or grime from the interior.
- (1 min) Reinsert only what belongs. Return only the curated items, placing them thoughtfully based on frequency of use.
This six-step process takes exactly nine minutes. The final minute is buffer time—use it to adjust or admire your work.
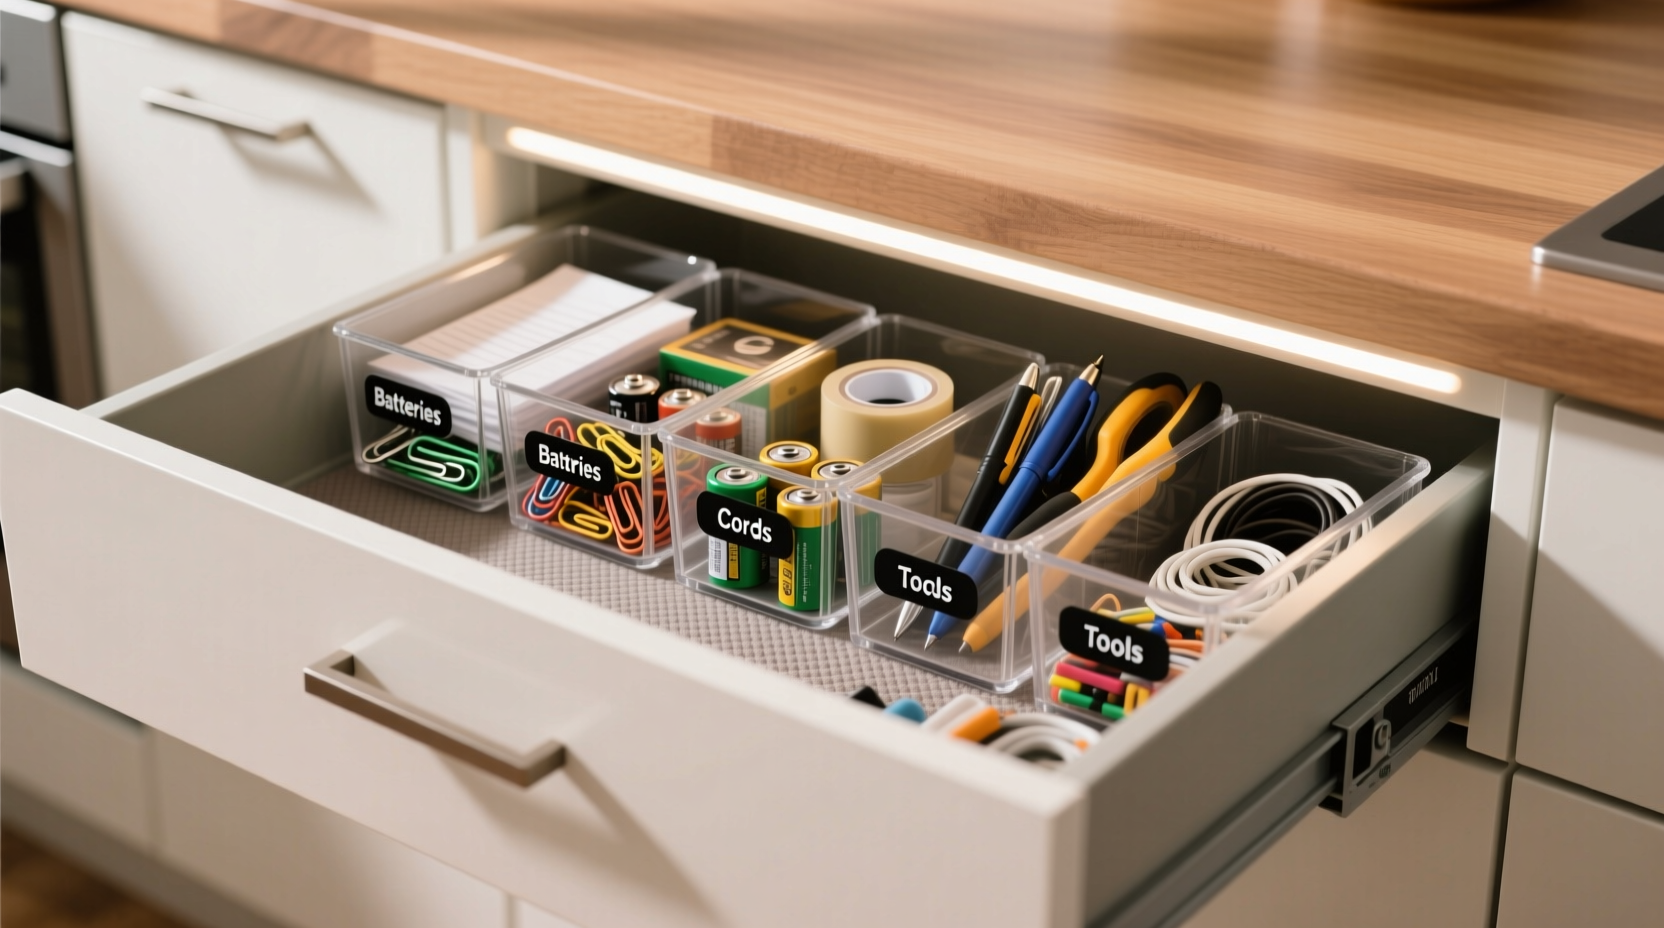
Functional Systems That Prevent Future Chaos
Speed is useful, but sustainability matters more. A truly organized junk drawer uses functional zones that match how you interact with its contents. Think of it as micro-urban planning: each category gets its district.
Use these principles to build a lasting system:
- Zone by function: Separate categories physically (e.g., office supplies vs. hardware).
- Prioritize access: Frequently used items go front and center.
- Contain with boundaries: Use dividers, trays, or repurposed containers to prevent migration.
- Label if needed: A small tag can help maintain order, especially in shared households.
For example, a stack of mint tins can hold screws, while a cut-up cardboard box creates instant compartments for batteries or thumbtacks. No need to buy specialty organizers unless you want to.
Recommended Container Options
| Container Type | Best For | Cost |
|---|---|---|
| Mint tin or film canister | Screws, nails, watch batteries | Free (repurposed) |
| Small plastic dish or saucer | Push pins, paper clips, rubber bands | $1–$3 |
| DIY cardboard divider | Creating custom sections | Free |
| Modular drawer organizer | Precision separation, long-term use | $8–$15 |
The best container is the one you’ll actually use. Start simple. Upgrade only if the system breaks down.
Real-Life Example: Sarah’s Kitchen Junk Drawer Turnaround
Sarah, a busy mother of two in Portland, had a kitchen drawer filled with loose batteries, tangled cords, old gift cards, and half-used tape rolls. She spent an average of 47 seconds per day searching for scissors. Over a year, that’s nearly five hours wasted.
Using the 9-minute method, she emptied the drawer, trashed expired items (including a 2018 coupon stack), grouped remaining contents, and built zones using a $2 ceramic dish for batteries and a repurposed tea tin for small tools. She placed frequently used scissors in the front corner.
Three months later, the drawer remains functional. Her kids know where to find tape for school projects, and she hasn’t lost a battery since. The system worked because it matched her habits—not someone else’s ideal.
Do’s and Don’ts of Junk Drawer Management
To maintain your newly organized space, follow these guidelines. They’re based on common pitfalls observed in hundreds of home audits.
| Do | Don’t |
|---|---|
| Limit the drawer to 5–7 core categories | Let it become a catch-all for everything “not elsewhere” |
| Reassess contents monthly for 30 seconds | Wait until it overflows to address it |
| Use vertical space with stackable trays | Overfill the drawer, making it hard to close |
| Store cords wrapped around a Popsicle stick | Leave cables loose and tangled |
| Keep a notepad for quick grocery lists | Fill it with random sticky notes and receipts |
The goal isn’t minimalism—it’s intentionality. Every item should earn its place.
Checklist: Maintain Your Junk Drawer System
Print or bookmark this checklist to perform a quick monthly tune-up:
- ☐ Remove all items briefly to assess clutter buildup
- ☐ Discard any new trash (dried glue, broken clips, etc.)
- ☐ Wipe down containers and drawer base
- ☐ Realign zones so high-use items remain accessible
- ☐ Confirm no single category is dominating space
- ☐ Ask: “Would someone else find this logical?”
Monthly maintenance takes less than three minutes and prevents regression.
FAQ: Common Junk Drawer Questions Answered
Can I organize a deep or wide drawer effectively without buying organizers?
Absolutely. Use everyday items: empty lipstick tubes for small screws, yogurt cups for tape, or folded cardboard to create walls. Function beats form. Many effective systems cost nothing.
How many categories should a junk drawer have?
Ideal range: 5 to 7. Too few means poor separation; too many leads to complexity. Common categories include: batteries, tools, office supplies, reusable bags, cords, emergency items, and household fixes (tape, fuses).
What if my family keeps messing it up?
Design for usability. Label zones with masking tape tags if needed. Involve others in the setup so they understand the logic. A system only works if everyone can follow it intuitively.
“The most durable organizational systems are the ones that require zero explanation.” — David Allen, Author of *Getting Things Done*
Conclusion: Build a System, Not Just a Clean Drawer
Organizing a junk drawer in under ten minutes isn’t about speed—it’s about strategy. The real win isn’t a tidy drawer today, but a functional system that lasts weeks, not days. By curating contents, zoning by use, and using simple containers, you turn chaos into clarity with minimal effort.
This isn’t just about one drawer. It’s a model for managing clutter anywhere: glove compartments, bathroom cabinets, or desk drawers. Once you see how a little structure improves daily life, you’ll want to replicate it everywhere.


 浙公网安备
33010002000092号
浙公网安备
33010002000092号 浙B2-20120091-4
Comments
No comments yet. Why don't you start the discussion?