
A junk drawer is one of those household features that starts with good intentions—“We’ll just keep the odd things here”—and ends in chaos. Rubber bands, loose batteries, expired coupons, twist ties, and mystery screws accumulate until opening the drawer feels like unleashing a tiny avalanche. But it doesn’t have to stay that way. With a clear system, intentional organization, and sustainable habits, you can transform your junk drawer from a dumping ground into a functional, efficient space that actually helps you find what you need—when you need it.
The key isn’t just cleaning it out once. It’s about designing a system that prevents clutter from building up again. This means rethinking what belongs in the drawer, how items are stored, and how often the system is maintained. When done right, an organized junk drawer saves time, reduces frustration, and supports daily efficiency.
Step 1: Empty and Evaluate Everything
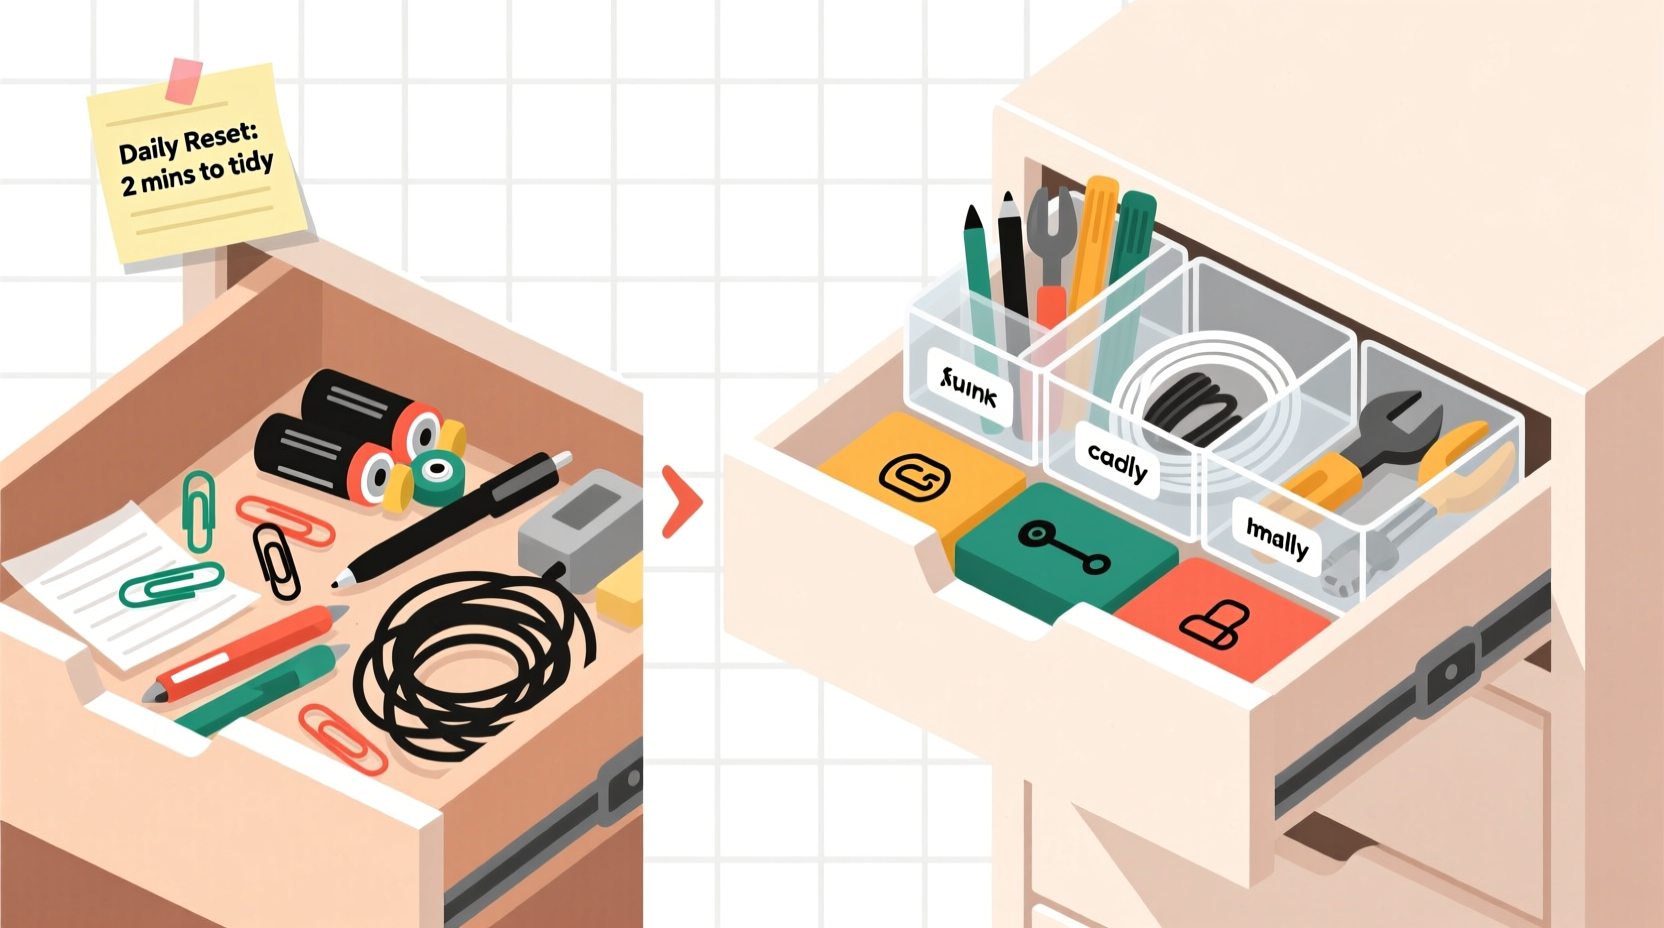
The first step in reclaiming your junk drawer is to remove every single item. Place them on a clean surface where you can see everything clearly. This visual audit reveals just how much has accumulated—and why.
Go through each object and ask: Do I use this? Do I need this? Does it belong here? Be ruthless. If something hasn’t been used in over a year, is broken, expired, or duplicates another item elsewhere in the house, discard or donate it.
- Expired batteries, old pens, dried-up glue sticks, and frayed cords should be discarded.
- Duplicate items (like five rubber bands) can be reduced to one small bundle.
- Items that belong elsewhere—scissors, tape, notepads—should be relocated to their proper storage zones.
This process isn’t just about decluttering—it’s about understanding your household’s actual needs. You might discover you go through batteries quickly but never use push pins. That insight shapes how you organize going forward.
Step 2: Define What Belongs in the Junk Drawer
Contrary to its name, a “junk” drawer shouldn’t hold junk. It should function as a utility drawer—home to frequently used, miscellaneous tools that don’t fit neatly into other categories. Think of it as a command center for everyday fixes and quick tasks.
Define a shortlist of acceptable categories. Common essentials include:
- Small tools: screwdrivers, scissors, tweezers, pliers
- Fasteners: rubber bands, paper clips, binder clips, safety pins
- Batteries (with terminals covered for safety)
- Tape (small roll), sticky notes, pens, pencils
- Zip ties, twist ties, string
- Flashlight or mini LED light
- Measuring tape
- Sticky tack or poster putty
Avoid letting the drawer become a catch-all for expired coupons, random keys, or unsorted cables. These items belong in designated spots—or not at all.
“An organized junk drawer isn’t empty—it’s curated. Every item earns its place.” — Sarah Lin, Home Organization Consultant
Step 3: Use Dividers and Containers for Structure
Once you’ve narrowed down what stays, the next step is containment. Without structure, even a cleaned-out drawer will revert to chaos within weeks.
Use drawer organizers, trays, or DIY solutions like small containers to create dedicated zones. Options include:
- Adjustable plastic dividers: Ideal for standard kitchen drawers; customizable to fit different-sized items.
- Mailing boxes or mint tins: Reuse small cardboard boxes or metal tins to corral similar items (e.g., batteries in a film canister).
- Silicone cupcake liners: Place inside larger containers to separate tiny objects like screws or thumbtacks.
- Pill organizer: Perfect for storing button batteries by type (AA, AAA, etc.).
| Item Type | Best Storage Method | Avoid |
|---|---|---|
| Batteries | Plastic container or pill organizer with labels | Loose in drawer or mixed together |
| Fasteners | Mini jars or divided tray | Piled together without separation |
| Tools | Dedicated slot or small pouch | Tossed loosely with soft items |
| Pens/Pencils | Vertical holder or angled tray | Lying flat under other items |
| Cables | Not recommended in junk drawer | Knotted or tangled lengths |
Labeling containers adds clarity. Even if you know where things go, others in the household may not. A simple tag like “Batteries – AA/AAA” or “Rubber Bands & Clips” makes maintenance easier for everyone.
Step 4: Implement a Maintenance Routine
The true test of any organizational system is sustainability. A junk drawer can stay tidy only if it’s regularly reviewed and corrected.
Set a monthly 5-minute check-in: open the drawer, scan contents, and reset any displaced items. During this time:
- Remove trash or broken items.
- Return misplaced objects to their zones.
- Replenish supplies if needed (e.g., replace used tape).
- Ask: Has anything new started accumulating? Adjust zones as necessary.
This habit prevents slow decay. Just like brushing your teeth, a small daily or weekly effort prevents bigger problems later.
Real-Life Example: The Johnson Family Drawer Makeover
The Johnsons had a deep kitchen drawer they called “the black hole.” It held spare change, dead remotes, three types of tape, and a collection of unidentified screws. After one too many late-night flashlight hunts, they decided to reorganize.
They emptied the drawer, removed expired items, and categorized what remained. They installed a $7 adjustable divider set and labeled each section. Batteries went into a small plastic case, fasteners into repurposed spice jars, and tools into a fabric wrap.
They also established a rule: if something doesn’t belong, it doesn’t stay. Within two months, family members were using the drawer correctly. The dad found himself reaching for it during homework help (“Need a pencil? Check the junk drawer.”). The mom appreciated not having to search three cabinets for tape.
It wasn’t perfection—but it was progress. And more importantly, it stayed functional because they committed to a quick monthly review.
Step 5: Prevent Future Clutter with Smart Habits
Organization isn’t a one-time fix. It’s a combination of design and behavior. To keep your junk drawer tidy for good, adopt these long-term strategies:
- Enforce a one-in, one-out rule: For every new item added, remove an old one. Bring in a new tape dispenser? Toss the dried-up one.
- Designate a “maybe” box: When unsure whether to keep something, place it in a small container outside the drawer. If you haven’t reached for it in 30 days, donate it.
- Limit capacity: Choose a drawer organizer that fits snugly, leaving no extra space for junk to creep in.
- Teach household members: Show everyone where things go and why the system matters. Kids can learn early that “just tossing it in the junk drawer” isn’t allowed.
- Reassess quarterly: Seasons change, needs evolve. A spring clean-up might reveal you now need gardening tags or holiday lights fuses.
These habits shift the mindset from passive accumulation to active management. The drawer becomes less of a storage void and more of a tool kit.
Checklist: How to Organize Your Junk Drawer for Good
- ✅ Empty the entire drawer onto a flat surface
- ✅ Sort items into Keep, Discard, Relocate piles
- ✅ Wipe down the drawer interior
- ✅ Define what belongs: useful, frequently used items only
- ✅ Choose and install organizers (dividers, trays, containers)
- ✅ Group similar items and assign zones
- ✅ Label containers for clarity
- ✅ Store batteries safely (covered terminals)
- ✅ Set a monthly maintenance reminder
- ✅ Train household members on the system
Frequently Asked Questions
Can I have more than one junk drawer?
Yes—if each serves a distinct purpose. For example, a kitchen junk drawer might hold cooking tools and tape, while a home office drawer stores paper clips and USB drives. The key is specialization, not duplication. Avoid having multiple chaotic drawers by spreading clutter thin.
What if my drawer is too shallow for organizers?
Use low-profile solutions: flat tins, folded cardboard dividers, or adhesive-backed fabric pockets. You can also mount a small magnetic strip inside the drawer front to hold metal items like scissors or tweezers, freeing up floor space.
How do I stop kids from turning it back into a mess?
Involve them in the organizing process. Let them pick colors for containers or help label sections. Create a simple visual guide (words or pictures) taped inside the drawer front. Consistency from adults models the behavior they’ll follow.
Conclusion: A Tidy Junk Drawer Is a Win Worth Keeping
An organized junk drawer is more than a neat trick—it’s a symbol of intentionality. It reflects a home where small things are respected, systems are trusted, and daily friction is reduced. You’re not just organizing a drawer; you’re creating ease in moments when you’re looking for a battery at 9 p.m. or need a rubber band in a hurry.
The method is simple: purge, define, contain, maintain. But the impact is lasting. Once you experience the relief of opening a drawer and finding exactly what you need—no digging, no frustration—you’ll wonder why you waited so long.


 浙公网安备
33010002000092号
浙公网安备
33010002000092号 浙B2-20120091-4
Comments
No comments yet. Why don't you start the discussion?