
A cluttered pantry doesn’t just make meal prep harder—it can also lead to wasted food, forgotten ingredients, and daily frustration. Many people assume that a beautifully organized pantry requires matching containers, uniform labels, and hours of shopping for the perfect set. But in reality, most households already have an assortment of jars, tubs, and boxes—some from takeout meals, others repurposed from grocery items. The good news? You don’t need to replace everything to create a functional, visually calming space. With the right approach, you can organize a pantry with mismatched containers effortlessly and efficiently.
The key lies not in perfection but in consistency of system. By focusing on accessibility, visibility, and logical grouping, even the most eclectic collection of containers can become part of a streamlined storage solution. This guide walks through practical steps, real-world applications, and expert-backed methods to turn your current chaos into a highly usable pantry—no shopping required.
Assess and Declutter First
Before arranging any container, begin with a full inventory. Remove everything from your pantry and place it on a nearby counter or table. This step is critical because it forces you to see what you actually own, rather than guessing based on obscured shelves.
As you pull items out, sort them into categories: dry goods (pasta, rice, grains), baking supplies (flour, sugar, cocoa powder), snacks, canned goods, oils and condiments, and spices. While sorting, check expiration dates and dispose of anything stale or expired. Consider donating unopened, non-perishable items you know you won’t use.
Once decluttered, evaluate your existing containers. Keep only those that are airtight, clean, and free of cracks or odors. Glass jars from sauces, plastic deli containers, and reusable silicone bags all qualify if they seal well. Discard warped lids or stained plastics that may harbor bacteria.
Create a Smart Storage System
Organization isn’t about aesthetics alone—it’s about function. Even mismatched containers can support a cohesive system when grouped by purpose and stored logically. Follow these principles to maximize usability:
- Group like with like: Store all grains together, all baking essentials in one zone, and snacks in another. This reduces decision fatigue during cooking.
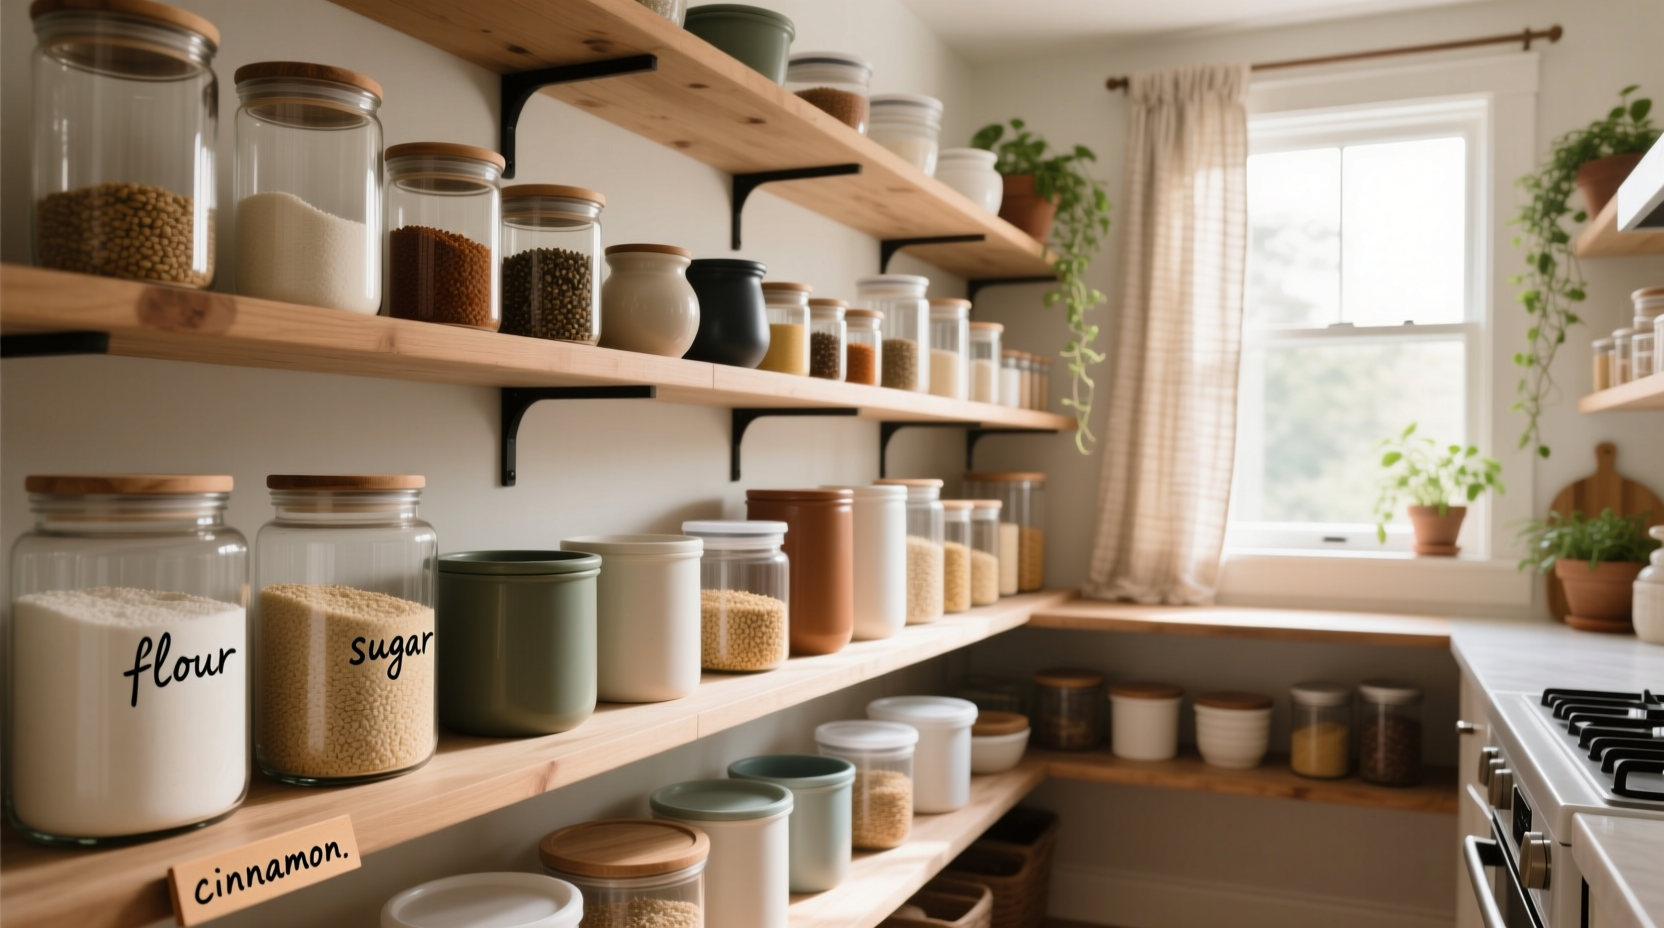
- Use clear containers whenever possible: Transparency allows you to see contents without opening each one, saving time and reducing spills.
- Standardize where you can: If you have several small spice jars, consider transferring spices into identical small glass bottles—even if the rest of your pantry remains varied.
- Prioritize shelf height: Place frequently used items between waist and eye level. Reserve top shelves for lightweight, rarely used goods and bottom shelves for heavy items like liquids or bulk bags.
“Functionality trumps uniformity every time. A well-organized pantry should reflect how you cook, not how it looks in a magazine.” — Lena Patel, Home Organization Consultant
Label Everything Consistently
One of the biggest challenges with mismatched containers is identifying contents quickly. A consistent labeling strategy bridges the visual gap between different shapes and sizes.
You don’t need a label maker. Use masking tape and a fine-tip marker, or chalkboard stickers for a reusable option. Write the item name and, optionally, the purchase or expiration date. For families, include icons or color-coding—like green dots for kid-friendly snacks—to help children participate in kitchen tasks.
| Labeling Method | Best For | Pros | Cons |
|---|---|---|---|
| Chalkboard stickers | Frequent ingredient changes | Reusable, customizable | Can smudge, requires chalk marker |
| Masking tape + pen | Budget-conscious organizing | Inexpensive, easy to apply | May peel over time |
| Label maker | Permanent organization | Clean, professional look | Less flexible for changes |
| Washi tape + handwriting | Decorative pantries | Stylish, removable | Not durable long-term |
Maximize Space with Simple Upgrades
You don’t need custom shelving to improve pantry efficiency. Low-cost accessories can dramatically increase usability, especially when dealing with irregularly shaped containers.
Consider adding tiered shelf organizers to bring back-row items forward. Can stackers work well for soup cans or protein bars. Lazy Susans are ideal for corner spaces or bottles of oil and vinegar. Baskets or bins can group smaller containers—like snack pouches or tea bags—into unified zones, minimizing visual clutter.
If your pantry has deep shelves, install under-shelf baskets to double vertical space. These are perfect for holding spice jars or small sauce containers that might otherwise get lost behind larger items.
Step-by-Step: Organizing Your Mismatched Pantry
- Empty the pantry completely. Wipe down shelves and inspect for pests or spills.
- Sort all items into broad categories. Dry goods, baking, snacks, canned, oils, spices, etc.
- Select appropriate containers. Transfer bulk or open items into airtight options you already own.
- Label each container clearly. Use consistent font and placement (e.g., front center).
- Assign zones based on usage frequency. High-use items at eye level; backups above or below.
- Add organizational tools. Insert bins, turntables, or risers where needed.
- Restock mindfully. Place heavier items on lower shelves and align labels outward for quick scanning.
- Review monthly. Adjust placements based on actual use and restock patterns.
Real Example: Sarah’s Busy Household Pantry
Sarah, a mother of three in Portland, struggled with a chaotic pantry filled with takeout containers, old yogurt tubs, and half-empty cereal boxes. Her family wasted time searching for snacks, and ingredients often expired unnoticed.
She decided to reorganize using only what she already had. She cleaned out expired goods, transferred pasta and rice into washed pickle jars and deli containers, and labeled each with masking tape. She grouped snacks in woven baskets and placed them on a middle shelf accessible to her kids. Oils and vinegars went on a lazy Susan in the door. Baking supplies were consolidated into two large plastic bins—one for flours, one for sugars and leaveners.
Within two hours, her pantry was transformed. Though the containers didn’t match, the consistent labeling and zoning made the space feel orderly. “I don’t waste time looking anymore,” she said. “And my kids can find their own snacks, which is a win.”
Common Mistakes to Avoid
- Over-prioritizing aesthetics: Spending money on matching sets before fixing underlying storage issues leads to temporary satisfaction and ongoing inefficiency.
- Ignoring container functionality: A beautiful jar that doesn’t seal properly will expose food to moisture and pests.
- Clustering by container type instead of food type: Don’t store all glass jars together if they contain unrelated items. Group by use, not form.
- Skipping the labeling step: Without labels, even familiar containers become mystery boxes after a few weeks.
- Blocking airflow: Overcrowding shelves traps humidity and accelerates spoilage, especially in warm climates.
FAQ
Can I use takeout containers for pantry storage?
Yes, if they’re made of rigid, food-safe plastic and have secure, airtight lids. Avoid thin or cracked containers. Wash thoroughly before reuse and label clearly to prevent confusion.
How do I keep mismatched containers from looking messy?
Focus on consistency in labeling and alignment. Arrange containers so labels face forward and group similar items together. Use baskets or trays to create visual boundaries between zones.
What if I run out of containers?
Instead of buying new ones, gradually collect suitable jars and tubs from household consumption. Save glass sauce jars, sturdy yogurt pots, or reusable produce clamshells. Clean and inspect them for future use.
Final Checklist: Pantry Readiness
- ✅ Pantry fully emptied and cleaned
- ✅ Expired or unused items discarded or donated
- ✅ All dry goods transferred into airtight containers
- ✅ Containers labeled with contents and dates
- ✅ Zones established (baking, snacks, grains, etc.)
- ✅ Frequently used items at eye level
- ✅ Organizers (bins, turntables, risers) installed
- ✅ Monthly review scheduled on calendar
Conclusion: Start Where You Are
You don’t need a perfectly coordinated set of containers to have a functional pantry. In fact, the most sustainable and practical systems grow organically from what you already use and love. By embracing your mismatched collection and applying smart organization principles—clear labeling, thoughtful zoning, and strategic storage—you create a space that works for your life, not against it.
The goal isn’t Instagram-worthy symmetry. It’s confidence: knowing exactly where your quinoa is, seeing what needs replenishing, and saving time every time you cook. That kind of order is effortless not because it lacks effort, but because the effort was invested wisely.


 浙公网安备
33010002000092号
浙公网安备
33010002000092号 浙B2-20120091-4
Comments
No comments yet. Why don't you start the discussion?