
A small bathroom doesn’t have to mean cramped, cluttered, or chaotic. With thoughtful planning and strategic use of vertical space, even the tiniest powder room can feel functional, clean, and stylish. Floating shelves are one of the most effective tools in modern bathroom organization—offering storage without sacrificing floor space. When paired with clever storage solutions, they transform underutilized walls into organized hubs for daily essentials.
The key is not just adding shelves but designing a system that matches your routine, habits, and available square footage. This guide dives into practical ways to implement floating shelves and other space-saving techniques to make your compact bathroom work smarter—not harder.
Why Floating Shelves Are Ideal for Small Bathrooms
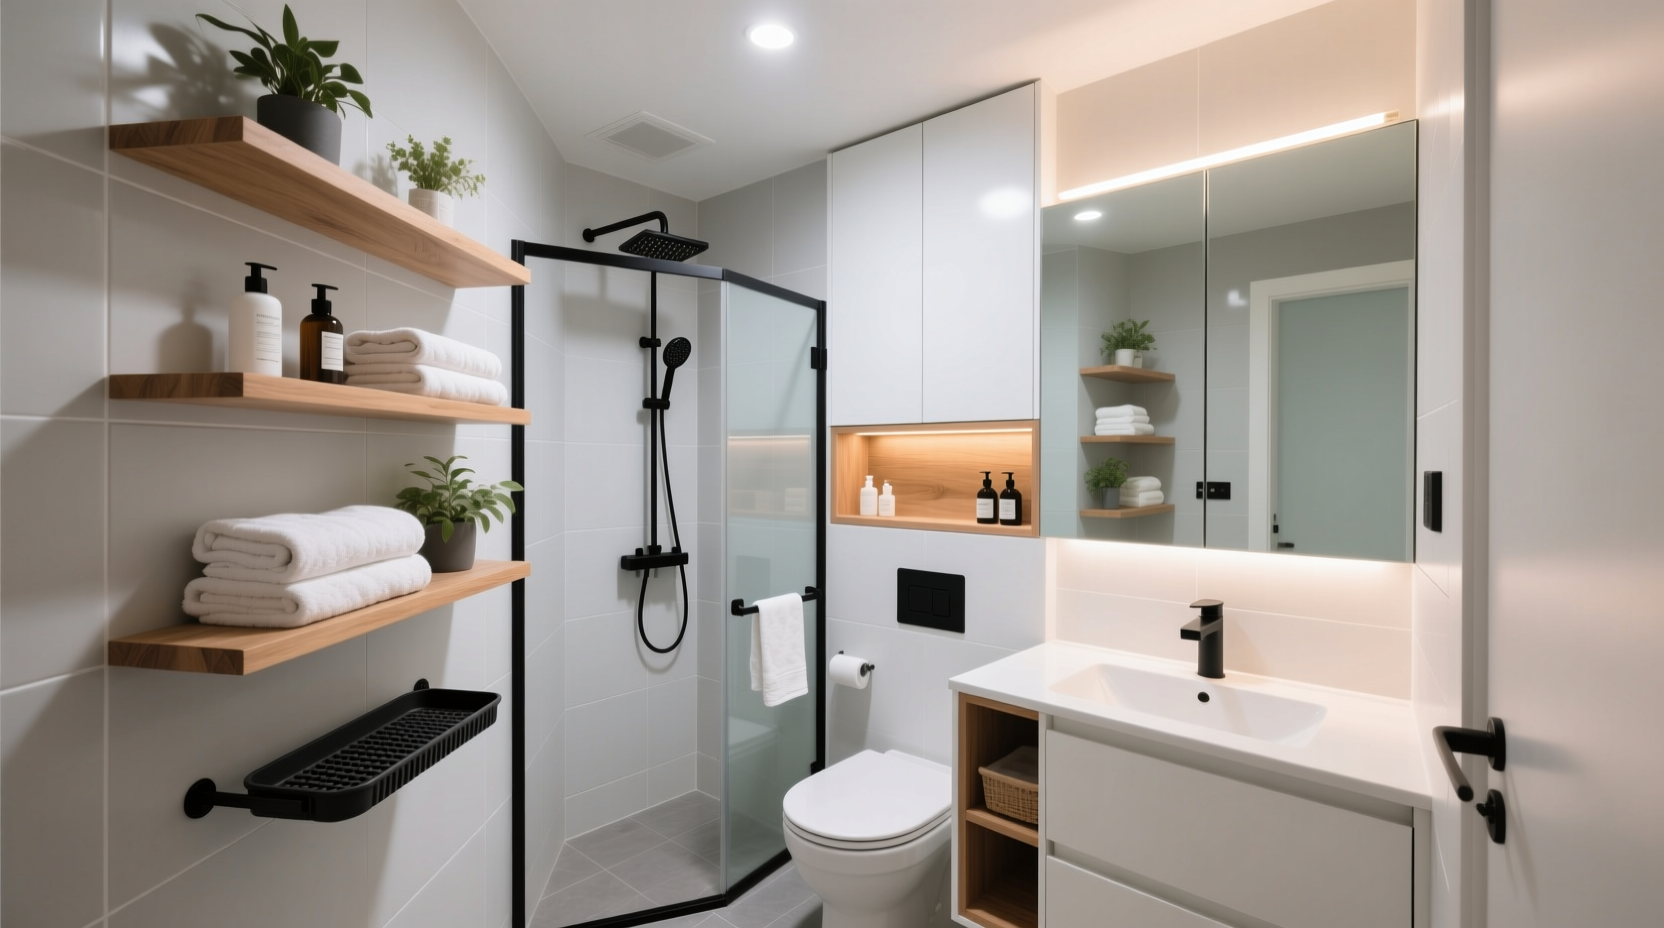
Floor space in a small bathroom is precious. Traditional cabinets and vanities eat up valuable square footage and can make the room feel boxed in. Floating shelves solve this by moving storage upward, freeing up floor area and creating visual lightness.
Unlike bulky furniture, floating shelves maintain sightlines across the room, preserving an open feel. They also offer flexibility: you can install them at varying heights to accommodate different items, from tall shampoo bottles to folded hand towels.
“Floating shelves are a game-changer in small bathrooms. They provide accessible storage while enhancing the perception of space.” — Dana Richards, Interior Designer & Small Space Specialist
Beyond aesthetics, these shelves support daily usability. Placing frequently used items within easy reach reduces clutter on countertops and inside cabinets. When installed correctly, they’re durable enough to hold glass jars, ceramic dispensers, and even small plants.
Smart Placement: Where to Install Floating Shelves
Not all wall space is equal. Strategic placement ensures maximum utility without interfering with movement or function.
- Above the toilet: One of the most underused zones. A narrow shelf here holds rolled towels, decorative baskets, or daily skincare products.
- Beside the sink: Perfect for storing toothbrushes, cotton pads, or perfume. Keeps counters clear while keeping essentials visible.
- Near the shower (outside): Install moisture-resistant shelves just beyond the splash zone for post-shower lotions or a loofah.
- Opposite the mirror: If wall space allows, add a longer shelf for display items like candles or spare soap, balancing visual weight.
Avoid placing shelves directly over electrical outlets or obstructing ventilation grilles. Always check stud locations before mounting to ensure stability—especially if storing heavier items.
Step-by-Step: Installing Floating Shelves Safely
- Choose the right material: Solid wood, bamboo, or waterproof MDF are ideal for humid environments.
- Measure and mark height: Standard eye-level shelving starts around 5–6 feet from the floor. Adjust based on user height.
- Locate wall studs: Use a stud finder. Anchors alone may not support long-term weight in drywall.
- Drill pilot holes and mount brackets: Ensure they’re level using a bubble level tool.
- Attach the shelf: Slide it onto brackets or secure with screws from below.
- Test load capacity: Start with light items, gradually increasing weight.
Smart Storage Hacks Beyond Shelves
Floating shelves are powerful, but combining them with other space-saving ideas creates a truly optimized bathroom.
Use Vertical Stackable Organizers
Inside medicine cabinets or under-sink areas, stackable bins maximize depth. Clear acrylic containers let you see contents instantly, reducing rummaging time.
Install Over-the-Door Hooks and Racks
The back of the bathroom door is often wasted. Slim over-the-door organizers hold hair tools, cleaning cloths, or guest toiletries. Choose rust-resistant models for longevity.
Leverage Magnetic Strips
Mount a magnetic strip inside a cabinet door to hold bobby pins, tweezers, or nail clippers. It keeps metal tools off shelves and prevents loss.
Add a Tiered Tray on the Counter
If you must keep a few items out, use a tiered tray to create levels. Group similar items—e.g., hand soap, lotion, and a candle—for a neat, intentional look.
Hang a Corner Shelf
Perfect for awkward corners near showers or sinks. Triangular or circular corner shelves utilize dead space and add architectural interest.
| Solution | Best For | Space Saved |
|---|---|---|
| Floating Shelves | Daily-use items, decor | High (floor space) |
| Over-the-Door Organizer | Tools, towels, extras | Medium |
| Magnetic Strip | Small metal tools | Low (but highly efficient) |
| Corner Shelf | Shower edges, tight walls | Medium |
| Stackable Bins | Under-sink storage | High (depth utilization) |
Real-Life Example: Transforming a 3x5-Foot Bathroom
Jamie, a city apartment dweller, faced constant frustration in her 3x5-foot bathroom. The vanity had limited drawer space, and the medicine cabinet was shallow. Towels piled on the toilet tank, and toiletries cluttered the sink edge.
She started by removing everything and sorting items into “daily,” “weekly,” and “rarely used” categories. The rarely used items—guest soaps, extra razors—were moved to a hallway closet.
Next, she installed two floating shelves: one above the toilet (holding folded hand towels and a small plant) and another beside the sink (featuring labeled glass jars for cotton balls and Q-tips). She added an over-the-door rack for blow-dryer storage and used a magnetic strip inside the cabinet for grooming tools.
The result? Countertop cleared completely. Daily routines became faster, and the room felt twice as large. Jamie reported feeling less stressed each morning simply because the space felt intentional and calm.
Do’s and Don’ts of Small Bathroom Organization
| Do | Don't |
|---|---|
| Group like items together (e.g., skincare, haircare) | Store expired medications or old cosmetics |
| Label containers for quick identification | Overcrowd shelves—leave breathing room |
| Use uniform containers for a clean look | Install shelves too high or too low for access |
| Wipe down shelves weekly to prevent mildew | Use non-waterproof materials near wet zones |
| Reassess storage every 3 months | Ignore ventilation needs when sealing items |
Creating Zones for Better Flow
Efficient small bathrooms benefit from designated zones—areas dedicated to specific functions. This reduces decision fatigue and keeps traffic patterns smooth.
- Grooming Zone: Around the mirror and sink. Store toothbrush, face wash, and moisturizer here.
- Shower Zone: Inside or just outside the tub. Use caddies or nearby shelves for shampoo, body wash, and loofahs.
- Towel Zone: On hooks or a rail near the shower. Limit to two towels per person to avoid pile-up.
- Utility Zone: Under the sink or in a cabinet. Keep cleaning supplies, spare toilet paper, and first-aid items here.
By assigning each category a home, you eliminate random placement and reduce daily clutter. Floating shelves play a central role in defining these zones visibly and accessibly.
Essential Checklist: Organize Your Small Bathroom in 7 Steps
- Empty all cabinets, drawers, and surfaces.
- Sort items into categories: skincare, haircare, dental, cleaning, etc.
- Purge expired products, duplicates, and unused items.
- Decide on functional zones (grooming, shower, towel, utility).
- Install floating shelves in key areas (above toilet, beside sink).
- Add supporting organizers (over-the-door racks, stackable bins, magnetic strips).
- Label containers and place items back by zone.
Repeat this process quarterly to maintain order and adapt to changing needs.
Frequently Asked Questions
Can I install floating shelves in a rental bathroom?
Yes, but choose lightweight shelves that use adhesive strips or removable anchors if drilling isn’t allowed. Brands like Command offer heavy-duty hanging solutions suitable for small loads. Always confirm with your landlord first.
How do I keep shelves from getting damp or moldy?
Wipe shelves weekly with a dry or slightly damp cloth. Avoid leaving wet bottles directly on wood. Use silicone coasters or trays underneath items prone to dripping. Ensure good ventilation—run the exhaust fan during and after showers.
What’s the ideal shelf depth for a bathroom?
Between 6 and 8 inches is optimal. It’s deep enough to hold standard toiletries but shallow enough to avoid protruding into walkways. For tighter spaces, 4–5 inch shelves work well for narrow items like rolls of tape or small jars.
Final Thoughts: Small Space, Big Impact
Organizing a small bathroom isn’t about fitting more in—it’s about making what you already own work better. Floating shelves are more than decorative accents; they’re functional anchors in a streamlined system. Paired with smart storage choices, they turn limitations into opportunities for creativity and efficiency.
The transformation doesn’t require a renovation. It starts with one shelf, one decluttering session, one decision to prioritize clarity over clutter. When your bathroom supports your routine instead of complicating it, the effect ripples into your day—a little more calm, a little more control.


 浙公网安备
33010002000092号
浙公网安备
33010002000092号 浙B2-20120091-4
Comments
No comments yet. Why don't you start the discussion?