
A cluttered closet doesn’t need to stay that way—especially when you’re on a tight budget. With a little creativity and the right tools, even the smallest closet can become a highly functional storage space. The best part? You don’t need to spend hundreds at specialty home stores. A trip to your local dollar store can yield all the organizational tools you need to transform chaos into order. From stackable bins to adhesive hooks, these affordable finds can be combined strategically to maximize vertical space, streamline access, and create a system that actually works long-term.
The key isn’t just buying organizing products—it’s using them wisely. Most people overlook the potential of inexpensive items because they assume “cheap” means “ineffective.” But with thoughtful planning and smart placement, dollar store supplies can outperform pricier alternatives. This guide walks you through how to assess your space, select the right tools, and implement a professional-grade organization system—all without breaking the bank.
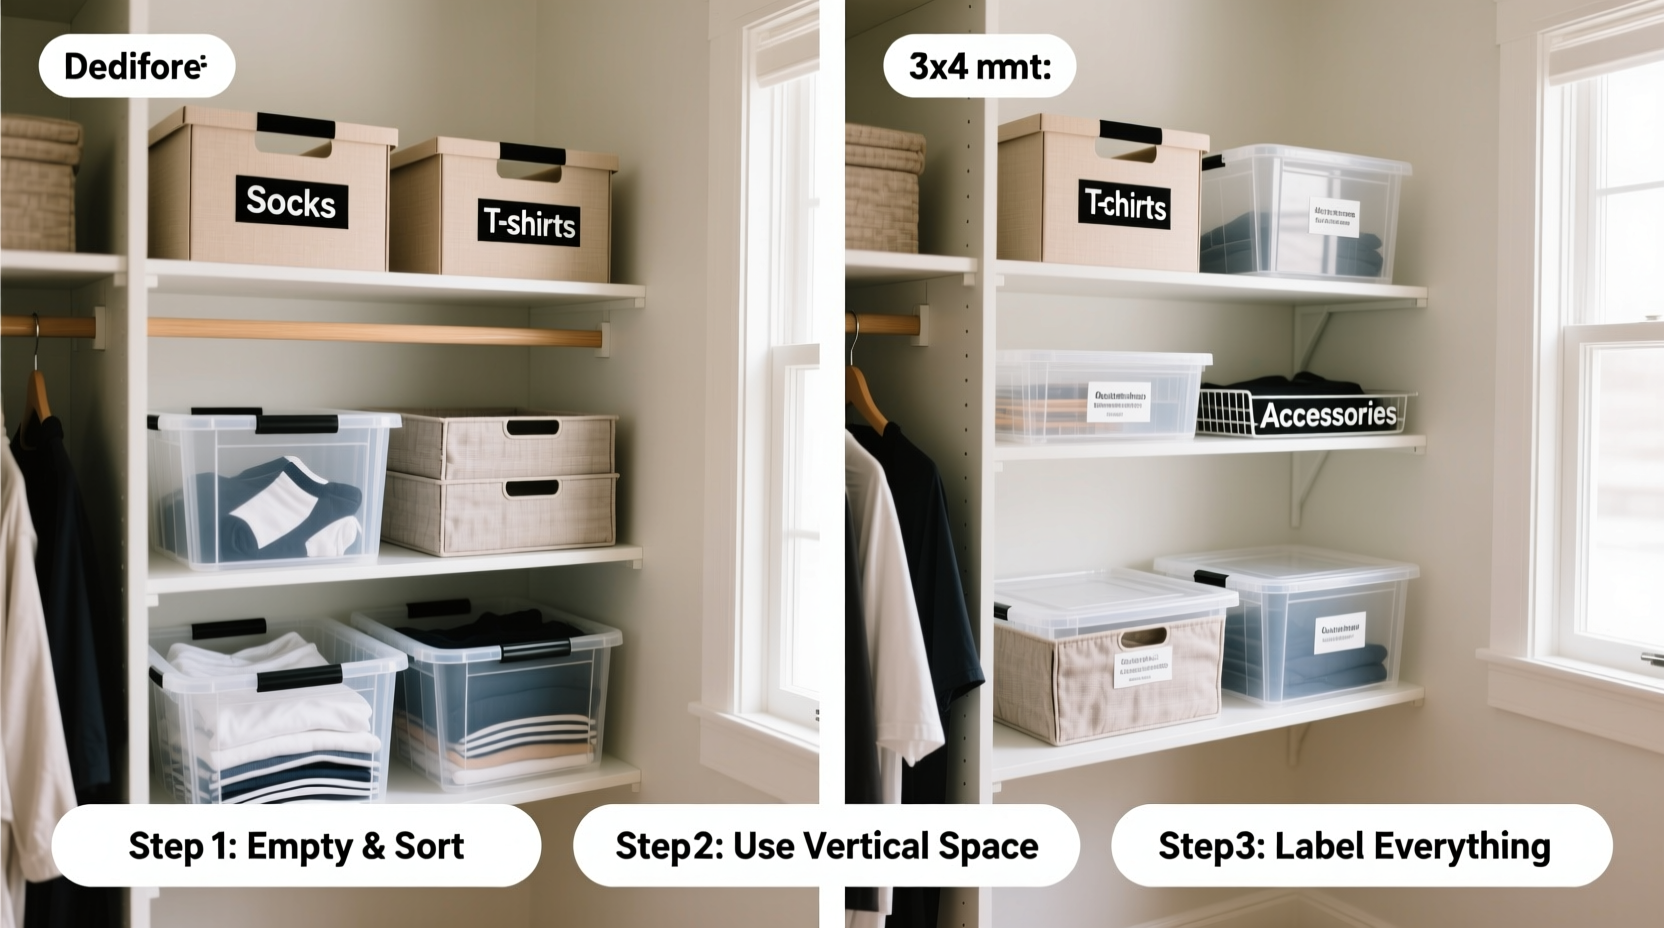
Assess Your Closet: Measure, Declutter, and Plan
Before purchasing a single bin or hook, take time to evaluate your current setup. A successful organization project starts with understanding what you have, how much space is available, and what kind of storage challenges you face.
- Empty the closet completely. This allows you to see the full dimensions and identify underused areas like corners, back panels, or overhead space.
- Measure every dimension: height, width, depth, shelf spacing, and rod height. Write these down—you’ll refer to them when selecting containers.
- Sort everything into categories: tops, pants, dresses, accessories, shoes, etc. Be honest about what you actually wear. If an item hasn’t been used in over a year, consider donating it.
- Identify pain points: Do scarves get tangled? Are shoes stacked haphazardly? Is folded clothing constantly falling over? Note these issues—they’ll inform your supply list.
Dollar Store Supplies That Work Like Premium Organizers
Many dollar store items are made from durable plastic, sturdy fabric, or strong metal alloys. When selected carefully, they perform just as well as high-end versions—sometimes better, because they’re lightweight and modular. Here’s a breakdown of the most effective supplies and how to use them.
| Item | Best For | Pro Tip |
|---|---|---|
| Stackable clear bins (small/medium) | Folded tees, sweaters, pajamas | Label fronts with masking tape + marker for instant visibility |
| Plastic drawer organizers | Socks, underwear, accessories | Place inside larger bins to subdivide space efficiently |
| Over-the-door shoe organizer | Shoes, hats, scarves, toiletries | Hang on the back of the closet door—use pockets for bulky items like beanies |
| Adhesive hooks (pack of 6) | Belts, robes, bags, jewelry | Install at eye level for easy reach; pair with tension rods below for hanging zones |
| Tension curtain rods (plastic or metal) | Creating double hang zones, scarf racks, bag holders | Cut to fit between side walls for adjustable shelving support |
| Wire mesh baskets | Toiletries, seasonal items, rolled jeans | Nest on shelves to elevate items and improve airflow |
Don’t underestimate multipurpose items. A $1 shower caddy, for example, can be mounted horizontally on a wall to hold handbags. A plastic cutlery tray fits perfectly inside a deep drawer to corral tank tops or workout gloves. The trick is repurposing with intention.
Step-by-Step: Build Your System in One Afternoon
You don’t need days to reorganize. Follow this proven sequence to complete your closet overhaul in under four hours.
- Prep (30 minutes): Empty the closet, wipe down shelves, vacuum the floor. Sort clothing into keep/donate piles.
- Purchase supplies (45 minutes): Visit one or two dollar stores with your measurements and list. Stick strictly to planned items—avoid impulse buys.
- Install fixed elements (30 minutes): Mount over-the-door organizers, attach adhesive hooks, set tension rods. Let adhesives cure if needed.
- Layer in containers (45 minutes): Place stackable bins on shelves. Insert drawer dividers. Label each container by category.
- Assign and hang clothing (60 minutes): Hang frequently worn items at eye level. Fold bulky knits vertically in bins. Use slim hangers (also available at dollar stores) for uniformity.
- Final review (15 minutes): Step back and test access. Can you reach everything easily? Is there wasted space? Adjust as needed.
Real Example: Transforming a 3x4 Foot Reach-In Closet
Jamie, a teacher living in a studio apartment in Portland, struggled with a cramped closet that held her entire wardrobe. Shoes were piled on the floor, belts tangled on the rod, and folded clothes collapsed into messy heaps. After reading about budget organizing, she visited her local Dollar Tree with a measuring tape and a plan.
She bought two over-the-door shoe organizers (one for shoes, one repurposed for scarves and clutches), six stackable bins, a pack of adhesive hooks, and three tension rods. She installed the shoe organizer on the back of the door, added hooks along the side panel for belts, and placed tension rods horizontally above the main rod to create a second hanging tier for lightweight jackets.
The stackable bins went on the top shelf—each labeled: “Work Tops,” “Loungewear,” “Sweaters.” She kept daily-use items at eye level and stored off-season pieces in under-bed bins. Total cost: $18.75. Now, Jamie opens her closet and sees everything instantly. “It feels like I doubled my space,” she says. “And I didn’t have to move or renovate.”
Expert Insight: Why Simplicity Wins
Professional organizers often emphasize functionality over aesthetics. As Maria Tran, certified home efficiency consultant, explains:
“Most closet failures happen because systems are too complicated. If it takes more than 10 seconds to put something away, people stop using it. Dollar store supplies work because they’re simple, accessible, and replaceable. The goal isn’t perfection—it’s sustainability.” — Maria Tran, Certified Home Efficiency Consultant
This philosophy underpins every smart organization strategy: choose solutions that require minimal effort to maintain. Clear bins let you see contents at a glance. Uniform hangers prevent slippage. Vertical folding keeps stacks stable. These small efficiencies add up to lasting order.
Do’s and Don’ts of Budget Closet Organization
Avoid common pitfalls that sabotage even the best intentions. This comparison table highlights critical dos and don’ts when using dollar store supplies.
| Do | Don't |
|---|---|
| Use matching hangers to save space and prevent slipping | Mix bulky wooden hangers with thin plastic ones |
| Label every bin—even if you think you’ll remember | Leave unlabeled containers that become “junk drawers” |
| Store heavy items on lower shelves or the floor | Stack heavy bins on top of lighter ones |
| Group by frequency of use (daily vs. seasonal) | Organize only by color or type without considering access |
| Reassess every 3 months and adjust as needed | Set it and forget it—systems evolve with lifestyle changes |
Checklist: Your Dollar Store Closet Makeover
Keep this checklist handy when shopping or implementing your plan:
- ☐ Measured closet dimensions (height, width, shelf spacing)
- ☐ Sorted and decluttered clothing (donate pile ready)
- ☐ List of needed supplies based on pain points
- ☐ Purchased: stackable bins, drawer dividers, over-the-door organizer
- ☐ Purchased: adhesive hooks, tension rods, slim hangers
- ☐ Installed fixed organizers (hooks, rods, door pockets)
- ☐ Labeled all containers clearly
- ☐ Grouped items by category and usage frequency
- ☐ Tested accessibility and made final adjustments
- ☐ Scheduled next review in 90 days
FAQ
Can dollar store bins really hold heavy clothing like sweaters?
Yes—if used correctly. Avoid overfilling and always place heavier bins on the floor or bottom shelves. Reinforce weak plastic bins by placing them inside sturdier fabric bins (also available at dollar stores) for added support.
What if adhesive hooks fall off the wall?
Surface prep is crucial. Clean the area with rubbing alcohol before applying. Press firmly for 30 seconds and wait 24 hours before hanging weight. For high-moisture areas, opt for screw-in mini hooks (some dollar stores carry them) instead.
How do I keep kids’ closets organized on a budget?
Use low shelves with clear bins labeled with pictures or words. Let children choose bin colors to increase engagement. Install hooks at their height for backpacks and jackets. Rotate seasonal items regularly to prevent overflow.
Conclusion: Small Space, Big Impact
Organizing a small closet doesn’t require luxury products or professional help. With strategic planning and resourceful use of dollar store supplies, anyone can create a streamlined, efficient system that stands the test of time. The real secret isn’t the tools—it’s consistency. A well-labeled bin only works if you return items to it. A double-hang rod is effective only if you use it daily.
Start small. Pick one section of your closet. Apply one idea from this guide. Once you see the results—a visible shelf, a tangle-free belt rack, a neatly stacked sweater bin—you’ll be motivated to keep going. Organization isn’t about achieving flawlessness; it’s about creating ease in your everyday life.


 浙公网安备
33010002000092号
浙公网安备
33010002000092号 浙B2-20120091-4
Comments
No comments yet. Why don't you start the discussion?