
In compact living spaces, every inch counts—especially in the closet. When your closet features double hanging rods but still feels cramped, it’s not the design that’s failing you; it’s the organization. Many people assume that double rods automatically mean more usable space, but without intentional planning, they can lead to overcrowding, tangled garments, and wasted vertical zones. The solution isn’t to remove the rods or buy new furniture—it’s to reframe how you use them. With smart categorization, strategic layering, and disciplined editing, even the smallest double-rod closet can become a model of efficiency.
Assess Your Current Inventory
The first step toward effective organization is understanding what you’re working with. Before rearranging anything, empty the closet completely. This may seem drastic, but it allows you to evaluate each item objectively. Lay everything out on your bed or floor and sort into categories: tops, pants, dresses, outerwear, off-season items, and accessories. As you sort, ask yourself three questions about each piece:
- Have I worn this in the past year?
- Does it fit me well and make me feel confident?
- Is it in good condition, or does it need repair?
If an item fails two or more of these criteria, consider donating, selling, or discarding it. Reducing volume is essential when space is limited. A closet crammed with rarely used clothes defeats the purpose of having organized storage. According to organizing expert Marie Kondo, “The objective of cleaning is not just to clean, but to feel happiness living within your space.” By curating only what you love and use, you create room for order—and peace of mind.
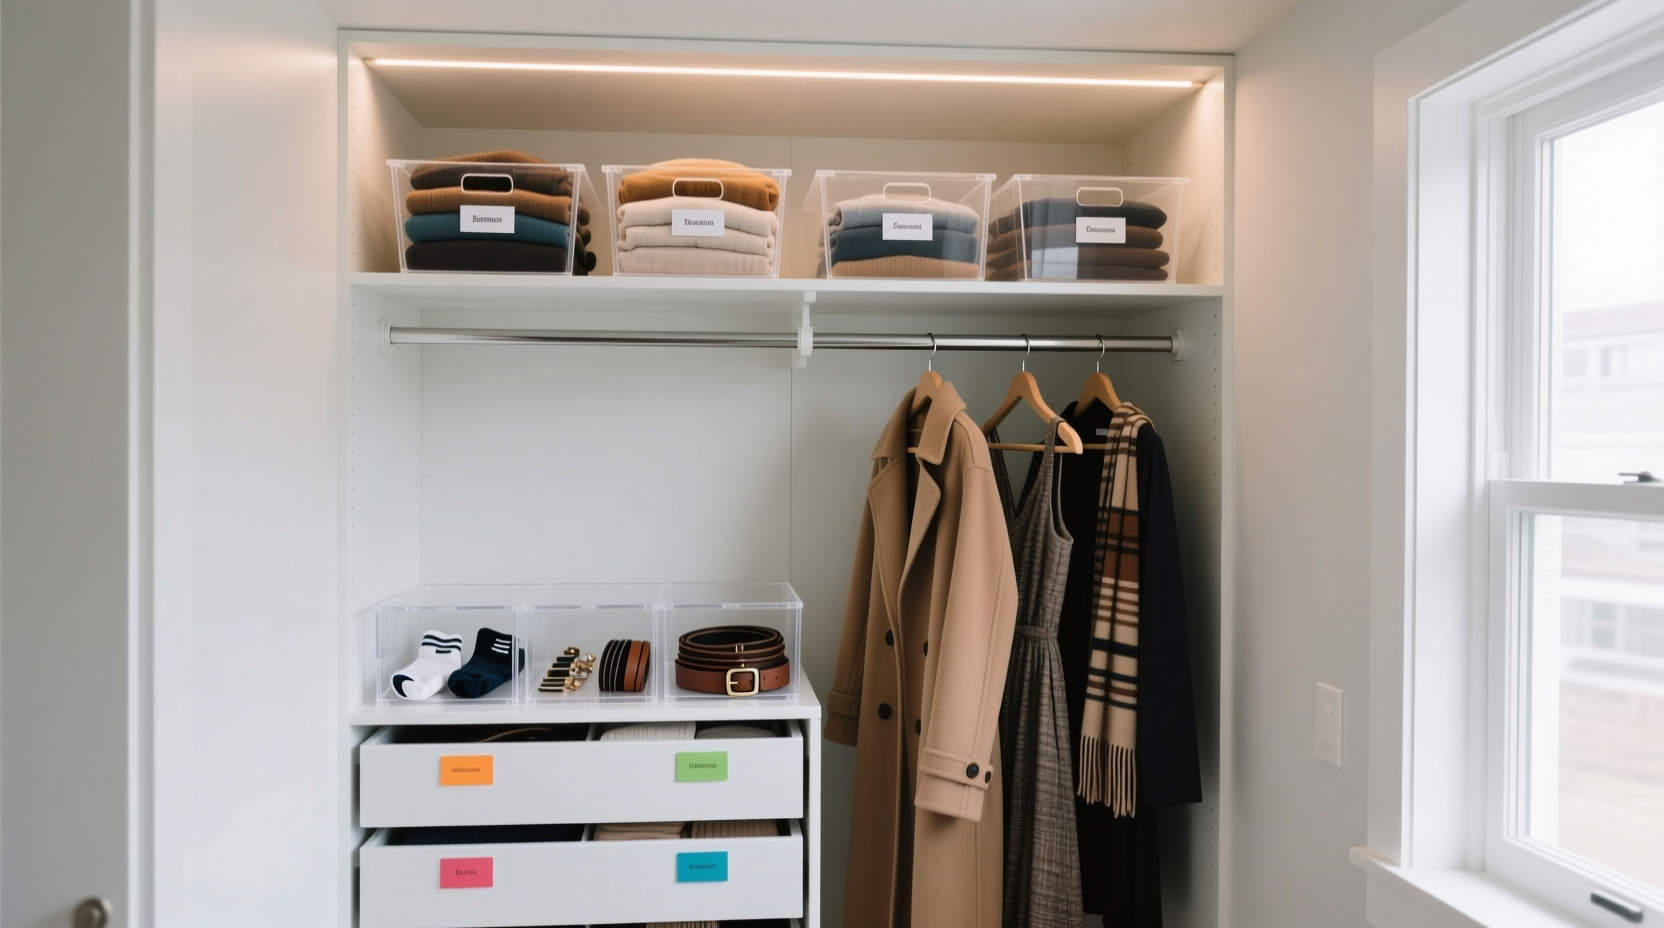
Optimize Vertical Space with Double Rod Strategy
Double hanging rods are ideal for maximizing vertical capacity, but only if used correctly. The standard configuration places the upper rod at approximately 80 inches from the floor—suitable for longer items like dresses or full-length coats—and the lower rod around 40 inches high, designed for shirts, blouses, or folded pants. However, many people misuse this setup by placing long garments on the bottom rod, which wastes valuable overhead space and creates awkward gaps below.
To fix this, reverse the logic: reserve the top rod exclusively for long-hanging items. These should include:
- Dresses
- Suits and blazers
- Coats and jackets
- Evening wear
The lower rod should hold shorter garments that won’t touch the floor when hung. Ideal candidates are:
- Blouses and dress shirts
- T-shirts and knit tops
- Skirts and slacks
- Pants folded over hangers
This tiered approach prevents tangling and ensures easy access. For added efficiency, install adjustable rods so you can fine-tune heights based on your wardrobe’s specific needs. If your closet lacks adjustability, consider replacing fixed rods with tension-mounted ones or adding a secondary rod beneath the existing lower one using L-brackets—ideal for kids’ clothing or lightweight items.
Do’s and Don’ts of Double Rod Usage
| Do | Don't |
|---|---|
| Hang long items only on the upper rod | Mix long and short garments on the same level |
| Fold pants over hangers on the lower rod | Let pants drag on the floor |
| Use slim, non-slip hangers to save space | Use bulky wooden hangers that waste width |
| Leave 2–3 inches between items for airflow | Pack clothes tightly to \"fit more\" |
| Adjust rod height seasonally if needed | Ignore clearance issues caused by shoe racks or bins |
“Vertical layering is the secret to small-space closets. Double rods work best when they reflect how you actually use your clothes—not just how they look stacked.” — Laura Bennett, Interior Organizer & Author of *Compact Closets, Full Lives*
Create Zones Within the Closet
Efficiency thrives on structure. Once your inventory is edited and rods are properly assigned, divide the closet into functional zones. Think of it like a retail store: categories are grouped together for quick access. Common zones include:
- Top Section: Long garments and formal wear
- Middle Section: Everyday tops, shirts, skirts
- Lower Section: Folded pants, sweaters, shoes
- Back Wall or Door: Accessories, belts, scarves
- Floor or Shelf Area: Bins for seasonal items or handbags
Within each zone, adopt a consistent hanging method. All shirts face the same direction, with buttons aligned uniformly. Color-code within categories—arrange from light to dark—to enhance visual clarity and speed up outfit selection. You’ll be surprised how much time this saves during morning routines.
For the lower rod, where space is tight, use cascading hangers sparingly. While they allow multiple garments on one hook, they often create tangles and make items hard to see. Instead, opt for slim velvet hangers with notches for straps. They prevent slipping and take up less lateral space than plastic or wire alternatives.
Maximize Forgotten Areas: Door, Floor, and Above Rods
When every square inch is spoken for, attention must shift to underutilized areas. Start with the back of the door. Install an over-the-door organizer with clear pockets for small accessories: sunglasses, scarves, socks, or jewelry. Avoid heavy loads that could warp the door or damage hinges.
The floor is another prime real estate. If you don’t have built-in drawers, use shallow rolling bins or fabric cubes to store folded sweaters, pajamas, or workout clothes. Choose containers that slide easily under hanging clothes but don’t obstruct access. Label each bin clearly—this prevents rummaging and preserves order.
Above the top rod, most closets have 6 to 12 inches of unused airspace. This gap is perfect for storing flat, infrequently used items. Slide in labeled bins containing:
- Out-of-season clothing
- Travel-size toiletries
- Extra bedding or linens
- Gift wrapping supplies
Use stackable, low-profile boxes made of breathable material to avoid moisture buildup. Avoid stacking more than two layers high—retrieval becomes difficult otherwise.
Step-by-Step: Transform Your Closet in One Afternoon
- Empty the closet completely. Place all items on a bed or clear surface.
- Edit ruthlessly. Donate or discard anything unworn or ill-fitting.
- Wipe down shelves and rods. Clean surfaces before returning clothes.
- Assign zones. Decide which section holds tops, bottoms, long garments, etc.
- Reinstall rods at optimal heights (upper ~80\", lower ~40\") if adjustable.
- Hang long items on top, short on bottom. Face all garments forward.
- Add organizers: door rack, bins, shelf dividers as needed.
- Label storage containers for quick identification.
- Store off-season items above or outside the closet.
- Review monthly. Remove anything that hasn’t been worn in 90 days.
Real-Life Example: Sarah’s Studio Apartment Closet
Sarah lives in a 450-square-foot studio in Chicago. Her reach-in closet measures just 4 feet wide and 2 feet deep, with two fixed rods. Despite the small size, she owns a professional wardrobe for her corporate job plus casual weekend wear. Initially, she crammed everything onto both rods, resulting in wrinkled blouses and inaccessible pants.
After applying the double-rod strategy, she reorganized: the upper rod now holds her five dresses and three blazers. The lower rod uses slim hangers for 12 blouses and 6 skirts, with pants folded neatly over hanger bars. She added a fabric cube organizer on the floor for tank tops and loungewear. Behind the door, a 12-pocket rack holds scarves, belts, and hats.
The result? She gained 30% more accessible space, reduced morning decision fatigue, and stopped buying duplicates because she could finally see what she owned. “I thought I needed a bigger apartment,” Sarah said, “but really, I just needed a smarter closet.”
Frequently Asked Questions
Can I add shelves above double hanging rods?
Yes, if ceiling height allows. Floating shelves or shallow cabinets above the top rod are excellent for storing folded items, handbags, or bins. Ensure there’s at least 6 inches of clearance above the highest rod to avoid head bumps and maintain airflow.
What type of hangers should I use in a tight closet?
Velvet-flocked hangers are ideal—they’re slim, prevent slipping, and protect delicate fabrics. Avoid thick plastic or wooden hangers, which consume too much horizontal space. Uniform hangers also create a streamlined look that makes the closet appear larger.
How do I prevent the lower rod from looking cluttered?
Limits are key. Allow only one layer of garments per hanger. Fold pants over the bar instead of hanging separately. Group by category and color, and leave small gaps between items. If it looks crowded, edit further—less is more in small closets.
Final Thoughts: Make Every Inch Work for You
A small closet with double hanging rods isn’t a limitation—it’s an opportunity to refine your relationship with your wardrobe. When space is constrained, you’re forced to be intentional. You keep only what serves you, store it logically, and interact with your clothes more mindfully. Organization isn’t about perfection; it’s about function, accessibility, and sustainability.
The techniques outlined here—editing inventory, optimizing vertical zones, creating dedicated sections, and utilizing overlooked spaces—can transform even the most overstuffed closet into a streamlined system. It doesn’t require expensive upgrades or renovations. Just consistency, clarity, and a willingness to let go of what no longer fits—literally and figuratively.


 浙公网安备
33010002000092号
浙公网安备
33010002000092号 浙B2-20120091-4
Comments
No comments yet. Why don't you start the discussion?