
A cluttered pantry doesn’t just make meal prep frustrating—it wastes valuable space and often leads to food waste. For many households, especially in urban apartments or compact kitchens, the pantry is small but essential. The good news? With strategic organization, even the tiniest pantry can feel spacious and highly functional. By rethinking layout, using vertical space, and adopting simple systems, you can effectively double your usable storage—without moving a single wall.
The key isn’t buying expensive organizers; it’s about maximizing every inch with purpose. From shelf risers to smart labeling, this guide walks through practical, proven methods that turn chaos into clarity. Whether your pantry is a closet-sized room or a narrow cabinet, these techniques work across all layouts and budgets.
Assess Your Current Pantry Layout
Before making changes, evaluate what you already have. Walk through your pantry and ask: What items take up the most space? Which are hardest to access? Are there unused zones like door backs or top shelves?
Start by removing everything. Yes, everything. This allows you to see the bare structure and identify underutilized areas. As you pull items out, sort them into categories: dry goods (pasta, rice), canned goods, snacks, baking supplies, spices, and perishables. Toss expired items and consolidate duplicates.
This inventory process reveals patterns. Maybe you have three jars of flour but no container for oats. Or perhaps bulky cereal boxes dominate shelf space while smaller, frequently used items get buried. These insights inform smarter storage decisions.
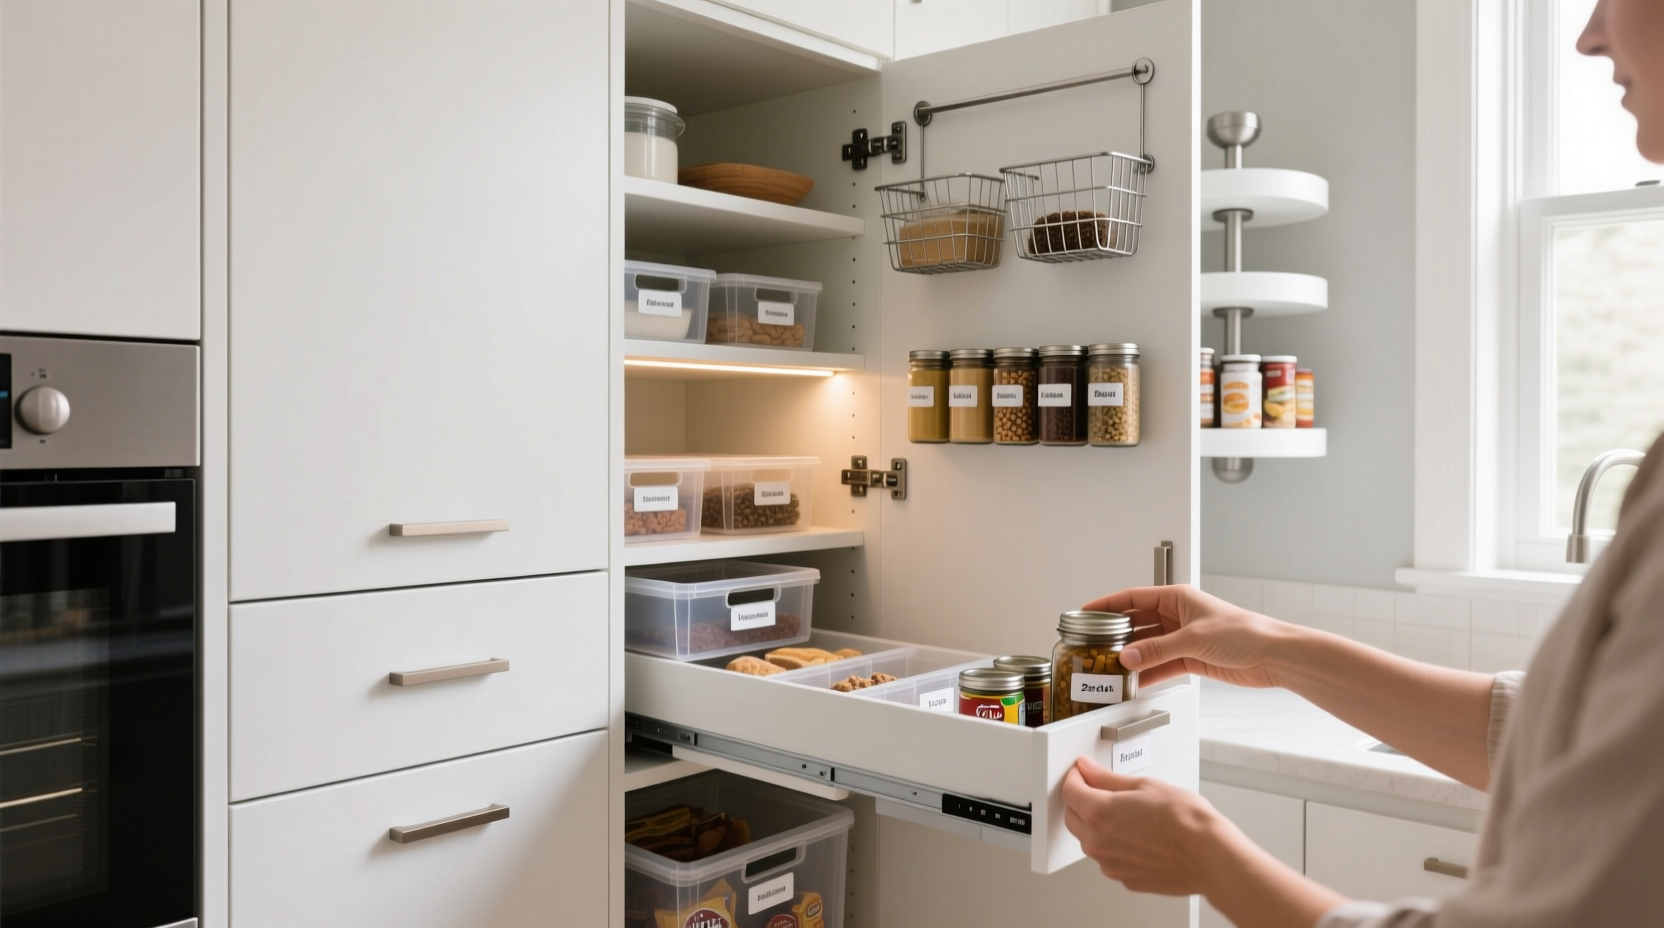
Maximize Vertical Space with Shelf Risers and Stackable Organizers
Most pantries underuse vertical space. Standard shelving often leaves tall gaps between levels, especially when storing flat items like cereal boxes or soup cans. Introducing shelf risers instantly creates two usable layers from one shelf.
For example, place a riser at the front of a shelf to elevate cereal boxes, then store smaller items like spice jars or snack bags underneath. This not only doubles capacity but also improves visibility—no more digging behind boxes to find what you need.
Stackable bins and tiered organizers serve a similar function. Use clear, labeled containers to group like items (e.g., pasta shapes, tea bags, nuts). When stacked vertically, they form a column that uses height efficiently. Opt for modular designs so you can adjust configurations as needs change.
Consider adjustable shelving if your pantry allows. Lowering one shelf and raising another can accommodate taller items without wasting overhead space. Even fixed shelves benefit from over-the-shelf expandable racks, which add an extra layer without permanent modifications.
Do’s and Don’ts of Vertical Storage
| Do | Don't |
|---|---|
| Use clear risers to maintain visibility | Stack heavy items on flimsy plastic risers |
| Label all tiers for quick identification | Block access to back items with tall front stacks |
| Group items by frequency of use on each level | Leave awkward gaps between stacked containers |
| Rotate stock using FIFO (first in, first out) | Overload risers beyond weight limits |
Utilize the Door and Side Walls
The interior of the pantry door and side walls are prime real estate often left empty. Installing slim racks, hooks, or adhesive bins transforms these surfaces into high-function zones.
Door-mounted organizers are ideal for lightweight, frequently used items: spice jars, seasoning packets, tea, or snack bars. Over-the-door shoe organizers with clear pockets work surprisingly well—each compartment holds one item, preventing clutter.
For heavier but compact items like oil sprays or small tools (peelers, measuring spoons), use metal wire racks secured with brackets. Ensure anchors are rated for the load, especially in drywall.
Side walls can support floating shelves or pegboards. Pegboards offer flexibility—you can rearrange baskets, hooks, and bins as needs evolve. They’re particularly useful for storing reusable produce bags, aprons, or kitchen timers.
Step-by-Step Guide to Reorganizing Your Pantry
Follow this sequence to transform your pantry efficiently and sustainably:
- Empty completely: Remove all items and clean shelves with mild soap and water. Let dry fully.
- Categorize: Group items into logical families (e.g., breakfast foods, baking, canned vegetables).
- Edit ruthlessly: Discard expired goods, donate unopened surplus, and consolidate partials (pour loose pasta into one container).
- Measure shelves: Note dimensions to choose appropriately sized bins and risers.
- Install door and wall organizers: Add racks or pockets before placing items back.
- Select uniform containers: Use clear, airtight jars or bins for dry goods. Label all.
- Place items strategically: Store daily-use items at eye level, heavy items below, rarely used above.
- Implement FIFO: Place newer purchases behind older ones to prevent expiration.
- Final check: Open and close the door, test accessibility, adjust spacing if needed.
- Maintain weekly: Dedicate 5 minutes weekly to straighten and check for expirations.
This process typically takes 1–2 hours and pays off immediately in time saved during meal prep.
Expert Insight: Designing for Function and Flow
Professional organizers emphasize that storage efficiency isn’t just about fitting more in—it’s about designing for ease of use.
“Pantry organization should follow how people actually cook and eat. If you use olive oil every day, it shouldn’t be on the top shelf. Systems fail when they’re inconvenient.” — Lena Patel, Certified Kitchen Organization Specialist
Patel recommends creating “zones” within the pantry based on usage: a breakfast zone near the coffee maker, a cooking oils and spices cluster near the stove, and a grab-and-go snacks section at kid-height. These micro-zones reduce movement and decision fatigue.
Mini Case Study: Transforming a 2-Shelf Pantry Cabinet
Sarah, a working mom in a Chicago condo, struggled with her 24-inch-wide pantry cabinet. It held groceries for four, but finding anything took minutes. Cereal boxes blocked view of back shelves, and snacks were scattered.
She followed the step-by-step method: emptied the cabinet, tossed expired granola bars, and grouped items. She installed an over-the-door rack for spice packets and tea. On each shelf, she added one shelf riser to create dual levels. Clear square containers replaced irregularly shaped boxes for pasta, rice, and lentils.
The result? She gained space for 12 additional items and cut grocery retrieval time by 70%. Her kids could now reach their snacks independently, reducing daily bottlenecks.
Budget-Friendly Container Solutions
You don’t need custom inserts to achieve a streamlined look. Repurpose what you have: glass jars from sauces, plastic deli containers, or even sturdy cardboard boxes lined with shelf paper.
For a cohesive aesthetic, paint labels with chalkboard spray or use removable vinyl labels. Chalk markers allow for easy updates when contents change.
If purchasing new, consider bulk packs of stackable bins. A set of 10 clear, lidded containers (ranging from 1 to 3 quarts) typically costs under $30 and covers most dry goods.
Pantry Organization Checklist
- ☐ Empty pantry and discard expired items
- ☐ Wipe down all shelves and walls
- ☐ Sort food into categories
- ☐ Measure shelf depth and height
- ☐ Install door and wall organizers
- ☐ Transfer dry goods into uniform containers
- ☐ Label all containers clearly
- ☐ Arrange by zone and frequency of use
- ☐ Apply FIFO principle to stock rotation
- ☐ Schedule a 5-minute weekly maintenance window
Frequently Asked Questions
How do I keep pests out of a well-stocked pantry?
Transfer all dry goods—especially grains, flour, and pet food—into airtight containers made of glass or thick plastic. Avoid storing food in cardboard or thin plastic bags, which pests can chew through. Regularly wipe shelves and vacuum crumbs. Consider placing bay leaves or food-safe silica gel packs as natural deterrents.
Can I organize a walk-in pantry the same way?
Yes, the principles are identical, but walk-in pantries allow for larger solutions like freestanding shelving units, rolling carts, or built-in drawers. Focus on zoning: dedicate sections to baking, breakfast, beverages, etc. Use floor-standing bins for potatoes, onions, or bulk paper goods.
What if my pantry has awkward corners or sloped ceilings?
Corner spaces benefit from lazy Susans or pull-out rotating trays. For sloped ceilings, reserve upper zones for lightweight, infrequently used items like holiday décor or spare serving dishes. Use lower, accessible areas for daily essentials.
Conclusion: Turn Constraints Into Opportunity
A small pantry isn’t a limitation—it’s an invitation to design with intention. By leveraging vertical space, optimizing door and wall surfaces, and implementing smart categorization, you unlock twice the functionality without expanding your footprint. The systems outlined here aren’t temporary fixes; they’re sustainable habits that save time, reduce waste, and simplify daily life.


 浙公网安备
33010002000092号
浙公网安备
33010002000092号 浙B2-20120091-4
Comments
No comments yet. Why don't you start the discussion?