
Deep shelves in a small pantry can be both a blessing and a curse. While they offer generous storage space, they often lead to forgotten items buried at the back, inefficient access, and visual clutter. Without a thoughtful layout, even the most well-stocked pantry becomes a frustrating maze. The key lies not in how much you own, but in how intelligently you arrange it. With strategic planning, vertical layering, and the right tools, deep shelves can transform from dead zones into highly functional storage zones. This guide delivers actionable strategies, real-world examples, and expert-backed methods to maximize every inch of your compact pantry.
Assess Your Pantry’s Dimensions and Usage Patterns
Before placing a single container, measure your pantry’s depth, height, and width. Deep shelves typically exceed 14 inches—sometimes reaching 20 or more—making front-to-back visibility a challenge. Note where lighting falls, how doors open, and whether there are obstructions like pipes or vents. Equally important is understanding how you use the space. Do you cook daily? Stock up on bulk goods? Store snacks for kids? Track your habits for a week: what do you reach for most often? What expires frequently? This audit informs your zoning strategy.
Create Functional Zones Based on Frequency and Category
Efficient pantries follow the principle of “zone by use.” Divide your pantry into distinct areas: everyday staples, cooking ingredients, breakfast items, snacks, beverages, and less-used supplies (like holiday baking goods). Place high-frequency items between waist and eye level on deep shelves. Reserve lower or upper depths for heavier or seasonal products. For example, canned tomatoes used weekly should be easily accessible, while extra paper towels can live toward the rear.
To prevent items from disappearing into the abyss, adopt a “front-facing” philosophy. Rotate stock so older items are always in front (FIFO: First In, First Out). This reduces waste and ensures nothing gets lost behind newer purchases.
“Deep shelves aren’t inherently problematic—it’s the lack of structure that causes chaos. Zoning turns depth into an advantage.” — Lena Torres, Residential Organizer & Author of *Space-Smart Kitchens*
Step-by-Step Guide to Implementing Your Pantry Layout
- Empty and clean: Remove everything and wipe down shelves. This resets your space and forces a full inventory.
- Categorize items: Group like with like—grains, canned goods, spices, baking supplies, snacks, etc.
- Measure shelf depth: Determine if pull-out trays, tiered shelves, or stackable bins will fit.
- Assign zones: Map out which categories go where based on frequency and weight.
- Select organizers: Choose containers and tools that match your shelf dimensions and usage needs.
- Install and arrange: Begin placing items, prioritizing accessibility and visibility.
- Evaluate and adjust: After one week of use, refine placements based on real-world flow.
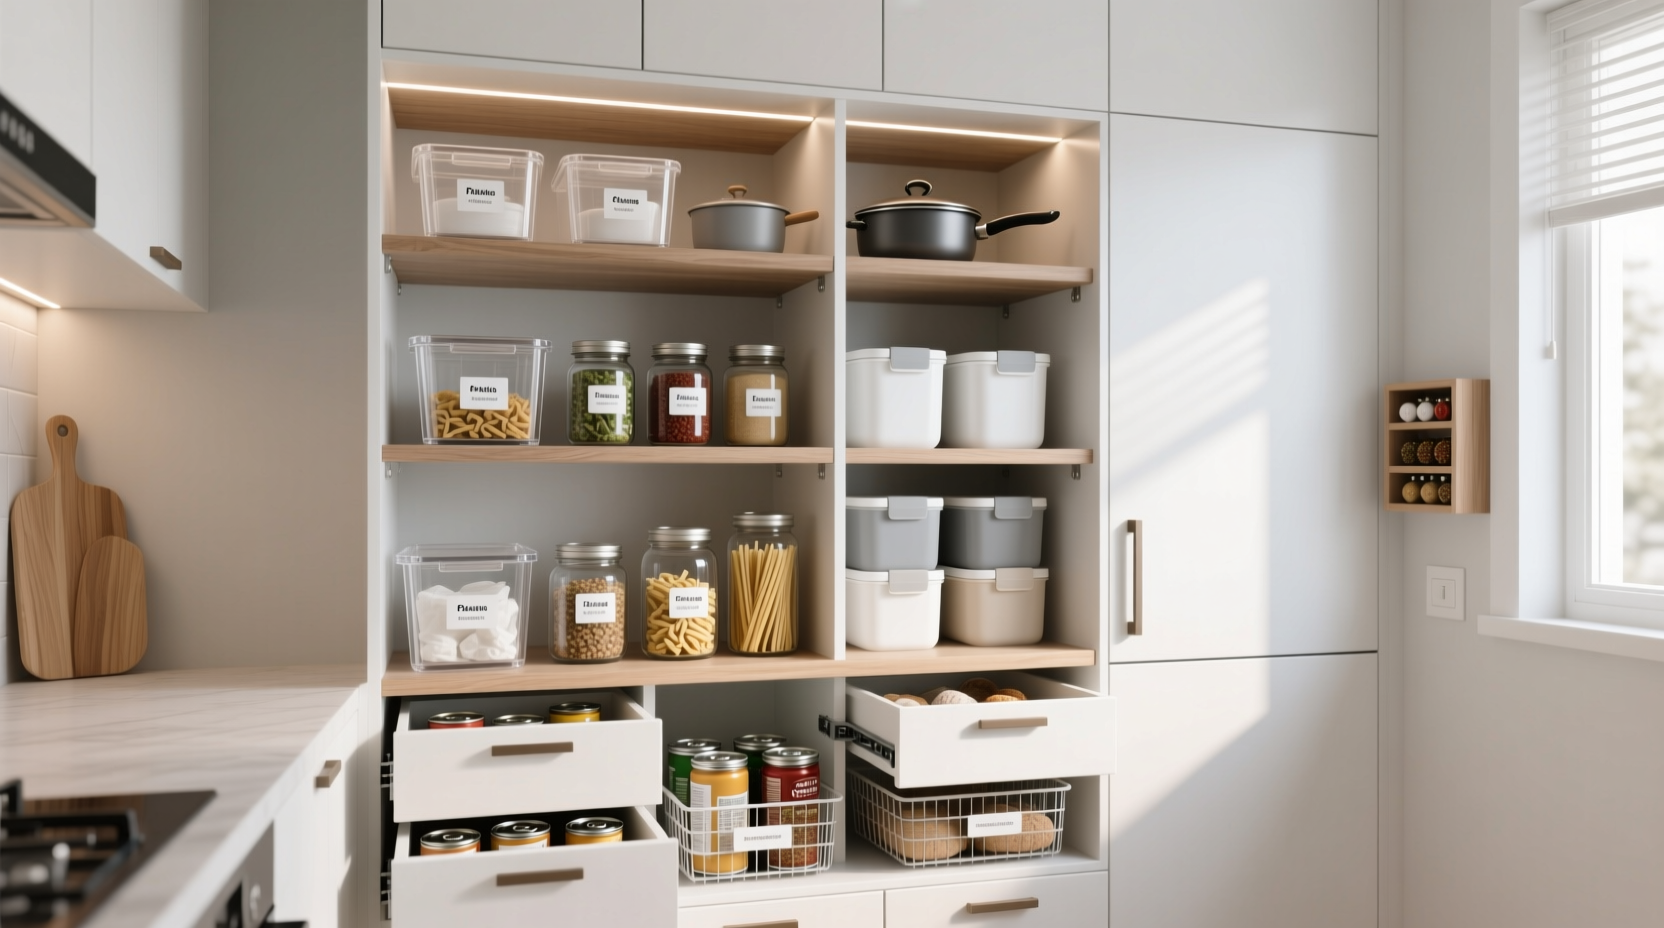
Smart Storage Solutions for Deep Shelves
The right organizers turn deep shelves from liabilities into assets. Consider these options:
- Pull-out wire baskets or slide-out trays: These glide forward like drawers, bringing rear items to the front. Ideal for heavy cans or appliances.
- Turntable lazy Susans: Perfect for corners or deep center shelves. Great for oils, sauces, or spice jars.
- Stackable clear bins: Allow vertical stacking while maintaining visibility. Use smaller ones for snack packs or tea bags.
- Tiered shelf risers: Create multiple levels within one shelf, so items in back aren’t hidden.
- Baskets with handles: Pull entire categories forward for access, then return them neatly.
Transparency matters. Clear, airtight containers let you see contents instantly and protect against pests and moisture. Label everything—even if you think you’ll remember. Labels save time and keep household members aligned.
Real Example: Transforming a 12-Inch Deep Urban Pantry
Sarah, a busy professional in a downtown apartment, struggled with her narrow pantry that had two deep shelves (16 inches each). Canned beans were always behind soup, and snacks vanished within days. She followed the zoning method: emptied the pantry, categorized items, and measured. She installed two slide-out baskets on the middle shelf for canned goods and pasta, added a small lazy Susan for condiments on the top shelf, and used tiered risers below for cereal boxes and oatmeal packets. Baskets with handles stored granola bars and fruit cups, pulled forward as needed. Within a week, meal prep time dropped by 15 minutes daily, and food waste decreased significantly. The deep shelves, once underused, now held 30% more items with better access.
Do’s and Don’ts for Deep Shelf Organization
| Do’s | Don’ts |
|---|---|
| Use pull-out trays for heavy or frequently used items | Stack opaque containers where contents can’t be seen |
| Label all containers clearly | Overfill shelves to the point of blocking access |
| Rotate stock using FIFO (First In, First Out) | Store heavy items on high shelves—risk of injury |
| Group by category and usage frequency | Ignore shelf depth when choosing bins—measure first |
| Use risers to create visibility tiers | Leave loose packages that can topple or spill |
Maximizing Vertical and Front-to-Back Space
Depth isn’t the only dimension—vertical space is equally valuable. Install adjustable shelving if possible, allowing you to customize heights for different items. Tall bottles or grain dispensers can occupy floor-level space, while lightweight snacks go higher up. On deep shelves, employ a three-row system: front (daily use), middle (weekly), and back (bulk or backup). Use low-profile bins in front, taller ones behind, ensuring nothing blocks the view.
For very deep shelves (over 18 inches), consider a “well system”: place a deeper bin or tray at the back for overflow stock, and a shallower organizer in front for active use. This keeps essentials visible while still utilizing full depth. Magnetic labels or chalkboard tags on bins allow for easy updates when contents change.
Checklist: Organizing Your Deep-Shelf Pantry in One Afternoon
- ☐ Empty and clean all shelves
- ☐ Sort items into categories (discard expired goods)
- ☐ Measure shelf depth, width, and height
- ☐ Define usage zones (everyday, backup, occasional)
- ☐ Purchase or gather organizers (bins, trays, risers)
- ☐ Install slide-outs or turntables where needed
- ☐ Transfer dry goods into labeled, airtight containers
- ☐ Arrange by zone and frequency—front for frequent, back for backup
- ☐ Add lighting if visibility is poor
- ☐ Test access and adjust after 3–5 days of use
Frequently Asked Questions
How do I prevent items from getting lost in the back of deep shelves?
Use pull-out trays, tiered risers, or front-facing bins. Adopt the FIFO method—always place new items behind older ones. Clear containers also help you see what’s stored at the rear without moving everything forward.
Are lazy Susans suitable for very deep shelves?
Yes, especially larger models (12-inch diameter or more). Position them near the front edge of the shelf so you can spin and reach items at the back. They work best for round items like jars, oils, or spice bottles.
What’s the best way to store bulky items like cereal boxes or paper towels?
Use open-front baskets or magazine-style holders that allow you to slide items in and out easily. Alternatively, transfer cereals into slim, tall containers and store paper towels vertically in a bin or rack to save depth.
Final Thoughts and Call to Action
A small pantry with deep shelves doesn’t have to be a source of frustration. With deliberate planning, the right tools, and consistent habits, you can turn depth into a powerful organizational asset. The goal isn’t perfection—it’s functionality. When your most-used items are within easy reach, meals come together faster, waste drops, and your kitchen feels more peaceful. Start small: pick one shelf, apply one strategy, and build from there. Organization is a process, not a one-time event.


 浙公网安备
33010002000092号
浙公网安备
33010002000092号 浙B2-20120091-4
Comments
No comments yet. Why don't you start the discussion?